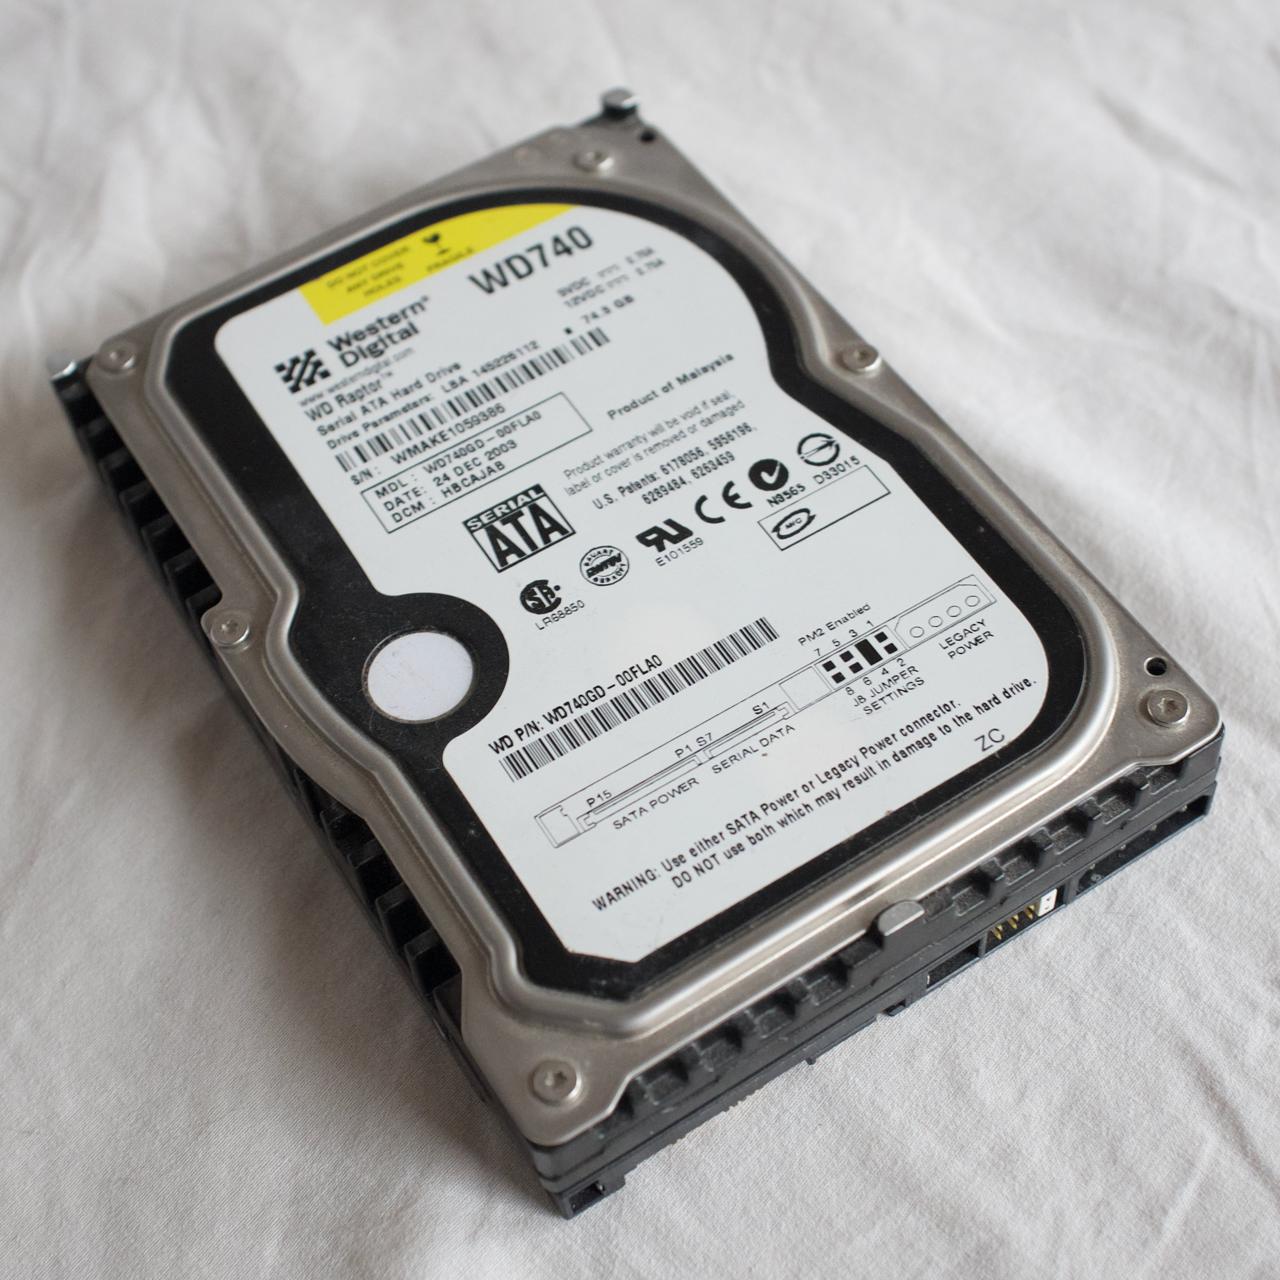
Back in 2004, I visited a now bankrupt Dutch computer store called MyCom1, located at the Kinkerstraat in Amsterdam. I was there to buy a Western Digital Raptor model WD740, with 74 GB of capacity, running at 10,000 RPM.
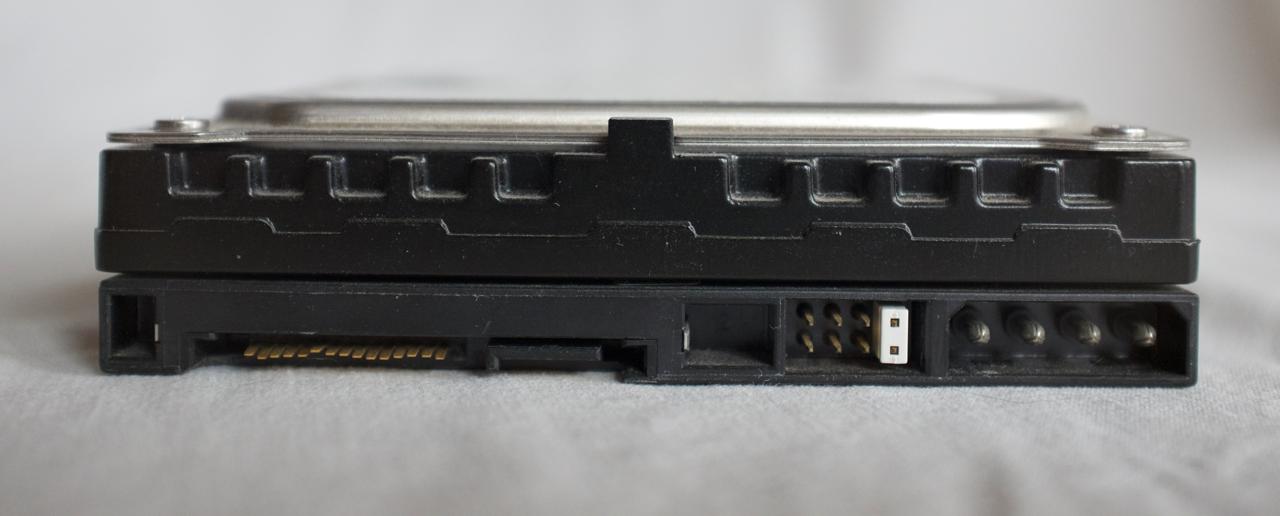
When I bought this drive, we were still in the middle of the transition from the PATA interface to SATA2. My raptor hard drive still had a molex connector because older computer power supplies didn't have SATA power connectors.
You may notice that I eventually managed to break off the plastic tab of the SATA power connector. Fortunately, I could still power the drive through the Molex connector.
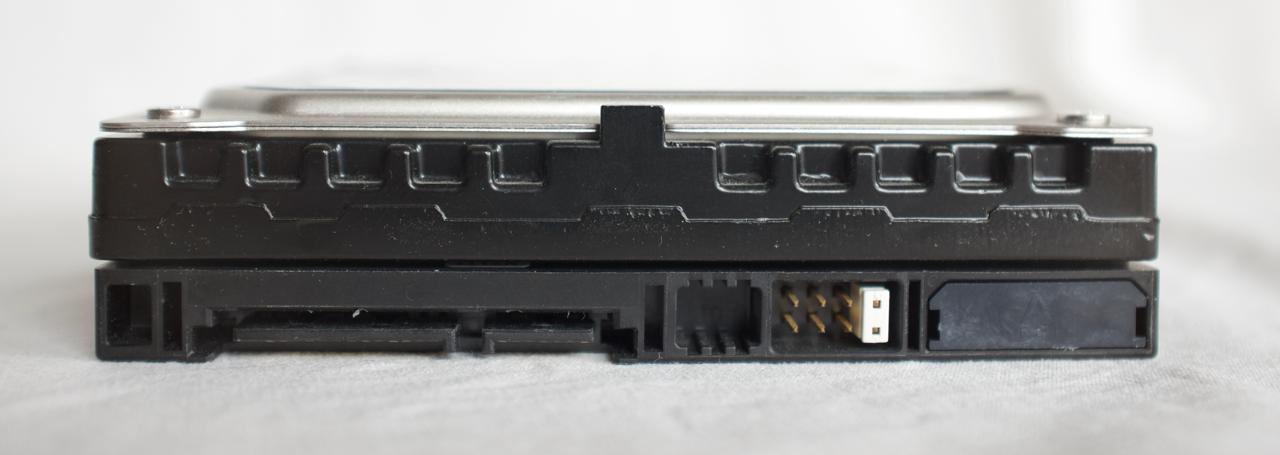
A later version of the same drive came with the Molex connector disabled, as you can see below.
Why did the Raptor matter so much?
I was very eager to get this drive as it was quite a bit faster than any consumer drive on the market at that time.
This drive not only made your computer start up faster, but it made it much more responsive. At least, it really felt like that to me at the time.
The faster spinning drive wasn't so much about more throughput in MB/s - although that improved too - it was all about reduced latency.
A drive that spins faster3 can complete more I/O operations per second or IOPs4. It can do more work in the same amount of time, because each operation takes less time, compared to slower turning drives.
The Raptor - mostly focussed on desktop applications5 - brought a lot of relief for professionals and consumer enthusiasts alike. Hard disk performance, notably latency, was one of the big performance bottlenecks at the time.
For the vast majority of consumers or employees this bottleneck would start to be alleviated only well after 2010 when SSDs slowly started to become standard in new computers.
And that's mostly also the point of SSDs: their I/O operations are measured in micro seconds instead of milliseconds. It's not that throughput (MB/s) doesn't matter, but for most interactive applications, you care about latency. That's what makes an old computer feel as new when you swap out the hard drive for an SSD.
The Raptor as a boot drive
For consumers and enthusiast, the Raptor was an amazing boot drive. The 74 GB model was large enough to hold the operating system and applications. The bulk of the data would still be stored on a second hard drive either also connected through SATA or even still through PATA.
Running your computer with a Raptor for the boot drive, resulted in lower boot times and application load times. But most of all, the system felt more responsive.
And despite the 10,000 RPM speed of the platters, it wasn't that much louder than regular drives at the time.7.
In the video above, a Raspberry Pi4 boots from a 74 GB Raptor hard drive.
Alternatives to the raptor at that time
To put things into perspective, 10,000 RPM drives were quite common even in 2003/2004 for usage in servers. The server-oriented drives used the SCSI interface/protocol which was incompatible with the on-board IDE/SATA controllers.
Some enthusiasts - who had the means to do so - did buy both the controller8 and one or more SCSI 'server' drives to increase the performance of their computer. They could even get 15,000 RPM hard drives! These drives however, were extremely loud and had even less capacity.
The Raptor did perform remarkably well in almost all circumstances, especially those who mattered to consumers and consumer enthusiasts alike. Suddenly you could get SCSI/Server performance for consumer prices.
The in-depth review of the WD740 by Techreport really shows how significant the raptor was.
The Velociraptor
The Raptor eventually got replaced with the Velociraptor. The Velociraptor had a 2.5" formfactor, but it was much thicker than a regular 2.5" laptop drive. Because it spun at 10,000 RPM, the drive would get hot and thus it was mounted in an 'icepack' to disipate the generated heat. This gave the Velociraptor a 3.5" formfactor, just like the older Raptor drives.
In the video below, a Raspberry Pi4 boots from a 500 GB Velociraptor hard drive.
Benchmarking the (Veloci)raptor
Hard drives do well with sequential read/write patterns, but their performance implodes when the data access pattern becomes random. This is due to the mechanical nature of the device. That random access pattern is where 10,000 RPM outperform their slower turning siblings.
Random 4K read performance showing both IOPs and latency. This is kind of a worst-case benchmark to understand the raw I/O and latency performance of a drive.
Drive ID
Form Factor
RPM
Size (GB)
Description
ST9500423AS
2.5"
7200
500
Seagate laptop hard drive
WD740GD-75FLA1
3.5"
10,000
74
Western Digital Raptor WD740
SAMSUNG HD103UJ
3.5"
7200
1000
Samsung Spintpoint F1
WDC WD5000HHTZ
2.5" in 3.5"
10,000
500
Western Digital Velociraptor
ST2000DM008
3.5"
7200
2000
Seagate 3.5" 2TB drive
MB1000GCWCV
3.5"
7200
1000
HP Branded Seagate 1 TB drive
I've tested the drives on an IBM M1015 SATA RAID card flashed to IT mode (HBA mode, no RAID firmware). The image is generated with fio-plot, which also comes with a tool to run the fio benchmarks.
It is quite clear that both 10,000 RPM drives outperform all 7200 rpm drives, as expected.
If we compare the original 3.5" Raptor to the 2.5" Velociraptor, the performance increase is significant: 22% more IOPs and 18% lower latency. I think that performance increase is due to a combination of the higher data density, the smaller size (r/w head is faster in the spot it needs to be) and maybe better firmware.
Both the laptop and desktop Seagate drives seem to be a bit slower than they should be based on theory. The opposite is true for the HP (rebranded Seagate), which seem to perform better than expected for the capacity and rotational speed. I have no idea why that is. I can only speculate that because the HP drive came out of a server, that the fireware was tuned for server usage patterns.
Closing words
Although the performance increase of the (veloci)raptor was quite significant, it never gained wide-spread adoption. Especially when the Raptor first came to marked, its primary role was that of a boot drive because of its small capacity.
You still needed a second drive for your data. So the increase in performance came at a significant extra cost.
The Raptor and Velociraptor are now obsolete. You can get a solid state drive for $20 to $40 and even those budget-oriented SSDs will outperform a (Veloci)raptor many times over.
If you are interested in more pictures and details, take a look at this article.
I read that WD intended the first Raptor (34 GB version) to be used in low-end servers as a cheaper alternative to SCSI drives . After the adoption of the Raptor by computer enthusiasts and professionals, it seems that Western Digital pivoted, so the next version - the 74 GB I have - was geared more towards desktop usage. That also meant that this 74 GB model got fluid bearings, making it quieter6. ↩
The 74 GB model is actually rather quiet drive at idle. Drive activity sounds rather smooth and pleasant, no rattling. ↩
Please note that the first model, the 37 GB version, used ball bearings in stead of fluid bearings, and was reported to be significant louder. ↩
Low-end SCSI card were often used to power flatbed scanners, Iomega ZIP drives, tape drives or other peripherals, but in order to benefit from the performance of those server hard drives, you needed a SCSI controller supporting higher bandwidth and those were more expensive. ↩
Disclaimer: this article is intended for consumers and hobbyists.
If you want to run your own router at home, the Raspberry Pi 4 Model B1 can be an excelent hardware choice:
it's fairly cheap
it's fast enough
it can saturate it's gigabit network port
it is power-efficient
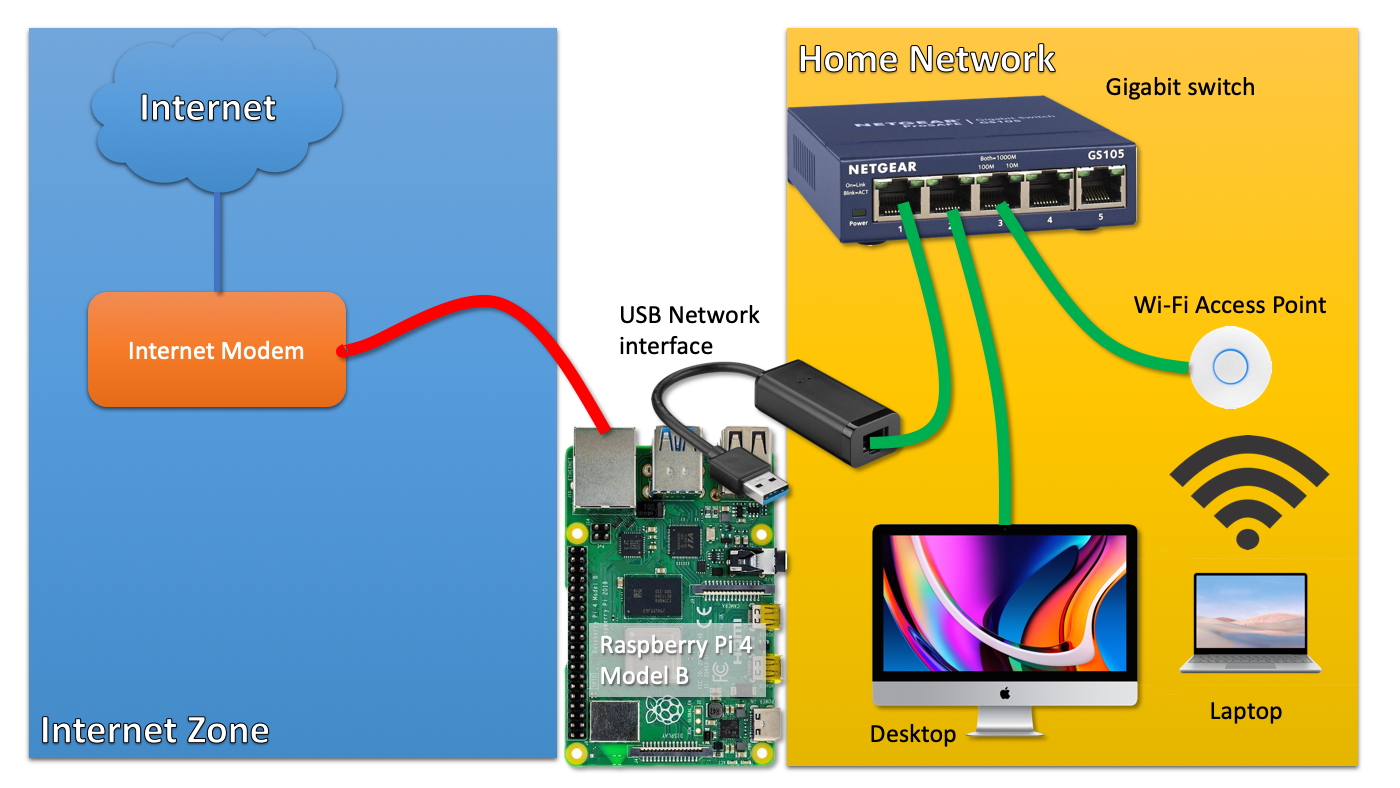
The key problem it seems, is that it has only one, single network interface. If you build a router, you need at least two:
The first interface connected to your internet modem/router (ideally in bridge mode)
The second interface connected to your home network (probably a switch)
So if you would use the Raspberry Pi, you would probably buy a gigabit USB3 NIC for around $20 and be done with it.
click on the image for a larger version
Now, what if I told you that you can build exactly the same setup by using only the single on-board network interface of the Raspberry Pi 4?
How is that possible?
Introducing VLANs
Yes, I'm introducing the reader to a technology that exists since the '90s. It is widely used within businesses and other organisations.
Because I have a sense that this technology is less well-known in circles outside IT operations, I think it may be an interesting topic to discuss.
Understanding VLANs
VLAN technology allows you to run different, separate networks over the same, single physical wire and on the same, single switch. This saves a lot on network cabling and the number of physical switches required if you want to operate networks that are separate from each other.
If you want to run traffic from different networks over the same physical wire or switch, how can you identify those different traffic flows?
With VLAN technology enabled, such network 'packets' are labeled with a tag. As the VLAN technology operates at the level of Ethernet, we should not talk about 'packets' but about 'ethernet frames'. The terminology is not important to understand the concept, I think.
It suffices to understand that there is a tag put in front of the ethernet frame, that tells any device that supports VLANs to which network a frame and thus a packet belongs.
This way, network traffic flows, can be distinguished from each other. And those tags are nothing fancy, they are called a VLAN ID and it is just a number between 1 and 40962.
Managed switch
Now that we understand the concept of VLANs, how do we use it?
First of all, you need a managed network switch that supports VLANs.
The cheapest switch with VLAN support I could find is the TP-LINK TL-SG105E, for around 25 euros or dollars. This is a 5-port switch, but the 8-port version is often only a few euros/dolars more.
Juan Pedro Paredes in the comments point out that this TP-LINK switch may not be able to handle the large number of ARP requests that may arrive at the port connected to the Internet Modem. Others are quite negative about this switch in the Hacker News discussion (linked below). I'm not sure if Netgear switches, which are near the same price, fare any better.
A switch like this has a web-based management interface that allows you to configure VLANS on the device.
Tagged vs untagged
In the context of VLANS, a network switch port can be in two states:
Member of a particular network (VLAN) (untagged)
Transporting multiple networks (VLANs) (tagged)
If a port is just a member of a VLAN, it just behaves like any other switch port. In this mode, it can obviously only be a member of one network/VLAN. The VLAN tags are stripped off all network traffic coming out of this port.
However, a port that is assigned 'tagged' VLAN trafic, just forwarded traffic as-is, including their VLAN tag.
This is the trick that we use to send network packets from different networks (VLANS) to our Raspberry Pi router over a single port/wire.
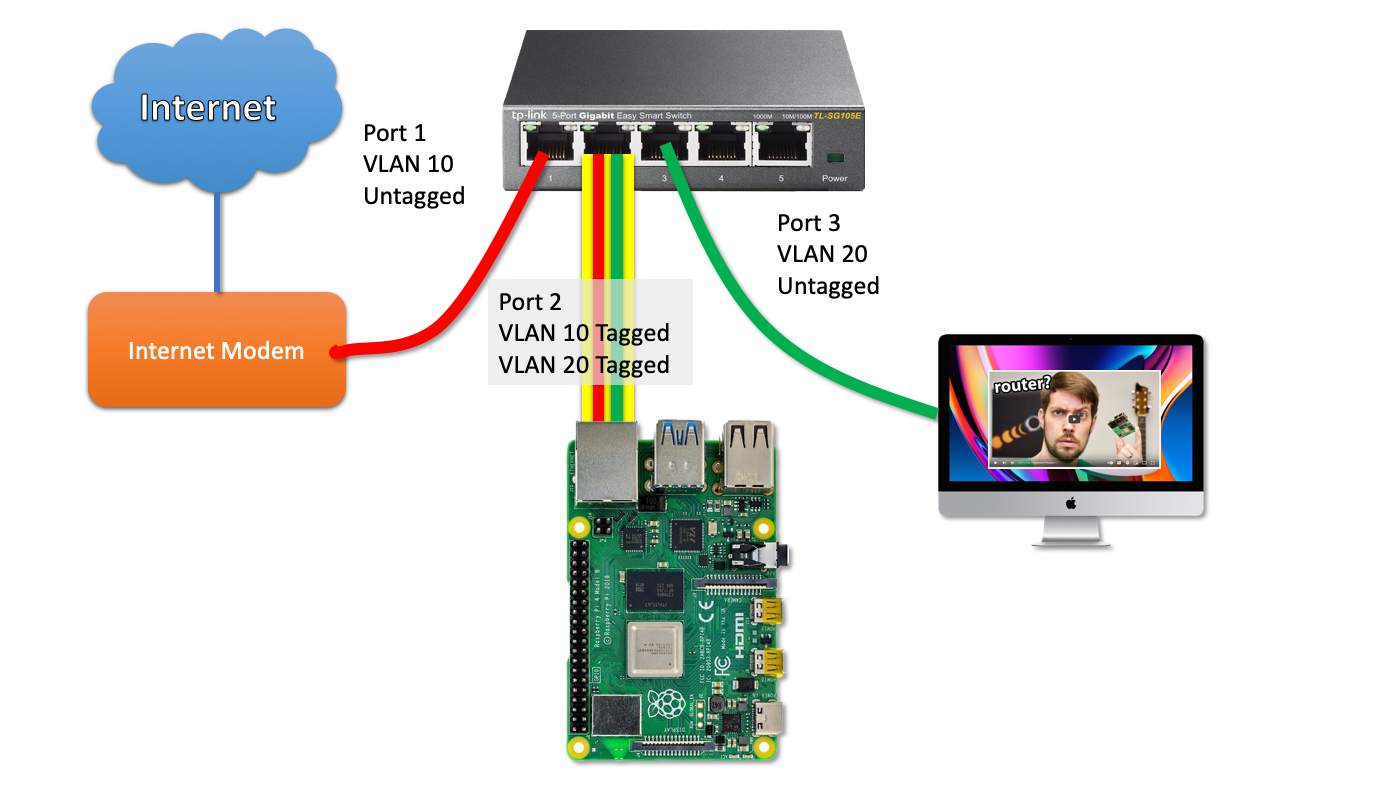
click on the image for a larger version
So let's unpack this picture together, step by step.
Let's imagine a (return) packet from the Internet arrives at the modem and is sent into switchport 1.
The switch knows that any traffic on that switch port belongs to VLAN 10. Since this traffic needs to be send towards the Pi Router, it will put a tag on the packet and forwards the packet, including the tag towards the Pi on switch port 2.
The Pi - in turn - is configured to work with VLANs just as the switch. The tag on the packet tells the Pi to wich virtual interface the packet must be send.
A netplan configuration example to illustrate this setup:
As you can see, the VLAN packets that arrive as tagged packets, are send (without their tags) to a virtual network interface belonging to that particular network. Those virtual network interfaces all share the same physical interface (enp2s0f0). The virtual network interfaces are just the physical interface name with ".(VLAN ID)" added.
From here on out, you probably understand where this is going: those two virtual network interfaces are basically similar to a setup with two physical network interfaces. So all the routing and NAT that needs to happen, just happens on those two virtual interfaces instead.
How to work with VLANs
To work with VLANs, you need a managed switch that supports VLANs. A managed switch has a management interface, often a web-based management interface.
In this example, I'm using the TP-LINK TL-SG105E switch as an example.
To get to this page, go to VLAN --> 802.1Q VLAN in the web interface.
So from this table we can derive that:
Port 1 is an untagged member of VLAN 10
Port 2 is a tagged member of VLAN 10 and VLAN 20
Port 3 is an untagged member of VLAN 20
Please note that it is also recommended to remove ports from VLANs they don't use. So I removed ports 1, 2 and 3 from the default VLAN 1.
Now, if you have more devices to connect to the internal LAN on this switch, you need to configure the ports to be an untagged member of VLAN 20.
Caveats
Bandwidth impact
Obviously, if you use a single interface, you only get to use the bandwidth of that sinle interface. In most cases, this is not an issue, as gigabit ethernet is full-duplex: there is physical exclusive wiring for upstream traffic and downstream traffic.
So you might say that full-duplex gigabit ethernet has a raw throughput capacity of two gigabit/s, although we mostly don't talk about it that way.
So when you download at 200 Mbit/s, that traffic is ingested over VLAN 10 over the incomming traffic path. It is then sent out over VLAN 20 towards your computer over VLAN 20 using the outgoing path. No problem there.
If you would also use the Raspberry Pi as a backup server (with an attached external hard drive), the backup traffic and the internet traffic could both 'fight' for bandwidth on the same gigabit link.
Impact on gigabit internet
Update June 2022 I was actually able to use full Gigabit internet speed over VLANs, at around 111 MB/s. I made some mistakes during earlier testing.
You will never get the full gigabit internet network speed if you would build this setup. It will probably max out at ~900 Mbit. (I'm assuming here that you would use x86 hardware as the Pi would not be able to handle firewalling this traffic anyway.)
This is because most traffic is based on TCP connections and when you download, there is traffic both ways!. The download traffic is the bulk of the traffic, but there is a substantial steady stream of return packets that acknowledges to the sender that traffic has been received (if not, it would trigger a retransmission).
Remember that in this single-port setup, the Pi uses the same gigabit port to send the return traffic to the internet over VLAN 10 and the download data towards your home computer over VLAN 20. So the size of the upstream traffic will limit your maximum download performance.
The Raspberry Pi 4 Model B as a router
The biggest limitation - which becomes an issue for more and more people - is performance. If you use IPTABLES on Linux for firewalling, in my experience, network throughput drops to a maximum of 650 Mbit/s.
That's only an issue (first world problems) if you have gigabit internet or an internet speed beyond what the Pi can handle.
If your internet speed doesn't even come close, this is not an issue at all.
Maybe the Raspberry Pi 400 or the compute module performs better in this regard as their CPUs are clocked at higher Ghz.
Closing words
If it makes any sense for you to implement this setup, is only for you to decide. I'm running this kind of setup (using an x86 server) for 10 years as I can't run a second cable from my modem to the room where my router lives. For a more detailed picture of my home network setup, take a look here.
Feel free to leave any questions of comments below.
I learned from the hacker news discussion that a router with just one network interface is called a router on a stick.
Older models of the Raspberry Pi are significantly network bandwidth constrained. So much so, that they would not be suitable as Internet routers if your internet speed is above 100Mbit. ↩
most cheap switches can't operate more than 32 ~ 64 VLANs maximum. Only more expensive, enterprise gear can work with the full 4096 VLANS at the same time. However, this is probably not relevant for consumers. ↩
The goal of this article is to give you a practical understanding of Lead Acid batteries. We won't address the underlying chemistry, we'll treat them as a black-box and we will discover their characteristics and how to keep them healthy.
Disclaimer
I'm an amateur. I have absolutely zero relevant background in battery technology or electronics. I just scraped some information together in a hopefully useful manner.
A high-level overview of the lead acid battery
It can provide a ton of current / power
It hates to be deep-discharged and will die quickly if done repeatedly
It hates being in a discharged state
Only use 50% of total capacity if longevity matters (ideally only 30%)
It's usable capacity depends on the load
They are slow to charge (8-12 hours)
They don't perform as well in cold weather
Lead acid batteries can provide a lot of current
Lead acid batteries can put out so much current that you can use them to weld2. They are widely used in ICE cars to power the starter motor, which needs hundreds of amps at 12 volt to turn over the engine.
They are also used to power mobility scooters, golf carts, trolly motors, small toy cars for children to ride in, or provide electricity on boats, caravans and in RVs. You can also find them in more stationary applications such in UPS systems1 or - of course - solar battery banks.
Danger
Lead acid batteries typically don't have any kind of short-circuit protection build-in. This means that if you (accidentally) short-circuit a lead acid battery, the battery can explode or it can cause a fire. Whatever object caused the short-circuit, will probably be destroyed.
Because lead acid batteries can supply such high currents, it's important to assure that you use the right wire thickness / diameter. If the wire is too thin, it causes too much resistance and thus may overheat, causing the insulation to catch fire.
Lead acid batteries can be very dangerous, so you have to be very carefull with them. Personally, I always make sure that anything connected to a lead acid battery is properly fused.
Lead acid batteries hate being deep discharged
The common rule of thumb is that a lead acid battery should not be discharged below 50% of capacity, or ideally not beyond 70% of capacity. This is because lead acid batteries age / wear out faster if you deep discharge them.
The most important lesson here is this:
Although a lead acid battery may have a stated capacity of 100Ah, it's practical usable capacity is only 50Ah or even just 30Ah
If you buy a lead acid battery for a particular application, you probably expect a certain lifetime from it, probably in years. If the battery won't last this long, it may not be an economically viable solution.
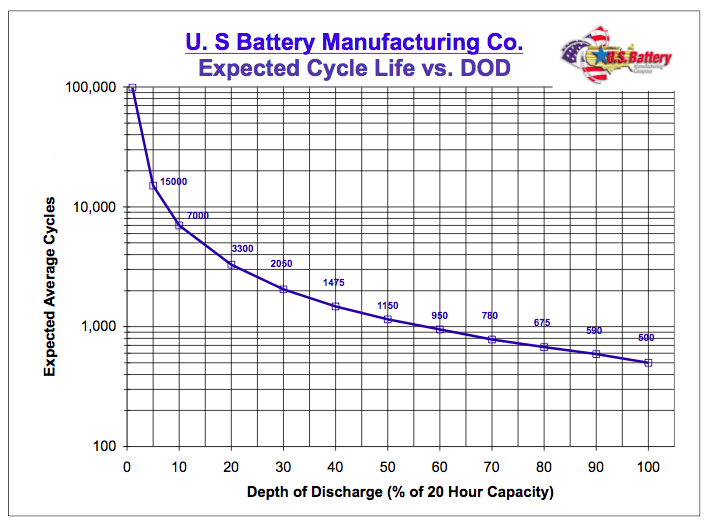
image source - Please note that this chart is based on a heavy-duty lead acid battery and doesn't reflect the lifecycle of a regular consumer lead acid battery. It is advised to look up the relevant chart for the particular battery model you may be interested in buying.
If you cycle a battery (with the characteristics depicted in the chart) every day as part of some kind of off-grid solar setup and you use 80% of it's capacity, you'll probably have to replace it after about two years.
If you add a few extra batteries in parallel, individual batteries may only be used 20% to 30% of capacity, and those same batteries may last 6 - 9 years. So by spending 2 or 3 times the money on batteries, you get 3 to 4 times the lifetime out of your setup.
So, for example, if you really need 100Ah of battery capacity, you may need two 100Ah batteries in parallel to assure longevity. You even may decide to buy three 100Ah batteries just to assure that they will last for the desired number of cycles.
However, if the battery setup is only meant for emergency power and thus only expected to operate a few times a year, discharging a lead acid battery to 80% of capacity is not a big deal. There is no need to add extra battery capacity because the number of charge/discharge cycles is so low that there isn't that much wear on the battery.
Lead acid batteries eventually die from old age
A lead acid battery deteriorates just by ageing. So even if it's kept full charged most of the time, it will wear out and needs to be replaced after a few years. It doesn't matter how well you treat them, even with the best care, they need to be replaced eventually.
Lead acid batteries hate being in a discharged state
Lead acid batteries should never stay discharged for a long time, ideally not longer than a day. It's best to immediately charge a lead acid battery after a (partial) discharge to keep them from quickly deteriorating.
A battery that is in a discharged state for a long time (many months) will probably never recover or ever be usable again even if it was new and/or hasn't been used much.
Usable capacity depends on the load
A typical 12-volt battery has a rating stated in ampere hour that tells you the capacity. For example, a battery can be rated as 70Ah.
So this could mean that the battery can sustain a load of 7A for 10 hours or 70A for one hour, right?
Unfortunately, no
It turns out that the usable capacity of a lead acid battery depends on the applied load. Therefore, the stated capacity is actually the capacity at a certain load that would deplete the battery in 20 hours.
This is concept of the C-rate. 1C is the theoretical one hour discharge rate based on the capacity. Batteries are mostly sold with a capacity based on a 0.05C discharge rate for 20 hours.
The C-rate is important because the C-rate is related to the usable capacity of a battery. That 70Ah capacity rating is based on a 0.05 C-rate or 20-hour discharge rate. That would be 70Ah / 20 = 3.5A.
This is important to understand: if you would put a higher load on this battery, the usable capacity will be less than 70Ah. For example, with a 7A load, the usable capacity may only be 64Ah (fake number for illustration purposes).
It also works in your favor: if the load is less than the 0.05 C-rate, the actual usable capacity will be higher!
So why is this?
When you put a load on a battery, the voltage drops a bit. Higher loads cause larger voltage drops, or to put it differently: the battery 'struggles' to maintain voltage.
So if a load exceeds the standard 0.05C rate (C/20), you may have to select a higher capacity battery or accept a shorter run-time than you might expect based on the rated capacity on the label.
You even may consider putting multiple batteries in parallel to reach the desired usable capacity / runtime.
WARNING
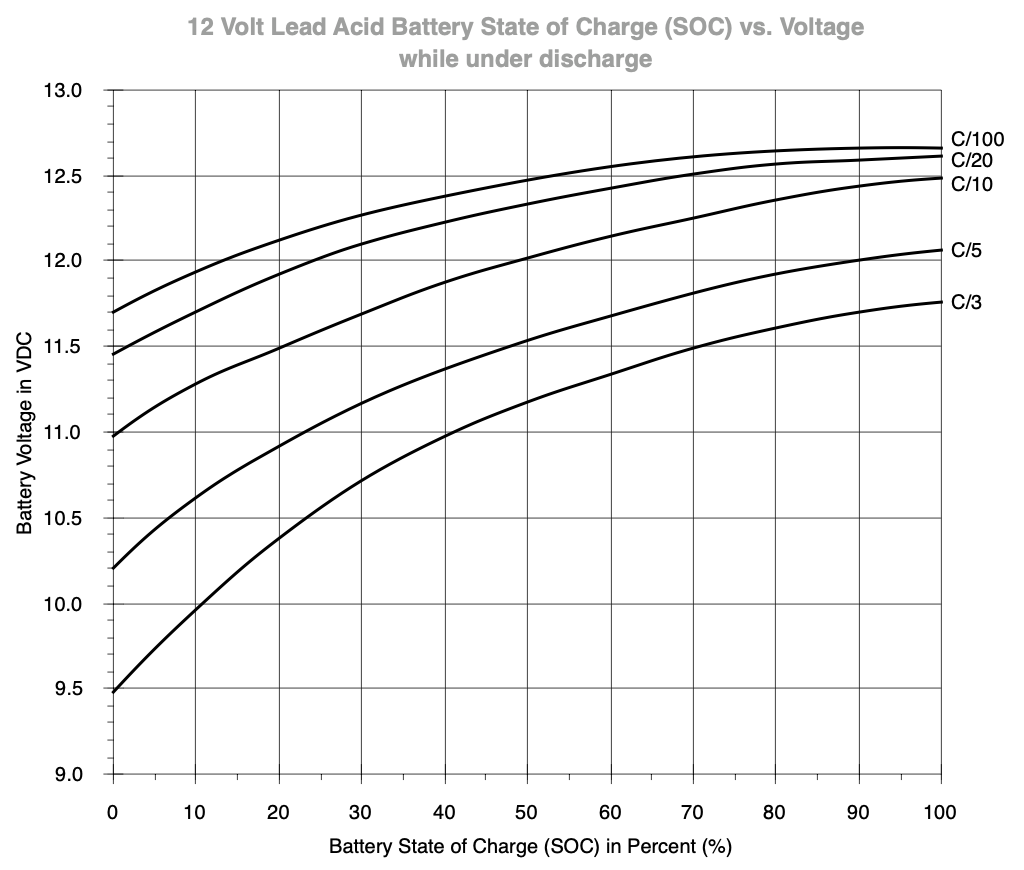
The chart about the state-of-charge under load shows that you should keep an eye on the actual load and voltage. With a C/20 load, the battery is at 50% at 12.30 volt3.
A C/5 load on a 70Ah battery would be 14A. At that load, the battery is at 50% capacity at ~11.55 Volt under load. Only the load in combination with the voltage may give an indication of actual state-of-charge.
Predicting state-of-charge under load is doable with a static, constant load, but becomes more difficult when the load fluctuates, so take this into account.
ANOTHER WARNING
Different manufacturers produce different batteries that may have different discharge characteristics. This means that you should look up the battery specifications and hopefully find a discharge rate chart that will help you gauge actual capacity under load for this particular model.
How do you know the state of charge of a lead acid battery?
The state of charge is measured at rest: when the battery is not connected to any load or charger for 24 hours. The voltage will reflect the state of charge (SoC).
WARNING
There are many different, conflicting tables to be found on the internet that correlate voltage with a particular state of charge. Be sure you check that you pick the right one, consult the footnote4 for more information.
State of Charge (SoC)
Voltage at rest (24h)
100%
12.70+
75%
12.40
50%
12.20
25%
12.00
0%
11.80
Please note that this table is only valid at an ambient temperature of 25C / 77F. If the temperature is lower, usable capacity diminishes and the voltages at wich a certain SoC is reached, will be higher.
Furthermore, these numbers can deviate a little bit depending on the kind of lead acid battery.
If you measure the voltage under load - for example, when you power some lights - the voltage does not reflect the actual state of charge.
It is quite difficult to determine the state of charge under load. Sometimes, battery manufactures provide a discharge chart that allows you to determine the state-of-charge based on the current load.
But often it is something you have to measure or figure out yourself. A constant load makes estimating battery capacity under load more predictable, but if the load varies, it is more difficult to accurately gauge the state of charge.
The positive impact on capacity of connecting batteries in parallel
By using multiple batteries in parallel, the load is also shared across all batteries. Each individual battery only has to supply a fraction of the total load. This means that in addition to the extra usable capacity of the added batteries, there is also added usable capacity because of the reduced load on each individual battery.
For example, if a 100Ah battery has a 0.05C discharge rate of 5A. If it has to provide 10A, the usable capacity is lower than the advertised 100Ah as explained earlier. If we add a second 100A battery in parallel, each battery now needs to supply only half of the load and thus will be able to provide the stated capacity as it is precisely the 0.05C discharge rate.
Lead acid batteries need deep discharge protection
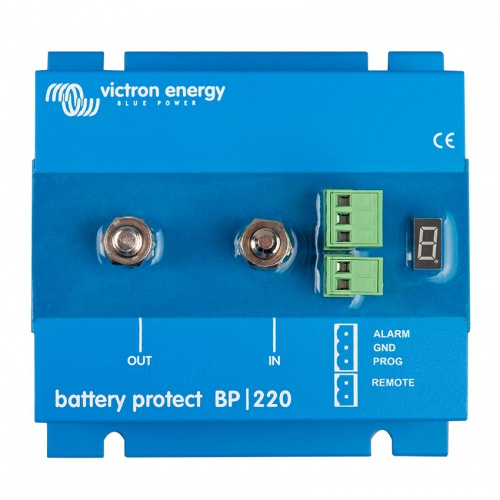
It is highly recommended to use lead acid batteries in combination with a low-voltage cut-off solution that protects the battery against deep discharge5.
this article is not sponsored by victron
Ideally you can configure the cut-off coltage, such as with the depicted unit.
So many lead acid batteries are 'murdered' because they are left connected (accidentally) to a power 'drain'.
Charging a lead acid battery
No matter the size, lead acid batteries are relatively slow to charge. It may take around 8 - 12 hours to fully charge a battery from fully depleted. It's not possible to just dump a lot of current into them and charge them quickly. That would just overload and destroy the battery8.
Lead acid batteries need a specific 3-stage charge process6 in order to preserve their condition.
In practice, if you don't discharge a battery beyond 50%, it takes less time to recharge the battery7.
It can be a good idea to hookup unused batteries permanently to a 'tricklecharger'. This is a charger that charges the battery with a maximum current of 0.8A.
As it can take a very long time to charge a larger capacity battery with a tricklecharger, you need a regular charger, that can supply a decent current, to charge a battery 'within a reasonable timeframe'.
Lead acid battery types
Flooded / FLA
This is the well-known older type of battery. It may be necessary to add distilled water from time to time, so they require maintenance.
The key problem with batteries that require maintenance is that most people (consumers) don't know and if they know, they forget. These batteries basically don't match well with 'human nature'.
It seems to me that these batteries are on their way out in the consumer space, but are still prevalent in commercial/industrial application. It's probably easy for a business to just have a trained employee or service company periodically maintain the batteries.
EFB or Enhanced Flooded Battery
These batteries are improved versions of the regular flooded battery. They are more expensive, but will last more charge/discharge cycles, especially with deeper discharges.
Although not as performant as AGM batteries (which will be discussed shortly), they provide a cheaper alternative to AGM batteries.
Sealed Lead Acid
This type of battery is fully sealed. SLA batteries essentially the same as VRLA batteries but this name is used for the smaller capacity batteries, as found in motorcycles, uninterruptible power supplies and such.
These are maintenance-free batteries. They never require any maintenance during their lifetime. You don't need to add distilled water or anything during their lifetime.
Valve-Regulated Lead Acid
This name is used for batteries like the SLA battery, but with higher capacities. See also wikipedia. They have liquid inside like the flooded battery, but they are sealed and don't need any maintenance. To be precise: they can't be maintained, only be replaced.
The 'valve(s)' are only there in case of emergency, to release pressure due to gas buildup within the battery case if charged incorrectly.
AGM (Absorbent Glass Mat)
This is also a fully sealed SLA/VRLA battery, but it is even more advanced.
They are better able to withstand deep discharges and can be recharged faster. This comes at a relatively steep price.
The faster recharge cycle can be important if used within a solar power bank, because there are only a limited number of hours when the sun provides enough energy for charging.
Deep-Cycle
These batteries are build differently9 and are less suited for starting cars, but better suited to provide power to power boats, RC vans or form a solar power bank.
They are often not a kind of battery in and of itself: there are just regular flooded deep-cycle batteries, or AGM deep-cycle batteries. They are often specifically designed for solar power banks or similar applications.
Evaluation
Although regular flooded batteries will have the longest lifespan of all lead acid battery technology, they require regular maintenance and that may not be practical. Therefore, AGM or other maintenance-free batteries are better suited for residential battery applications, the relatively lower life expectancy is just the price for practicality/convenience.
Low self-discharge rate and storing batteries
Lead acid batteries needs to be stored fully charged. They should be recharged at least every six months due to self-discharge, although the self-discharge rate is rather low.
Buyer beware - ask for fresh batteries
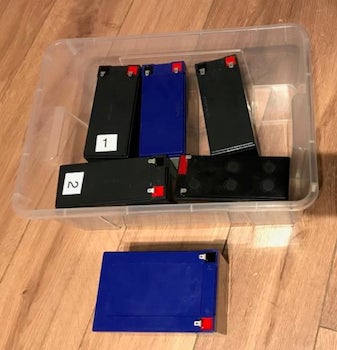
I've ordered quite a few smaller SLA batteries from various brands to test their capacities. I noticed that the actual brand didn't matter much. The age of the battery seemed to matter.
some of the tested SLA batteries
While they are in storage at the vendor, they are probably never recharged, which deteriorates the battery. The batteries with a lower SoC correlated with a serial number that indicated that they were older than the other batteries.
So it might be beneficial to specifically ask for a 'fresh' battery when you order a lead acid battery.
Q & A
Can my lead acid battery be revived?
No.
If the voltage of a 12 volt battery at rest is close to zero, it is dead.
There are tips like 'using epsomsalts' or keeping them on a charger for weeks, but at best, you get only a small portion of usable capacity back, if any. A battery 'revived' like this should never power something you rely on. Personally I don't think it's worth the cost of epsom salt or your time, but you have to decide for yourself if that's true or not.
If a battery is totally dead, I would recommend to accept the loss and get a new one.
The impact of cold weather on performance
If a lead acid battery is exposed to colder or even freezing temperatures, it will work fine, but it can output less current. This is relevant for older, more worn-down batteries. Such batteries can still work fine in the summer, but may no longer be able to start a car or provide another utility with sufficient power when temperatures drop significantly.
Does it make sense to use Lead acid batteries for an off-grid solar setup?
You can do a lead acid solar setup if you can get those batteries cheap but otherwise it may be better to go for a LiFePo4 based setup. Although the initial investment is much higher, Lithium-based batteries will be cheaper long-term because they last so much longer than lead acid batteries (life-time).
I think lead acid batteries are suited for climates with a lot of sunlight available all year round, to power a livingspace through the night.
Since lead acid batteries don't 'like' to be in a discharged state for a long time (more than a day at most), I don't think they are suitable for a more temperate climate, with lots of overcast days.
So the first issue with lead acid batteries is that they don't take well being in a discharged state for more than a day or so. It will make them deteriorate faster.
I think the second issue with lead acid batteries as a solar power bank is their slow charging speed. Lead acid batteries often can't use all available solar power to charge because they just can't charge any faster, no matter their capacity.
This means that even though there would have been enough energy available to fully charge the batteries, it was not available long enough to fully charge the batteries. Maybe AGM batteries may help as they can be charged with higher currents, even though they may not last as long.
Lithium-based batteries can be charged with very large currents and can - in some sense - capture every bit of sunlight that's available. This is much better suited to climates with more intermittent sunny days or even sunny hours, I think.
Another thing that comes to mind is that if you really want to go with lead acid batteries for a solar bank, flooded may be the longest lasting, but the regular maintenance they require may quickly become a chore / unmanageable. I have zero experience with this, but please verify this beforehand. All the more reason to consider at least maintenance-free lead acid batteries, even if they may not last as long.
This is just my thought, I'm no expert on this.
Just remember that regular car batteries are just not suitable for this application. You need - more expensive - batteries that are build specifically for being used in a power bank10.
Why are lead acid batteries so widely used in cars?
Cars need a power source that can provide a lot of power to run the starter motor. Starter motors can use anywhere from 1.5 to 3 Kilowatt when cranking the engine. That's about 125A to 250A of current at 12 volts.
You may notice that batteries are often rated for much higher CCA or 'Cold Cranking Amps' values, but since they deteriorate over time, that extra margin will come in handy. Especially in colder weather.
Lead acid batteries as used in cars can last many years because they are used under near ideal conditions. They are always kept fully charged and are ony briefly and slightly discharged. They are immediately recharged after the car is started.
How can I check if a battery is healthy ?
You need a battery tester for this. They can be had for around 50 Euro's, which is not far off from just buying a new battery, which you might have to do anyway.
A UPS can be quite small, to power just a single computer, running off a 'small' 12 volt 7Ah lead acid battery (depicted further down below in the acticle). A step up in size would be a 19-inch rackmounted UPS, which can often be expanded with multiple external battery packs. A datacenter scale UPS is build using many large batteries in both series for higher voltages and in parallel for higher capacity. Lead acid batteries are well-suited for these type of applications because they are always kept fully charged and rarely (fully) discharged. In datacenter applications, they often only need to last until the diesel generators kick in. ↩
Just because you can, doesn't mean you should. Don't do it. ↩
Notice the voltages in the C/20 discharge rate - which should reflect the numbers in the table shown earlier - are actually a bit higher. If you want to be safe, using higher voltages is always safer for battery longevity, but at the cost of usable capacity. ↩
This article goes into more detail about this. Be sure you look at a table that correlates resting voltage against SoC and not the voltage under load. If you see a table with 10.8 volts at 0%, you are looking at a table for under load voltages. A battery at 10.5 - 10.8 volts at rest is probably damaged. A lead acid battery should never be below 11.80 volt at rest. ↩
'bad' battery protection solutions will just start to oscillate as the battery voltage recovers (above the cut-off threshold) when the load is removed. I bought a cheap 20 Euro unit and it was effectively useless because of this problem. ↩
If Lithium-based batteries have one big upside over lead acid batteries in energy storage applications, it might be this aspect: they can be charged much faster. It may make sense to oversize the solar power array just to charge the batteries as quickly as possible within the limited number of available 'sun-hours'. ↩
It is critical that a proper battery charger is used. You should never just apply a static current as overcharging the battery may lead to the buildup of flammable gasses like hydrogen. There are many documented cases of car batteries exploding in this way. Not only can you get hurt by debris, the internal liquid is acidic which can cause significant burns and is especially dangerous for the eyes. ↩
They have ticker plates that are better able to withstand deep discharges at the cost of lower peak current. ↩
I myself do use regular car batteries as part of my solar-powered blog because I got them for free and even if they are shot, they may last for quite a bit. I can also imagine that people would actually build a battery bank made of old car batteries and just ad a whole lot of them, if you have the space. I'm not sure if that kind of setup would be quite reliable. ↩
The car batteries are free, and I had no other use for the gel batteries so I hooked those up too (in parallel). The batteries have wildly different capacities and this is absolutely not recommended. If you hook up batteries in parallel, always use the same capacity. ↩