Introduction
Update September 2023: A small horizontal and large vertical row of pixels died. Demo of defective display here.
I'm running a solar-powered blog and I wanted to add a low-power display to show the daily solar 'harvest' and maybe some additional information.
So I decided to use an e-paper display. I wanted a display that would be readable from a distance, so bigger would be better. I therefore chose the Waveshare 12.48 inch e-paper display.
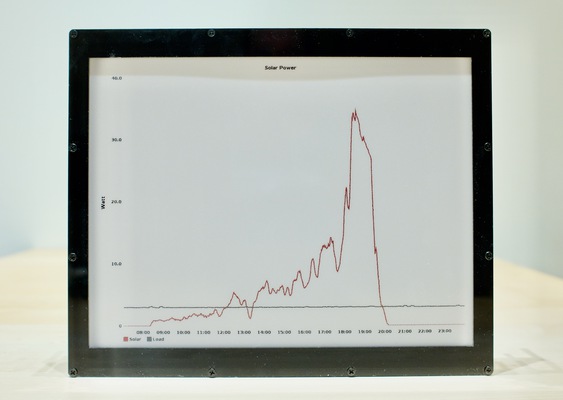
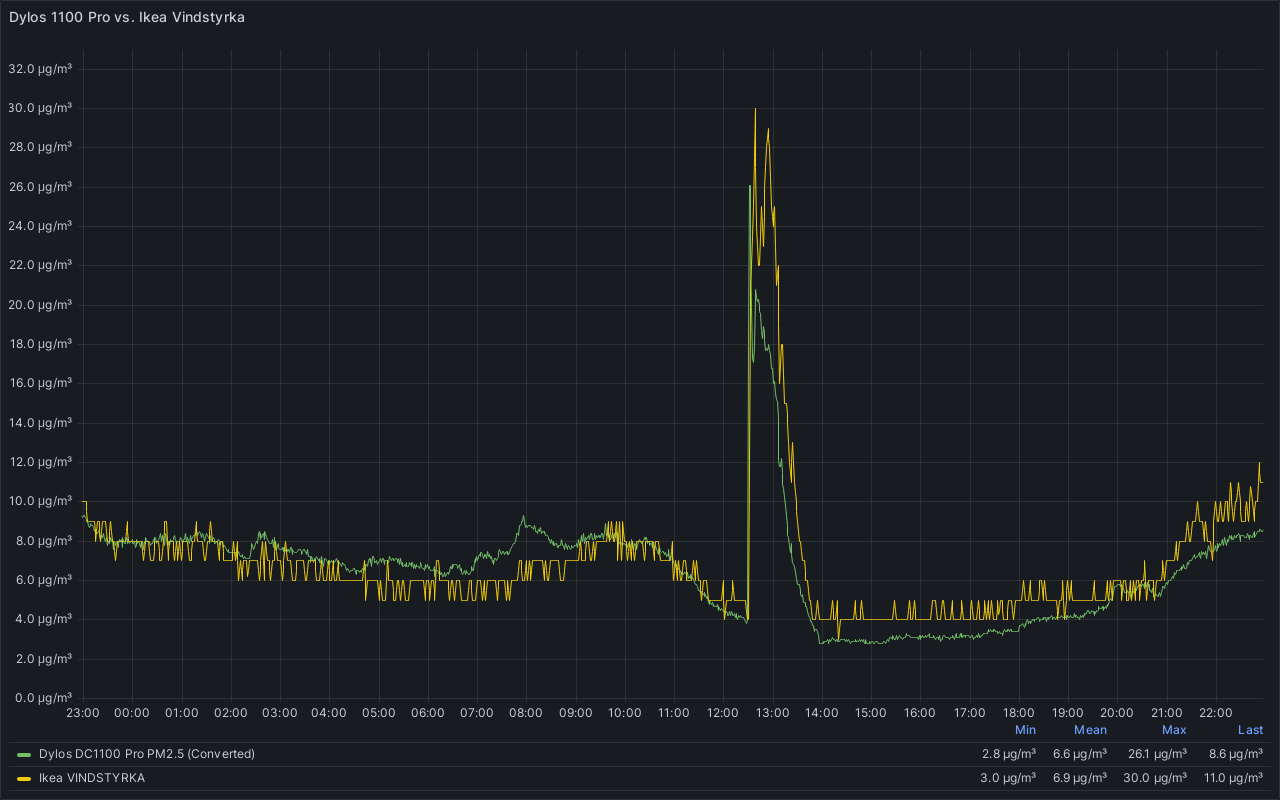
an example based on data from the summer, generated with Graphite
This particular display costs $179 excluding taxes and shipping at the time this article was written.
Specifications
Waveshare sells a two-color (black and white) and a three-color version (black, white, red). I bought the three-color version. The three-color version is the (B) model.
Specifications:
Screen size     :      12.48 inches
Resolution      :      1304 x 984
Colors          :      black, white, red
Greyscale       :      2 levels
Refresh rate    :      16 seconds
Partial refresh :      Not supported
Interfaces      :      Raspberry Pi, ESP32, STM32, Arduino
The two-color variant of this display has a refresh rate of 8 seconds.
This display is clearly quite slow. Furthermore, the lack of partial refresh support could make this display unsuitable for some applications. I was OK with this slow refresh rate.
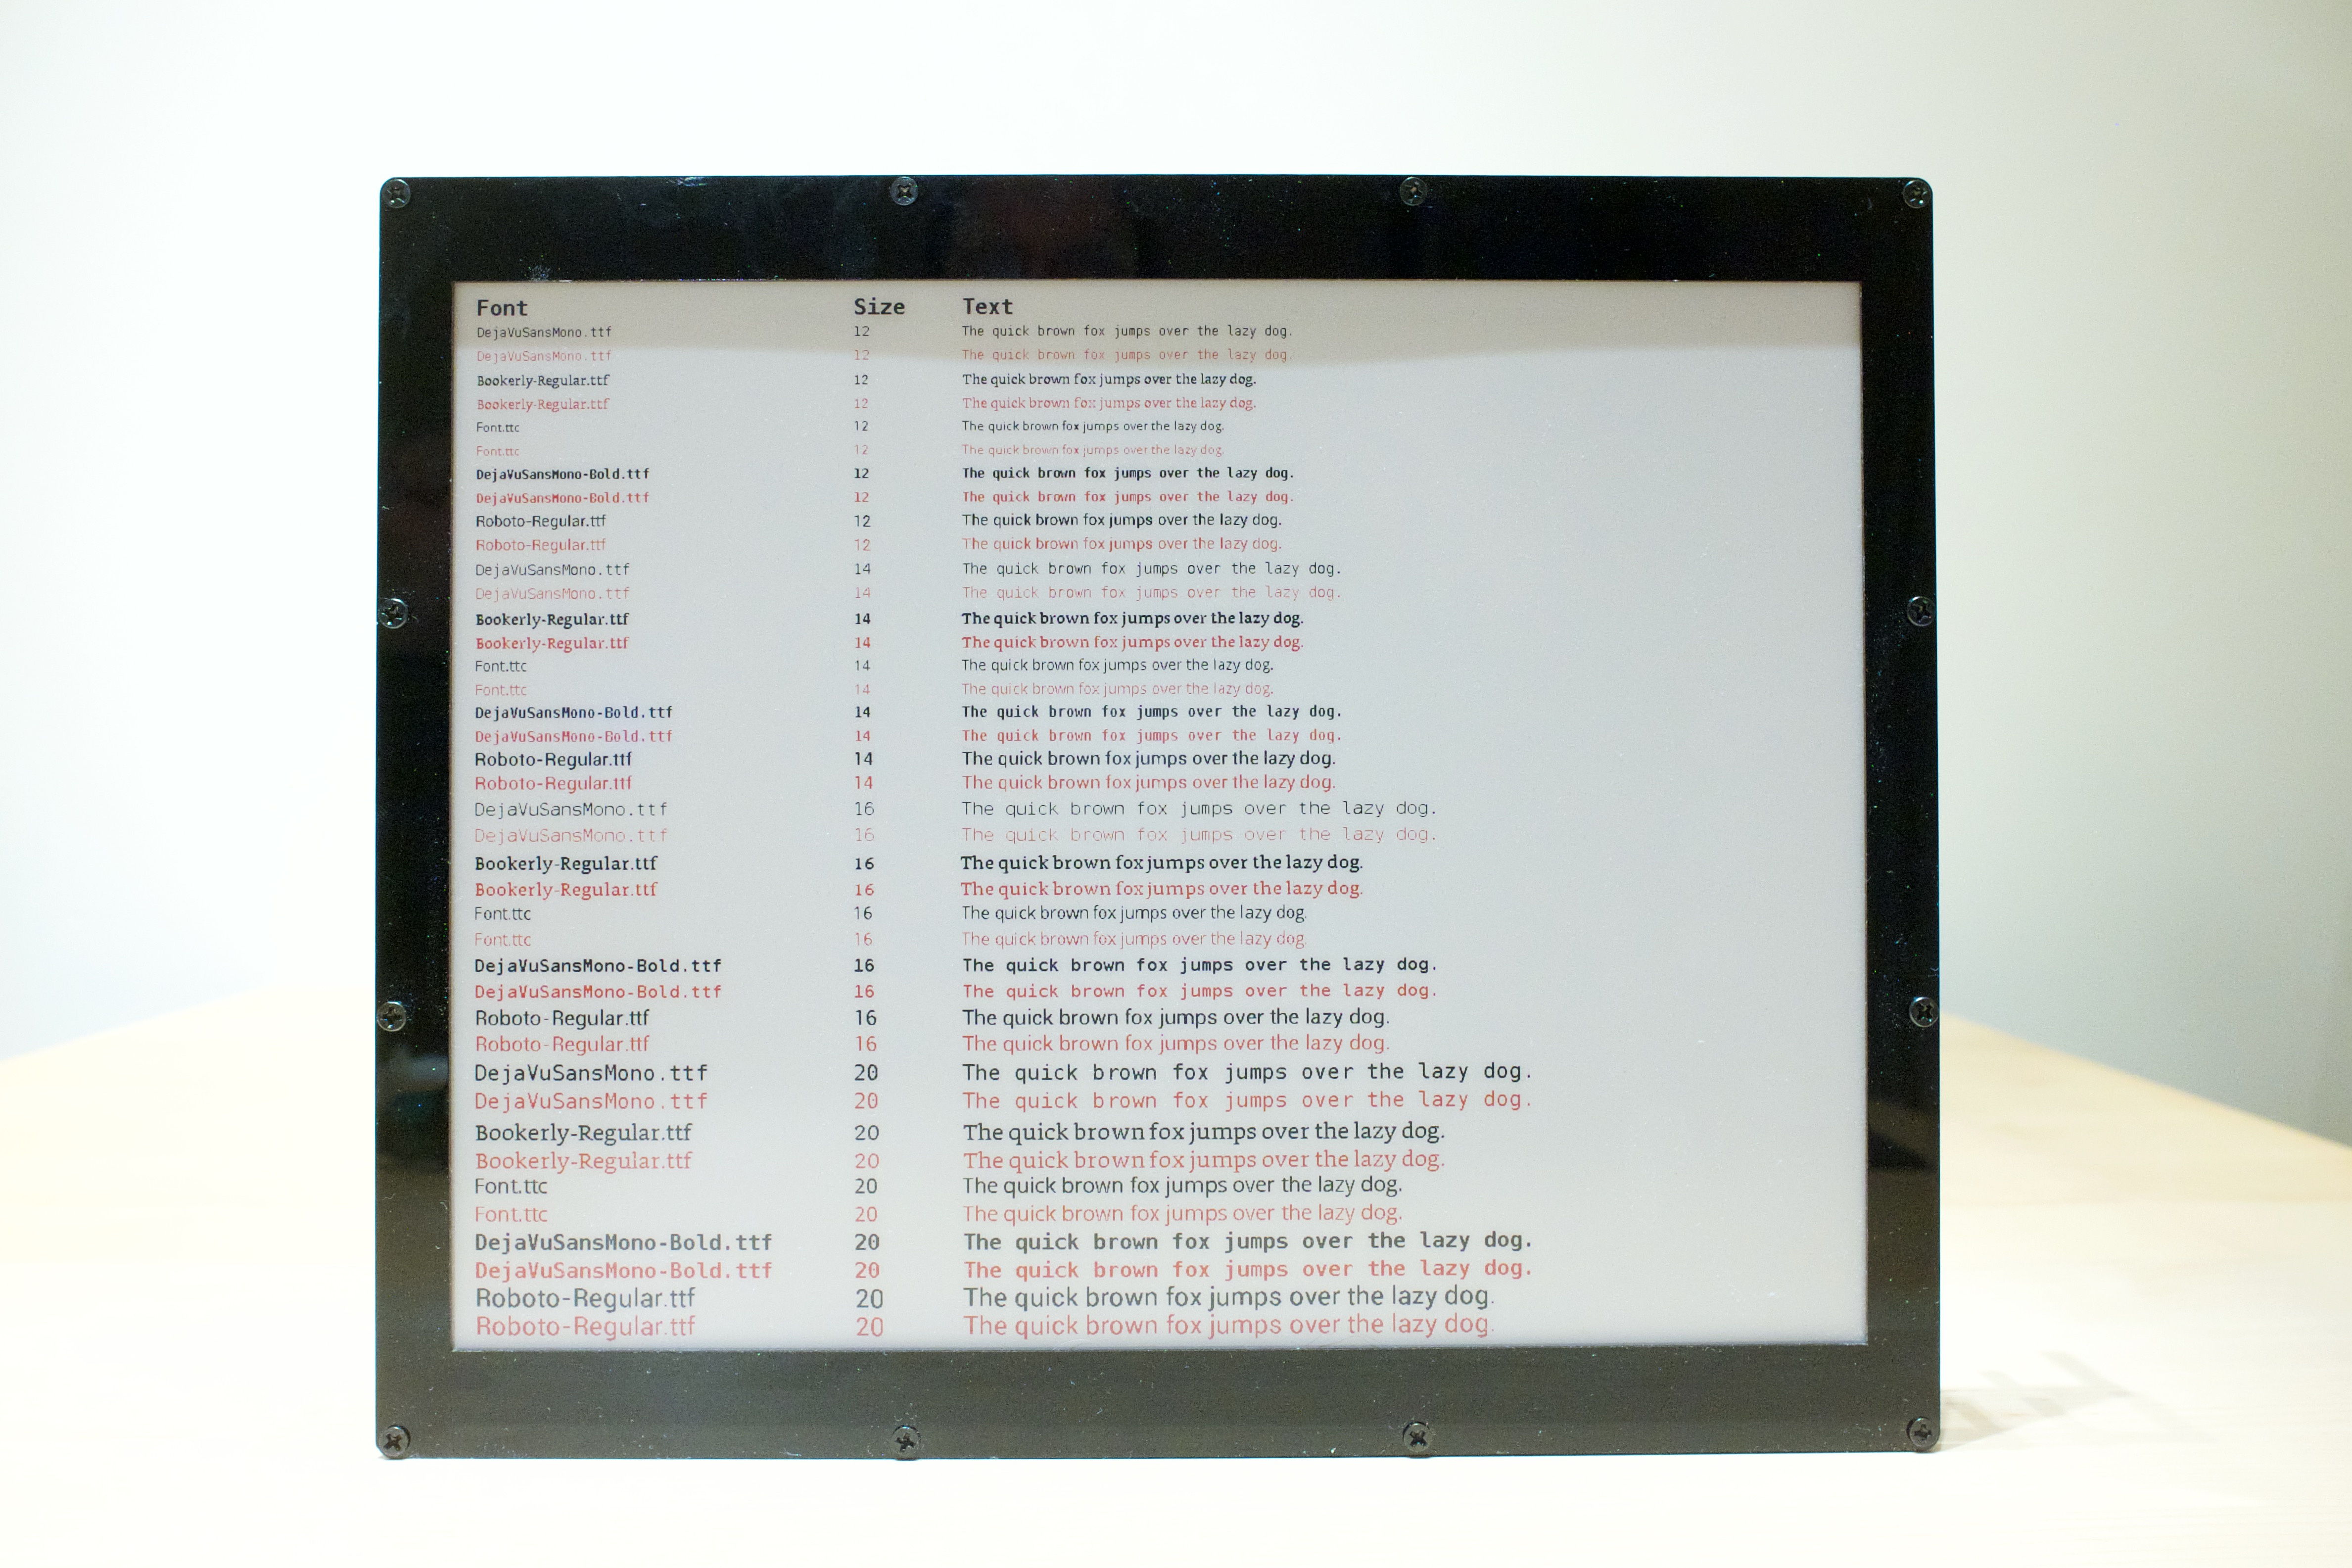
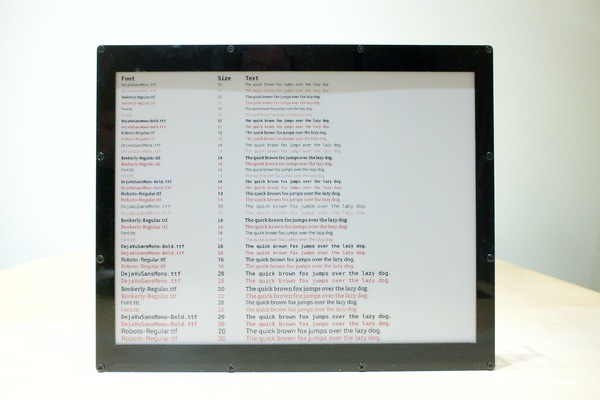
The image below demonstrates different fonts and sizes. I think DejaVuSansMono-Bold looks really well on the display, better than the font supplied by Waveshare.
The Interfaces
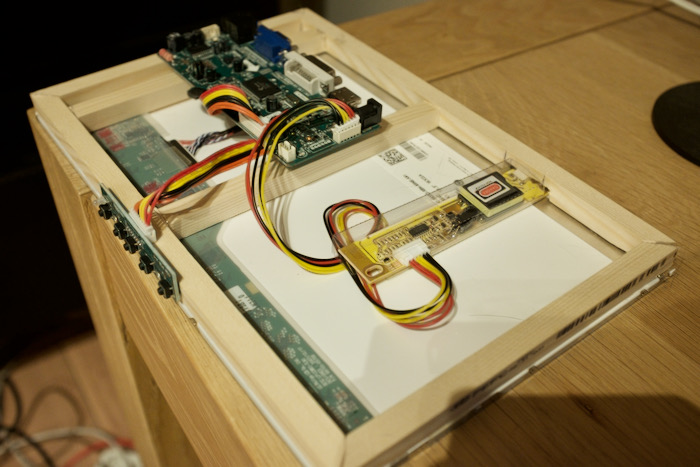
The display includes a microcontroller that in turn can be driven through one of four interfaces:
- A Raspberry Pi (Worked)
- An ESP32 (Not tested)
- An Arduino (Didn't work)
- An STM32 (Not tested)
I've tried the Arduino header with an Arduino Uno, but the supplied demo code didn't work. I did not investigate further why this was the case. It could be a problem with voltage regulation.
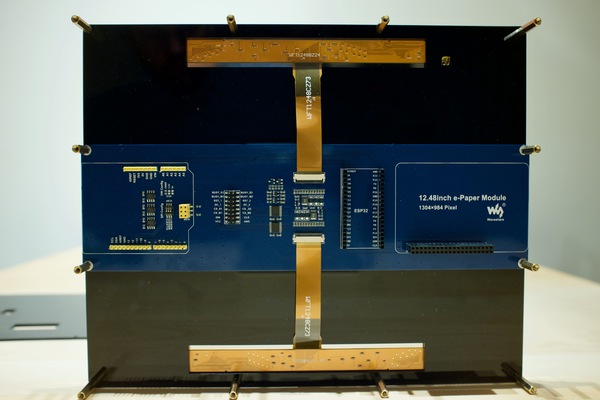
In the image above, the black plastic backplate is removed.
Image quality
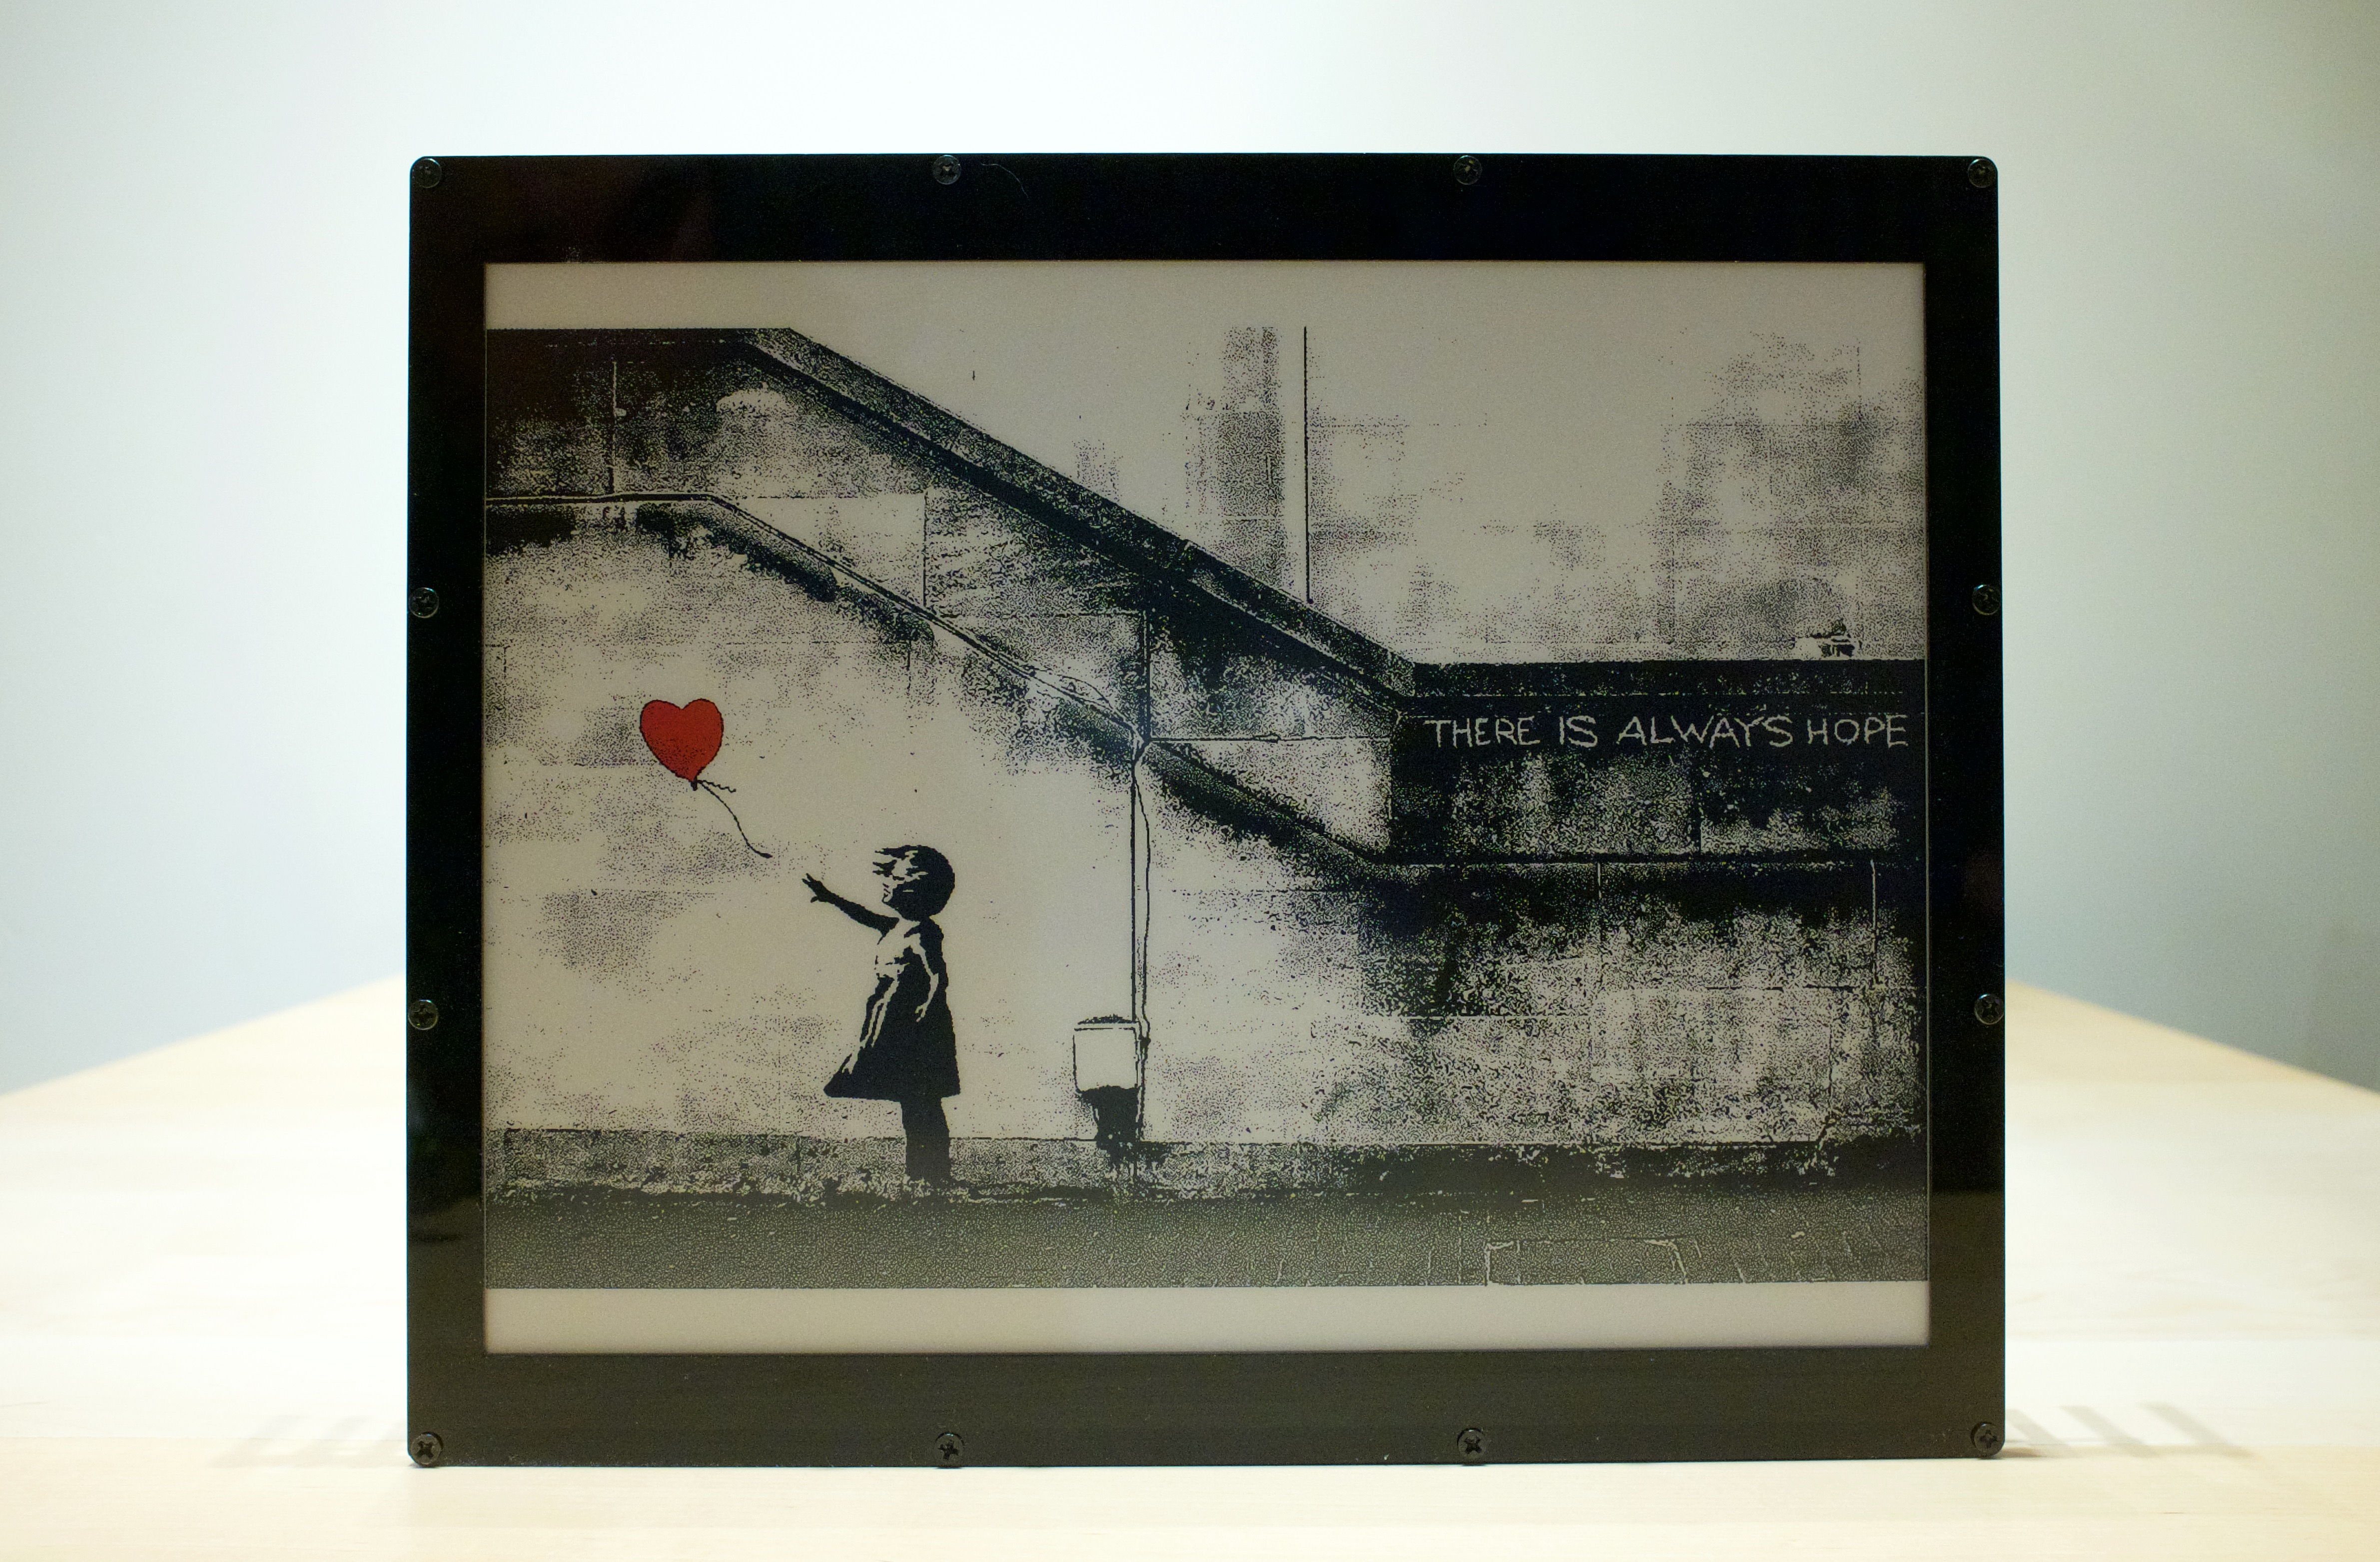
These e-paper displays are mostly sold as product information displays for supermarkets and other businesses. However, the quality is good enough to display images. Especially the support for red can make an image stand out.
Below is an example of an image that incorporates the third (red) color.

The display seems suitable to display art.
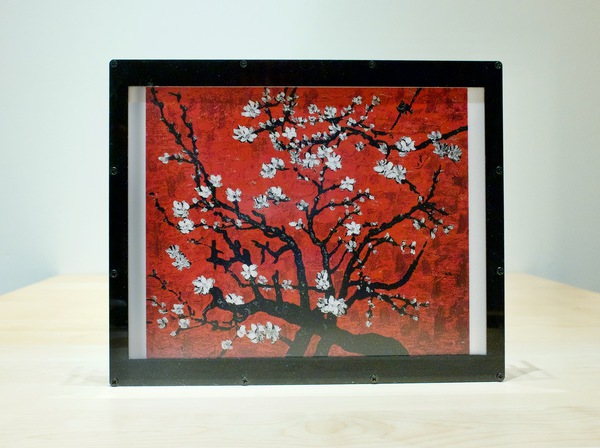
It looks quite good in real life (sorry for the glare).
How the display shows three colors
The display acts like it is actually two displays in one. A black and white display, and a red and white display.
First, the black and white image is drawn. Next, the red and white image is put on top.
Because the display has to draw two images in succession, it takes 16 seconds to refresh the screen. This explains why the black-and-white version of this screen does a refresh in eight seconds: it doesn't have to refresh the red color.
Please note that the entire process of displaying content on the screen takes much longer.
A demonstration:
Displaying an image is cumbersome (On Raspberry Pi 3B+)
At the time this article was written, I could not find any information or tools for this display.
Many Waveshare e-paper displays are popular and have a decent community support. However, it seems that this display is rather unknown.
Therefore, it seems that there are no tools available to display an arbitrary image on this display. You can use the example Python code to display an image but you have to follow these steps:
- Create a black-and-white version of the image
- Create a red-and-white version of the image, that contains only data for the red parts of the image
- If the source image doesn't match the required resolution, you have to resize, crop and fill the image where appropriate.
Both 'black' and 'red' images need to exactly match the resolution of the display (1304x984) or the library will abort with an error.
As I found this proces tedious, I automated it.
A new tool to make displaying an image easy
I've used the python library as supplied by Waveshare and created a command-line tool (Github) on top of it to perform all the required steps as described in the previous section. I'm using Imagemagick for all the image processing.
The script works like this:
./display -i <image file> [--rotate 90] [--fuzz 35] [--color yellow]
The --fuzz and --color parameters may require some clarification.
The color red is extracted from an image but it's not always perfect. By applying the --fuzz parameter (the argument is a percentage), it is possible to capture more of the red (or selected color) of an image.
The --color option specifies which color should be 'converted' to red. By default this color is 'red' (obviously). The 'solar chart' (at the start of this article) is an example where a yellow line was converted to red.
Very slow: it takes about 55 seconds to display an image using the Raspberry Pi 3B+. Half of that minute is spend converting the images to the appropriate format using Imagemagick.
Informational: The Python program includes a modified version of the Waveshare Python library. This library has been altered to prevent double conversion of images, which significantly degrades image quality.
Slow performance
If you use the provided Python library (Python3 compatible) it takes about 30+ seconds to draw an image on the screen. (This excludes the image processing performed with the 'display' tool.)
Further testing showed that the Python library converts and dithers the image before it is sent to the display. And it does so for both black and red. Dithering is performed by looping in Python over every of the 1.3 milion pixels.
Each of these loops (for black and red) take about 10 seconds on the Raspberry Pi 3B+, which explains why it takes so long to update the display. Therefore, I think the combination of Python + the Raspberry Pi 3B+ is not ideal in this case.
Evaluation
I wanted to share my experience with this display to make other people aware of its existence. The tool I created should make it simple to get up and running and display an image.
It clearly has some drawbacks but due to the size, resolution and third color, it seems to be unique and may therefore be interesting.
Although I never tried the display with an ESP32, I think its an ideal for the purpose of a low-power picture frame.
This article was discussed on Hacker News (briefly).
This resulted in about 9000 unique visitors for this article.
Appendix A - Remark on other displays
Please note: Waveshare also sells a smaller 10.3 inch black-and-white e-paper display for a similar price with some significant benefits:
Screen size     :      10.3 inches
Resolution      :      1872 x 1404
Colors          :      black and white
Greyscale       :      16 levels
Refresh rate    :      450 miliseconds
Partial refresh :      Supported
This particular display is smaller but has a higher resolution, supports 16 grayscale levels and updates in half a second. This display may better suit your particular needs. For example, I believe that this display may have been used in this project, a solar-powered digital photo frame.
Appendix B - How to make the display work on a Raspberry Pi
This information is straight from the Waveshare site but I include it for completeness and ease of use.
PART I: Enable the SPI interface with raspi-config
- sudo raspi-config
- select Interfacing Options
- Select SPI
- Select Yes
- Reboot the Raspberry Pi
PART II: Install the required libraries
Install BCM283
Website
wget http://www.airspayce.com/mikem/bcm2835/bcm2835-1.60.tar.gz
tar zxvf bcm2835-1.60.tar.gz
cd bcm2835-1.60/
sudo ./configure
sudo make
sudo make check
sudo make install
Install wiringPi
website
sudo apt-get install wiringpi
cd /tmp
wget https://project-downloads.drogon.net/wiringpi-latest.deb
sudo dpkg -i wiringpi-latest.deb
gpio -v
Caution: The library seems to be deprecated. The Raspberry Pi 4 is supported but future versions of the Raspberry Pi may not.
The wiringPi library is used as part of a compiled library called "DEV_Config.so" as found in the ./lib directory.
@raspberrypi:~/epaper_display $ ldd lib/DEV_Config.so
    linux-vdso.so.1 (0x7ee0d000)
    /usr/lib/arm-linux-gnueabihf/libarmmem-${PLATFORM}.so => /usr/lib/arm-linux-gnueabihf/libarmmem-v7l.so (0x76f1e000)
    libwiringPi.so => /usr/lib/libwiringPi.so (0x76f00000)
    libm.so.6 => /lib/arm-linux-gnueabihf/libm.so.6 (0x76e7e000)
    libc.so.6 => /lib/arm-linux-gnueabihf/libc.so.6 (0x76d30000)
    libpthread.so.0 => /lib/arm-linux-gnueabihf/libpthread.so.0 (0x76d06000)
    librt.so.1 => /lib/arm-linux-gnueabihf/librt.so.1 (0x76cef000)
    libcrypt.so.1 => /lib/arm-linux-gnueabihf/libcrypt.so.1 (0x76caf000)
    /lib/ld-linux-armhf.so.3 (0x76f46000)
Install Python3 and required libraries
sudo apt-get update
sudo apt-get install python3-pip
sudo apt-get install python3-pil
sudo pip3 install RPi.GPIO
sudo pip3 install spidev
Apendix C - E-paper hacking
I see myself as a consumer and I don't have any desire to hack the display for lower refresh-rates or partial refresh support, with the risk of damaging the display in the process.
However one resource about this topic I find very informative is a video from the Youtube Channel "Applied Science" (By Ben Krasnow), called "E-paper hacking: fastest possible refresh rate".
Apendix D - Available libraries
Example code for all supported platforms can be found in this github location.
I also found this github repository that may support this display. This code (also) didn't work for me on my Arduino uno. This could be due to a voltage mismatch, but I'm not willing to solder and potentially destroy the display.
Apendix E - Links to other e-paper projects
Very large and expensive display (Medium paywall)
E-paper calendar
Solar-powered digital photo frame
 click on the image for a picture of the back
 click on the image for a larger version
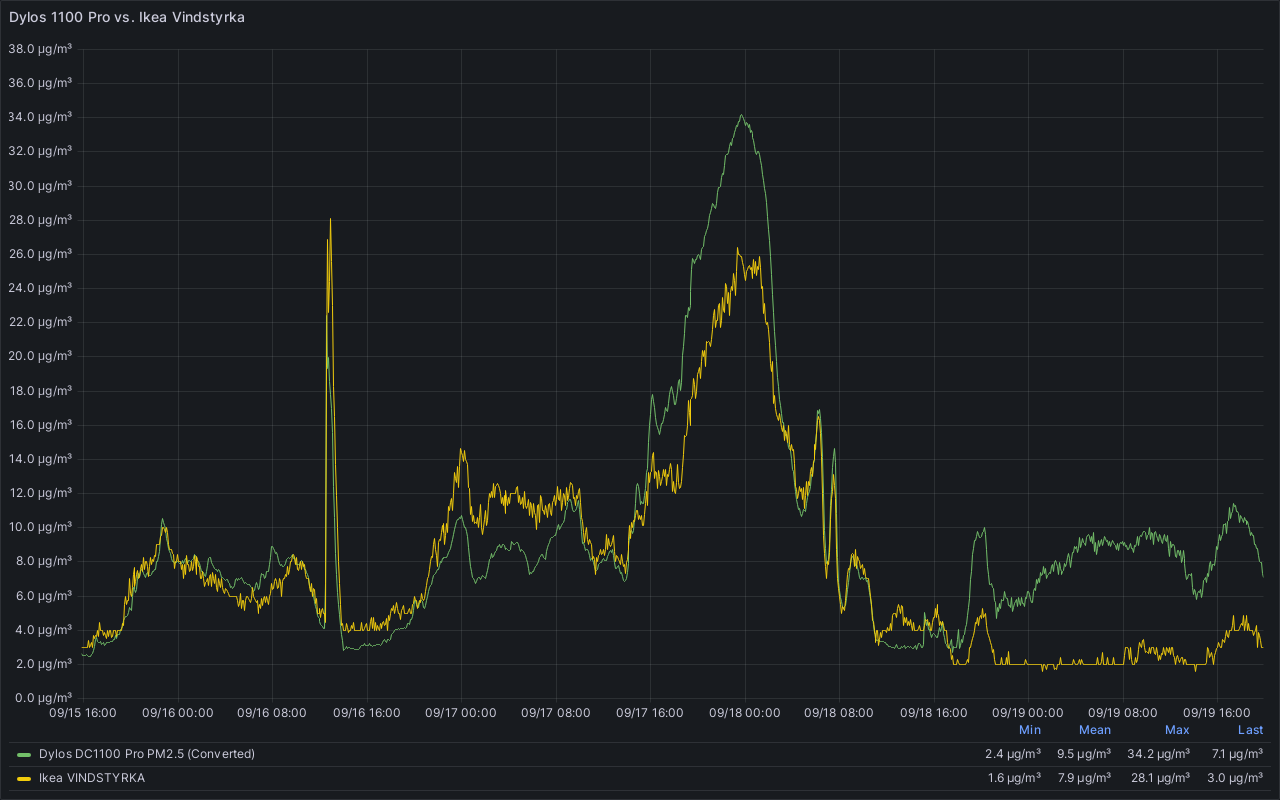 click on the image for a larger version