Articles in the Networking category

  1. Raspberry Pi as a Router Using a Single Network Interface

    Wed 29 September 2021

    Introduction

    Disclaimer: this article is intended for consumers and hobbyists.


    If you want to run your own router at home, the Raspberry Pi 4 Model B1 can be an excelent hardware choice:

    1. it's fairly cheap
    2. it's fast enough
    3. it can saturate it's gigabit network port
    4. it is power-efficient

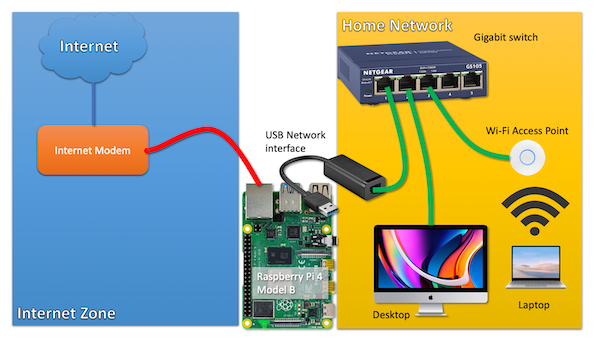
    The key problem it seems, is that it has only one, single network interface. If you build a router, you need at least two:

    1. The first interface connected to your internet modem/router (ideally in bridge mode)
    2. The second interface connected to your home network (probably a switch)

    So if you would use the Raspberry Pi, you would probably buy a gigabit USB3 NIC for around $20 and be done with it.
    routersetup click on the image for a larger version

    Now, what if I told you that you can build exactly the same setup by using only the single on-board network interface of the Raspberry Pi 4?

    How is that possible?

    Introducing VLANs

    Yes, I'm introducing the reader to a technology that exists since the '90s. It is widely used within businesses and other organisations.

    Because I have a sense that this technology is less well-known in circles outside IT operations, I think it may be an interesting topic to discuss.

    Understanding VLANs

    VLAN technology allows you to run different, separate networks over the same, single physical wire and on the same, single switch. This saves a lot on network cabling and the number of physical switches required if you want to operate networks that are separate from each other.

    If you want to run traffic from different networks over the same physical wire or switch, how can you identify those different traffic flows?

    With VLAN technology enabled, such network 'packets' are labeled with a tag. As the VLAN technology operates at the level of Ethernet, we should not talk about 'packets' but about 'ethernet frames'. The terminology is not important to understand the concept, I think.

    It suffices to understand that there is a tag put in front of the ethernet frame, that tells any device that supports VLANs to which network a frame and thus a packet belongs.

    This way, network traffic flows, can be distinguished from each other. And those tags are nothing fancy, they are called a VLAN ID and it is just a number between 1 and 40962.

    Managed switch

    Now that we understand the concept of VLANs, how do we use it?

    First of all, you need a managed network switch that supports VLANs.

    The cheapest switch with VLAN support I could find is the TP-LINK TL-SG105E, for around 25 euros or dollars. This is a 5-port switch, but the 8-port version is often only a few euros/dolars more.


    Juan Pedro Paredes in the comments point out that this TP-LINK switch may not be able to handle the large number of ARP requests that may arrive at the port connected to the Internet Modem. Others are quite negative about this switch in the Hacker News discussion (linked below). I'm not sure if Netgear switches, which are near the same price, fare any better.


    A switch like this has a web-based management interface that allows you to configure VLANS on the device.

    Tagged vs untagged

    In the context of VLANS, a network switch port can be in two states:

    1. Member of a particular network (VLAN) (untagged)
    2. Transporting multiple networks (VLANs) (tagged)

    If a port is just a member of a VLAN, it just behaves like any other switch port. In this mode, it can obviously only be a member of one network/VLAN. The VLAN tags are stripped off all network traffic coming out of this port.

    However, a port that is assigned 'tagged' VLAN trafic, just forwarded traffic as-is, including their VLAN tag.

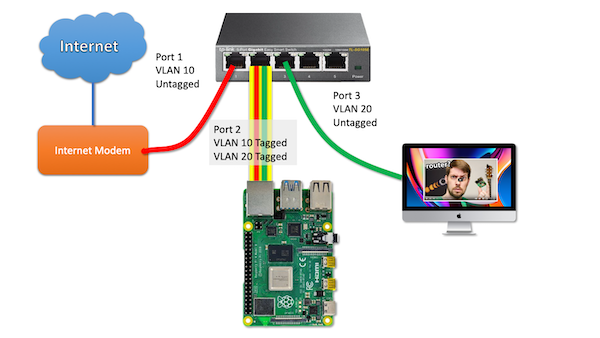
    This is the trick that we use to send network packets from different networks (VLANS) to our Raspberry Pi router over a single port/wire.
    routersetup click on the image for a larger version

    So let's unpack this picture together, step by step.

    Let's imagine a (return) packet from the Internet arrives at the modem and is sent into switchport 1.

    The switch knows that any traffic on that switch port belongs to VLAN 10. Since this traffic needs to be send towards the Pi Router, it will put a tag on the packet and forwards the packet, including the tag towards the Pi on switch port 2.

    The Pi - in turn - is configured to work with VLANs just as the switch. The tag on the packet tells the Pi to wich virtual interface the packet must be send.

    A netplan configuration example to illustrate this setup:

    network:
      version: 2
      ethernets:
        enp2s0f0:
          dhcp4: no
      vlans:
        enp2s0f0.10:
           id: 10
           link: enp2s0f0
           addresses:
             - 68.69.70.71/24 (fake internet address)
           gateway4: 68.69.70.1 (fake upstream ISP router)
        enp2s0f0.20:
           id: 20
           link: enp2s0f0
           addresses:
             - 192.168.0.1/24 (internal network address, acting as gateway)
    

    As you can see, the VLAN packets that arrive as tagged packets, are send (without their tags) to a virtual network interface belonging to that particular network. Those virtual network interfaces all share the same physical interface (enp2s0f0). The virtual network interfaces are just the physical interface name with ".(VLAN ID)" added.

    From here on out, you probably understand where this is going: those two virtual network interfaces are basically similar to a setup with two physical network interfaces. So all the routing and NAT that needs to happen, just happens on those two virtual interfaces instead.

    How to work with VLANs

    To work with VLANs, you need a managed switch that supports VLANs. A managed switch has a management interface, often a web-based management interface.

    In this example, I'm using the TP-LINK TL-SG105E switch as an example. To get to this page, go to VLAN --> 802.1Q VLAN in the web interface.

    vlanconfig

    So from this table we can derive that:

    • Port 1 is an untagged member of VLAN 10
    • Port 2 is a tagged member of VLAN 10 and VLAN 20
    • Port 3 is an untagged member of VLAN 20

    Please note that it is also recommended to remove ports from VLANs they don't use. So I removed ports 1, 2 and 3 from the default VLAN 1.

    Now, if you have more devices to connect to the internal LAN on this switch, you need to configure the ports to be an untagged member of VLAN 20.

    Caveats

    Bandwidth impact

    Obviously, if you use a single interface, you only get to use the bandwidth of that sinle interface. In most cases, this is not an issue, as gigabit ethernet is full-duplex: there is physical exclusive wiring for upstream traffic and downstream traffic.

    So you might say that full-duplex gigabit ethernet has a raw throughput capacity of two gigabit/s, although we mostly don't talk about it that way.

    So when you download at 200 Mbit/s, that traffic is ingested over VLAN 10 over the incomming traffic path. It is then sent out over VLAN 20 towards your computer over VLAN 20 using the outgoing path. No problem there.

    If you would also use the Raspberry Pi as a backup server (with an attached external hard drive), the backup traffic and the internet traffic could both 'fight' for bandwidth on the same gigabit link.

    Impact on gigabit internet


    Update June 2022 I was actually able to use full Gigabit internet speed over VLANs, at around 111 MB/s. I made some mistakes during earlier testing.

    You will never get the full gigabit internet network speed if you would build this setup. It will probably max out at ~900 Mbit. (I'm assuming here that you would use x86 hardware as the Pi would not be able to handle firewalling this traffic anyway.)


    This is because most traffic is based on TCP connections and when you download, there is traffic both ways!. The download traffic is the bulk of the traffic, but there is a substantial steady stream of return packets that acknowledges to the sender that traffic has been received (if not, it would trigger a retransmission).

    Remember that in this single-port setup, the Pi uses the same gigabit port to send the return traffic to the internet over VLAN 10 and the download data towards your home computer over VLAN 20. So the size of the upstream traffic will limit your maximum download performance.

    The Raspberry Pi 4 Model B as a router

    The biggest limitation - which becomes an issue for more and more people - is performance. If you use IPTABLES on Linux for firewalling, in my experience, network throughput drops to a maximum of 650 Mbit/s.

    That's only an issue (first world problems) if you have gigabit internet or an internet speed beyond what the Pi can handle.

    If your internet speed doesn't even come close, this is not an issue at all.

    Maybe the Raspberry Pi 400 or the compute module performs better in this regard as their CPUs are clocked at higher Ghz.

    Closing words

    If it makes any sense for you to implement this setup, is only for you to decide. I'm running this kind of setup (using an x86 server) for 10 years as I can't run a second cable from my modem to the room where my router lives. For a more detailed picture of my home network setup, take a look here.

    Feel free to leave any questions of comments below.

    The hacker news discussion about this article can be found here.

    Route-on-a-stick

    I learned from the hacker news discussion that a router with just one network interface is called a router on a stick.


    1. Older models of the Raspberry Pi are significantly network bandwidth constrained. So much so, that they would not be suitable as Internet routers if your internet speed is above 100Mbit. 

    2. most cheap switches can't operate more than 32 ~ 64 VLANs maximum. Only more expensive, enterprise gear can work with the full 4096 VLANS at the same time. However, this is probably not relevant for consumers. 

    Tagged as : networking
  2. My Home Network Setup Based on Managed Switches and VLANs

    Fri 10 April 2020

    My home networking setup

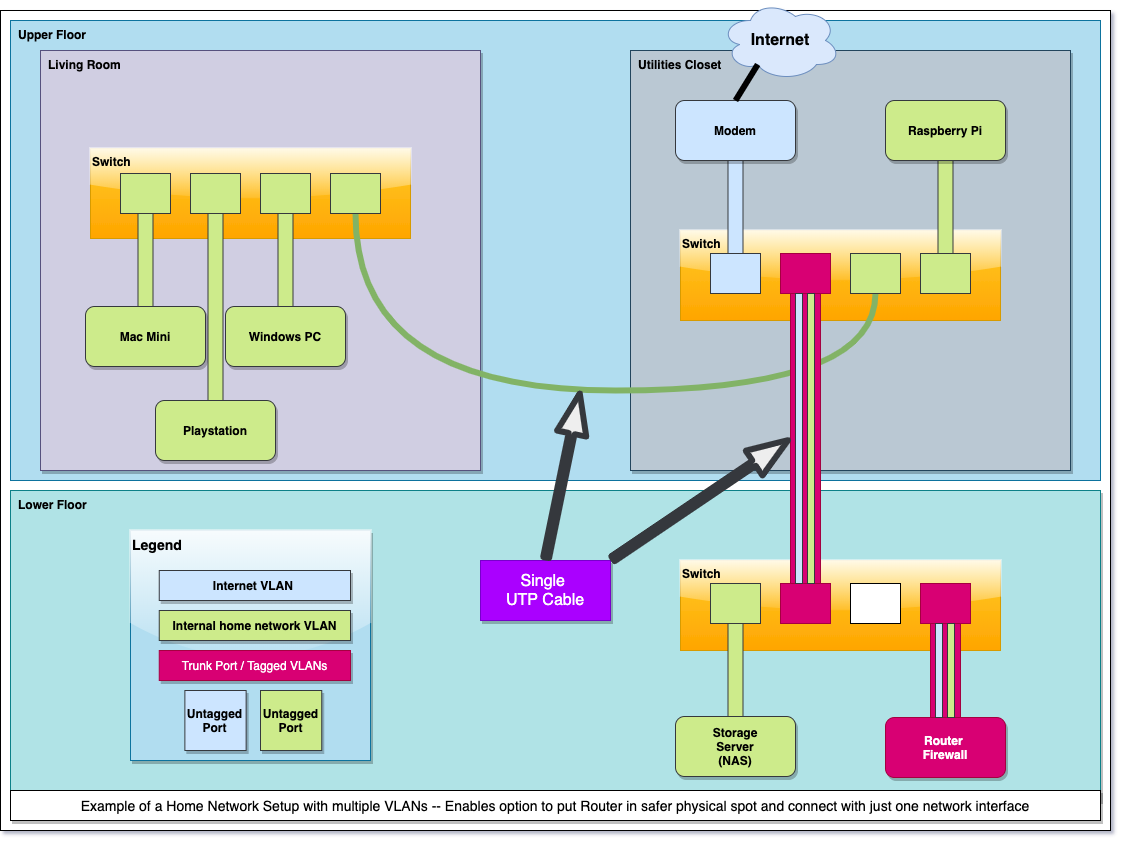
    I live in a two story apartment, with on the top floor my utilities closet and my living room. The bottom floor contains a bedroom with all my servers and networking gear.

    So this is my setup (click for a bigger version):

    home

    I like to run my own router but my utilities closed is not the safest place in terms of security and climate.

    By default, most people who run their own home router will use a box with two network interfaces, one connected to the (cable) modem and the other one connected to the home network.

    I could have done the same thing, by running a cable from the modem to my router, and a second cable back up towards my closet (and livingroom).

    However, I didn't want to run multiple cables from my utilities closed to my bedroom downstairs, I saw no need for that: because I can use VLANs.

    The small 8-port switch in the closed is connected with a single (long) cable to the 24-port switch I have in my bedroom downstairs. This switch connects to my router and multiple servers.

    I've setup a trunk between these two switches where my internet traffic flows over 'VLAN 100' and my home network uses 'VLAN 200'.

    The router, an HP N40L, has only a single network interface. I just expose the two VLANS as 'tagged' and let the router route traffic between the two VLANS. No need for a second interface (as many home setups do).

    So in my setup there are two trunks, one between the two switches and the other one between the bedroom switch and my router. All other devices are connected to untagged network ports, in their appropriate VLAN.

    The small switch in the closet is responsible for carrying my home network to the switch in my living room.

    The raspberry pi connects to my smart meter to collect information about my power and gas usage.

    Tagged as : Networking
  3. Setup a VPN on Your iPhone With OpenVPN and Linux

    Mon 18 June 2018

    [Update 2018] This article has been substantially updated since it was published in 2013.

    Introduction

    In this article, I will show you how to setup a Linux-based OpenVPN server. Once this server is up and running, I'll show you how to setup your iOS devices, such as your iPhone or iPad so that they can connect with your new VPN server.

    The goal of this effort is to encapsulate all internet traffic through your VPN connection so no matter where you are, nobody can monitor which sites you visit and what you do. This is ideal if you have to visit the internet through untrusted internet sources like public Wi-Fi.

    Some typical scenarios would be:

    • you run an OpenVPN service on your Linux-based home router directly
    • you run an OpenVPN service on a device behind your home router using portforwarding (like a Raspberry Pi)
    • you run an OpenVPN service on a VPS hosted by one of many cloud service providers

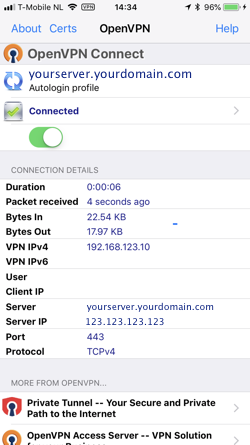
    Your iOS devices will be running OpenVPN Connect, a free application found in the App store.

    screenshot

    A note on other platforms: Although this tutorial is focussed on iOS devices, your new OpenVPN-based VPN server will support any client OS, may it be Windows, MacOS, Android or Linux. Configuration of these other clients is out-of-scope for this article.

    This tutorial is based on OpenVPN, an open-source product. The company behind OpenVPN also offers VPN services for a price per month. If you find the effort of setting up your own server too much of a hassle, you could look into their service. Please note that I have never used this service and cannot vouch for it.

    This is a brief overview of all the steps you will need to take in order to have a fully functional setup, including configuration of the clients:

    1. Install a Linux server (out-of-scope)
    2. Install the OpenVPN software
    3. Setup the Certificate Authority
    4. Generate the server certificate
    5. Configure the OpenVPN server configuration
    6. Configure the firewall on your Linux server
    7. Generate certificates for every client (iPhone, iPad, and so on)
    8. Copy the client configuration to your devices
    9. Test your clients

    How It Works

    OpenVPN is an SSL-based VPN solution. SSL-based VPNs are very reliable because if you set it up properly, you will never be blocked by any firewall as long as TCP-port 443 is accessible. By default, OpenVPN uses UDP as a transport at port 1194, but you can switch to TCP-port 443 to increase the chance that your traffic will not be blocked at the cost of a little bit more bandwidth usage.

    Authentication

    Authentication is based on public/private key cryptography. The OpenVPN server is similar to an HTTPS server. The biggest difference is that your device doesn't use a username/password combination for authentication, but a certificate. This certificate is stored within the client configuration file.

    So before you can configure and start your OpenVPN service, you need to setup a Certificate Authority (CA). With the CA you can create the server certificate for your OpenVPN server and after that's done, generate all client certificates.

    OpenVPN installation

    OpenVPN is available on most common Linux Distros by default. apt-get install openvpn for any Debian or Ubuntu version is all you need to install OpenVPN.

    Or take a look here

    I have never tried it out, but you can try and take a look at an OpenVPN install script

    This script seems to automate a lot of steps, like firewall configuration, certificate generation, etc.

    Tip

    It's out-of-scope for this tutorial, but you should make sure that you keep your OpenVPN software up-to-date, in case security vulnerabilities are discovered in OpenVPN in the future.

    Security

    I'm creating this tutorial on an older system, with less secure default configuration settings for both the Certificate Authority as the OpenVPN server itself. The settings I use in this tutorial are based on the steps in this blog.

    Notable improvements:

    • AES256 for encryption
    • 2048 bit key sizes over 1024 bit keys
    • SHA256 over sha1/md5

    Performance

    I did some performance tests and got around 40-50 Mbs per iOS client. I believe that the bottleneck lies with my old HP Microserver N40L with its relatively weak CPU.

    Traffic Shaping

    If you want to limit how much bandwidth a client is allowed to use, I recommend to use this tutorial. I have tried it out and it works perfectly.

    Creating a certificate authority.

    For unbuntu: install the package "easy-rsa" and use the 'make-cadir' command instead of the setup instructions below.

    I assume that you will setup your OpenVPN configuration in /etc/openvpn. Before you can setup the server configuration, you need to create a certificate authority. I used the folder /etc/openvpn/easy-rsa as the location for my CA.

    mkdir /etc/openvpn/easy-rsa
    

    We start with copying all these files to this new directory:

    cp -R /usr/share/doc/openvpn/examples/easy-rsa/2.0* /etc/openvpn/easy-rsa
    

    Please note that depending on your Linux flavour, these files may be found at some other path.

    Next, we cd into the destination directory.

    cd /etc/openvpn/easy-rsa
    

    Now, open the 'vars' file with your favorite text editor. The following instructions are straight from the OpenVPN howto.

    You should change all the values to ones that apply to you (obviously).

    export KEY_COUNTRY="US"
    export KEY_PROVINCE="California"
    export KEY_CITY="San Fransisco"
    export KEY_ORG="My Company"
    export KEY_EMAIL="my@mail.com"
    export KEY_CN=server
    export KEY_NAME=server
    export KEY_OU=home
    

    Change the KEY_SIZE parameter:

    export KEY_SIZE=2048
    

    How long would you like your certificates to be valid (10 years?)

    export CA_EXPIRE=3650
    export KEY_EXPIRE=3650
    

    Then I had to copy openssl-1.0.0.cnf to openssl.cnf because the 'vars' script complained that it couldn't find the latter file.

    cp openssl-1.0.0.cnf openssl.cnf
    

    Notice I went through these steps on an older Linux installation. I had to edit the file /etc/openvpn/easy-rsa/pkitool and changed all occurrences of 'sha1' to 'sha256'.

    Now we 'source' var and run two additional commands that actually generate the certificate authority. Notice the dot before ./vars.

    . ./vars
    ./clean-all
    ./build-ca
    ./build-dh
    

    You will have to confirm the values or change them if necessary.

    Now we have a certificate authority and we can create new certificates that will be signed by this authority.

    WARNING: be extremely careful with all key files, they should be kept private.

    I would recommend performing these commands:

    chown -R root:root /etc/openvpn 
    chmod -R 700 /etc/openvpn
    

    By default, OpenVPN runs as root. With these commands, only the root user will be able to access the keys. If you don't run OpenVPN as root, you must select the appropriate user for the first command. See also this article.

    Creating the Server Certificate

    We create the server certificate:

    ./build-key-server server
    

    It's up to you to come up with an alternative for 'server'. This is the file name under which the key files and certificates are stored.

    All files that are generated can be found in the '/etc/openvpn/easy-rsa/keys' directory. This is just a flat folder with both the server and client keys.

    Creating the optional TLS-AUTH Certificate

    This step is optional but it doesn't take much effort and it seems to add an additional security layer at no significant cost. In this step we create an additional secret key that is shared with both the server and the clients.

    The following steps are based on this article (use of -tls-auth).

    cd /etc/openvpn/easy-rsa/keys
    openvpn --genkey --secret ta.key
    

    When we are going to create the server configuration, we will reference this key file.

    Creating the Client Certificate

    Now that we have a server certificate, we are going to create a certificate for our iPhone (or any other iOS device).

    ./build-key iphone
    

    Answer the questions with the defaults. Don't forget to answer these questions:

    Sign the certificate? [y/n]:y
    1 out of 1 certificate requests certified, commit? [y/n]y
    

    So now we have everything in place to start creating an OpenVPN configuration. We must create a configuration for the server and the client. Those configurations are based on the examples that can be find in /usr/share/doc/openvpn/examples/.

    Example Server configuration

    This is my server configuration which is operational. It is stored in /etc/openvpn/openvpn.conf

    dev tun2
    tls-server
    cipher AES-256-CBC
    auth SHA256
    remote-cert-tls client
    dh easy-rsa/keys/dh2048pem
    ca easy-rsa/keys/ca.crt
    cert easy-rsa/keys/server.crt
    key easy-rsa/keys/server.key
    tls-auth easy-rsa/keys/ta.key
    server 10.0.0.0 255.255.255.0
    log /var/log/openvpn.log
    script-security 2
    route-up "/sbin/ifconfig tun2 up"
    port 443
    proto tcp-server
    push "redirect-gateway def1 bypass-dhcp"
    push "dhcp-option DNS 8.8.8.8"
    

    I believe you should be able to use this configuration as-is. Depending on your local IP-addresses within your own network, you may have to change the server section.

    I use TCP-port 443 as this destination port is almost never blocked as blocking this port would break most internet connectivity. (The downside is that I can no longer host any secure web site on this IP-address).

    The OpenVPN service will provide your client with an IP-address within the address range configured in the 'server' section.

    Change any parameters if required and then start or restart the OpenVPN service:

    /etc/init.d/openvpn restart
    

    Make sure that the server is running properly in /var/log/openvpn.log

    If you want to use your VPN to browse the internet, we still need to configure a basic firewall setup.

    I'm assuming that you already have some kind of IPtables-based firewall running. Configuring a Linux firewall is out-of-scope for this article. I will only discuss the changes you may need to make for the OpenVPN service to operate properly.

    You will need to accept traffic to TCP port 443 on the interface connected to the internet.

    iptables -A INPUT -p tcp -m tcp --dport 443 -j ACCEPT
    

    If your OpenVPN server is behind a router/firewall, you need to configure port-forwarding on that router/firewall. How to do so is out-of-scope for this article, as it is different for different devices.

    Assuming that you will - for example - use the 10.0.0.0/24 network for VPN clients such as your iPhone, you must also create a NAT rule so VPN clients can use the IP-address of the Linux server to access Internet.

    iptables -t nat -A POSTROUTING -s "10.0.0.0/24" -o "eth0" -j MASQUERADE
    

    Please note that you must change eth0 with the name of the appropriate interface that connects to the internet. Change the IP-address range according to your own situation. It should not conflict with your existing network.

    iptables -A FORWARD -p tcp -s 10.0.0.0/24 -d 0.0.0.0/0 -j ACCEPT
    

    Please note that I haven't tested these rules, as I have a different setup. But this should be sufficient. And make sure that forwarding is enabled like this:

    echo 1 > /proc/sys/net/ipv4/ip_forward
    

    Example Client configuration

    Most OpenVPN clients can automatically import files with the .ovpn file extension. A typical configuration file is something like 'iphone.ovpn'.

    Warning: the .ovpn files will contain the certificate used by your iPhone/iPad to authenticate against your OpenVPN server. Be very carefull where you store this file. Anyone that is able to obtain a copy of this file, will be able to connect to your VPN server.

    This is an example configuration file, but we are not going to create it by hand, it's too much work.

    What you will notice from this example is that the .ovpn file contains both the client configuration and all the required certificates:

    1. the CA root certificate
    2. the server certificate to validate the server
    3. the client private certificate
    4. the TLS-AUTH certificate (an optional extra security measure)

    Create a client configuration file (.ovpn) with a script

    You can create your client configuration file manually but that is a lot of work. Because you need to append all the certificates to a single file, that also contains the configuration settings.

    So we will use a script to setup the client configuration.

    First we are going to create a folder where our client configuration files will be stored.

    mkdir /etc/openvpn/clientconfig
    chmod 700 /etc/openvpn/clientconfig
    

    Now we will download the script and the accompanying configuration template file. Notice that the links may wrap.

    cd /etc/openvpn
    wget https://raw.githubusercontent.com/louwrentius/openvpntutorial/master/create-client-config.sh
    wget https://raw.githubusercontent.com/louwrentius/openvpntutorial/master/client-config-template
    chmod +x create-client-config.sh
    

    Please note that you first need to create the certificates for your devices before you can generate a configuration file. So please go back to that step if you need to.

    Also take note of the name you have used for your devices. You can always take a look in /etc/openvpn/easy-rsa/keys to see how your devices are called.

    Now, edit this client-config-template and change the appropriate values where required. You may probably only need to change the first line:

    remote <your server DNS address or IP address>
    

    Now you are ready to run the script and generate the config file for your device.

    When you run this script, a configuration file is generated and placed in to the folder /etc/openvpn/clientconfig.

    The script just puts the client configuration template and all required certificates in one file. This is how you use it:

    ./create-client-config.sh iPhone
    

    Some output you will notice when running the script:

    user@server:/etc/openvpn# ./create-client-config.sh iphone
    Client's cert found: /etc/openvpn/easy-rsa/keys/iphone
    Client's Private Key found: /etc/openvpn/easy-rsa/keys/iphone.key
    CA public Key found: /etc/openvpn/easy-rsa/keys/ca.crt
    tls-auth Private Key found: /etc/openvpn/easy-rsa/keys/ta.key
    Done! /etc/openvpn/clientconfig/iphone.ovpn Successfully Created.
    

    You should now find a file called 'iphone.ovpn' in the directory /etc/openvpn/clientconfig.

    We are almost there. We just need to copy this file to your iOS device.

    You have three options:

    1. Use iCloud Drive
    2. Use iTunes
    3. Use email (obviously insecure and not discussed)

    Setting up your iPhone or iPad with iCloud Drive

    1. First install the OpenVPN Connect application if you haven't done so.
    2. Copy the .ovpn file from your OpenVPN server to your iCloud Drive.
    3. Take your device and use the 'files' browser to navigate within your iCloud drive to the .ovpn file you just copied.
    4. Tap on the file to download and open it.
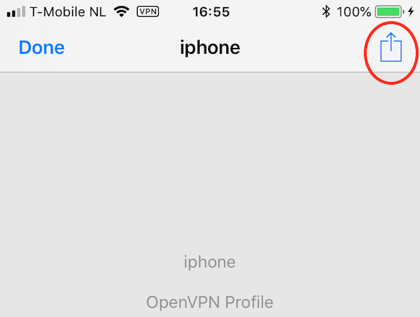
    5. Now comes the tricky part: press the share symbol

    step 1

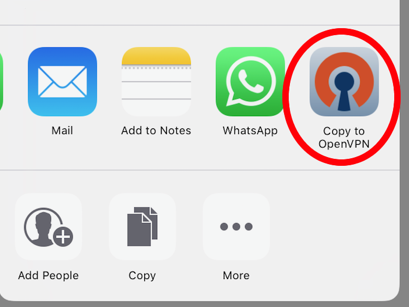
    Open the file with the OpenVPN application on your iOS device:

    step 2

    step 3

    When you get the question "OpenVPN would like to Add VPN Configurations", choose 'Allow'.

    Continue with the step 'Test your iOS device'.

    If the OpenVPN Connect client doesn't import the file, remove the application from the device and re-install it. (This is what I had to do on my iPad).

    Setting up your iPhone or iPad with iTunes

    You can skip this step if you used iCloud Drive to copy the .ovpn profile to your device.

    You need to get the following files on your iOS device:

    iphone.ovpn
    

    Copy this file from your OpenVPN server to the computer running iTunes. Then connect your device to iTunes with a cable.

    1. Open iTunes
    2. Select your device at the top right
    3. Go to the Apps tab
    4. Scroll to the file sharing section
    5. Select the OpenVPN application
    6. Add the iphone.ovpn
    7. Sync your device

    Test your iOS device

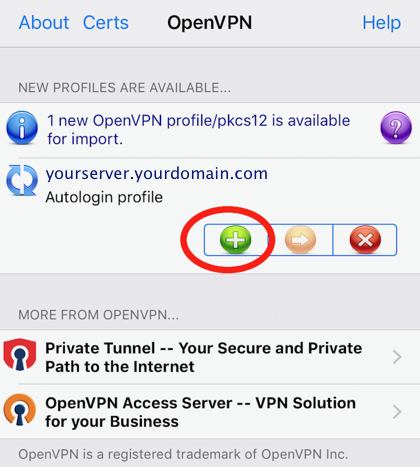
    Open the OpenVPN client. You will see a notice that a new configuration has been imported and you need to accept this configuration.

    As it might not work straight away, you need to monitor /var/log/openvpn.log on the server to watch for any errors.

    Now try to connect and enjoy.

    Conclusion

    You should be able to keep your VPN enabled at all times because battery usage overhead should be minimal. If you are unable to connect to your VPN when you are at home behind your own firewall, you need to check your firewall settings.

    Updated 20130123 with keepalive option. Updated 20130801 with extra server push options for traffic redirection and DNS configuration Updated 20180618 as substantial rewrite of the original outdated article.

Page 1 / 8