Background
In 2020 - inspired by Low Tech Magazine - I decided to make this blog solar-powered. At that time, I was already self-hosting this blog on a Raspberry Pi at that time so it felt like a fun little project.
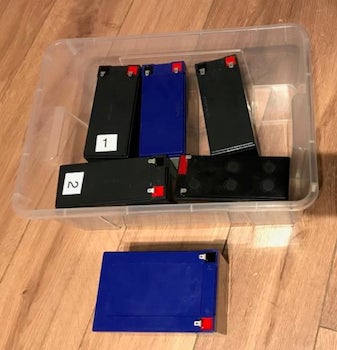
It all started with a small 60W solar panel and a few small 'motor cycle' lead acid batteries. In part due to the sub-optimal orientation of my balcony, the 60W panel did not generate enough energy. So I added a bigger 150W panel in parallel with the 60W panel and added an old lead acid car battery, as documented in my first blog post about the project.
As this still didn't generate enough solar power to keep the Raspberry Pi running 24/7, I added two 370 Watt solar panels and a large 280Ah 12V lead-acid battery, as documented here.
During spring and summer, the two large solar panels provided enough power to charge the battery and even run my Mac mini and dual monitor setup for many hours. So I added an inverter (converts DC to AC) to make this possible.
As this setup worked great, I decided to replace the lead-acid battery with an
LFP battery, which was a huge improvement.
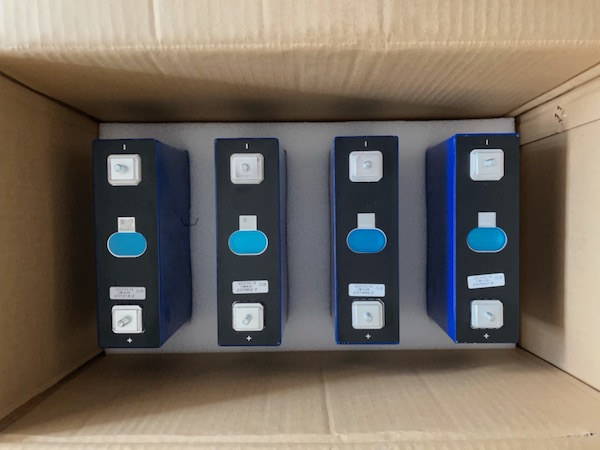 Four 230Ah LFP prismatic cells (~2.7 kWh)
As a ship of Theseus, not a single component of that first solar setup remains. And I'm no longer only powering the 3W Raspberry Pi hosting this blog, or just my computer and monitors.
My solar-setup now powers my apartment.
I want to acknowledge that DIY solar-battery systems is starting to become more mainstream and in that sense my setup is not special. People building DIY 1-phase or 3-phase systems with 15kWh - 64kWh+ of battery storage is well-documented on Youtube.
Yet, I think my small setup might still be interesting and I just wanted to share my build.
About my apartment
I live in an apartment in The Netherlands. I've placed two solar panels on my balcony, which is facing west. Direct sunlight only appears at around 16:00 in the afternoon, which is far, far from ideal.
This is an important limitation of my setup and the daily solar yield of the two panels would be much higher if my balcony would have faced south. I'm convinced I could run my home most of the time on solar from April until early October with just two 370W panels.
An overview of my current setup
It's a 12V system where all components are connected to a shared busbar. It consists of two 370W solar panels, each connected to its own solar (MPPT) controller. There are two batteries based on LFP with a combined capacity of around 6kW. The inverter is grid-connected and can charge from the grid or discharge towards the grid. A 20x4 LCD display connected to the Pis GPIO pins shows some basic info.
Some 12V 'cigarette lighter' style outlets are used to charge power banks, tablets and other battery-powered gizmos. I've also used a boost-converter to power 30V DC led lights to illuminate my living room.
The shunt is a device that measures how much energy is flowing through the system and it is the most accurate device to gauge state-of-charge of the batteries. Although statistics about the batteries and individual cells can be read through bluetooth, the state-of-charge estimate of the individual BMSses (Battery Management System) isn't reliable enough.

I want to acknowledge that the wiring of my setup isn't neat or pretty, but I've done my best to keep everything safe to the best of my knowledge.
Since the last blog post about my solar setup, the following changes have been made:
- Added a second MPPT solar charge controller, one for each 370W panel
- Added a grid-connected inverter to keep my house energy meter at zero
- I'm reading P1 energy data in real-time from my energy meter via P1
- Switched from a fixed to a dynamic energy tariff for my grid connection
- Added a second 280Ah LFP battery (~3.3kWh for a total of ~6kWh)
- Added two 12V 25A battery chargers to speed up charging (1 visible)
- Use zigbee to enable / disable the auxiliary chargers
- Bought proper battery cases for the cells and BMS
- Added 1W temperature sensors
These changes will be discussed in this blogpost.
Extra MPPT Charge Controller
Initially, I had the two solar panels connected to a single solar controller (MPPT 100/30) in parallel, but the output of this MPPT is limited to 30A x 12V = 360W. By adding a second solar controller - one for each panel - 576W peak power was reached in June. Adding the second MPPT clearly removed a bottleneck.
The new grid-connected inverter
By far the most important change is the new grid-connected inverter.
My original Victron Phoenix inverter is intended for off-grid usage only and can't be connected to the grid, so I had to replace it.
I bought the Victron Multiplus II 12/1200/50 model. This is a 12 Volt model with a max output of 1kW and can charge with 0.6kW.
The Multiplus inverter can use the grid to charge the batteries, but can also inject power back onto the grid. In other words: if your home is using 200W and the inverter injects 200W onto the grid, the utility energy meter reads zero. We often talk about 'keeping the meter at zero'.
Victron does sell a complete system to manage and control your solar-battery setup, but I wanted to build the energy management system myself, as a hobby project.
The main goal for this new inverter is to charge the batteries when energy is cheap, and use the energy from the batteries and inject the energy back into the grid when energy is more expensive. People may be confused by the idea of 'cheap' or 'more expensive' kWh prices, as many will pay a fixed flat kWh rate.
However, since a couple of years it's possible in The Netherlands (and elsewhere) to get a 'dynamic' electricity contract, with fluctuating kWh prices.
About dynamic energy tariffs (or day-ahead tariffs)
When you have an electricity contract with an energy provider that supports dynamic pricing, you don't pay a flat fee per kWh. Instead, the day is chopped up in 15 minute segments, and each 15-minute segment has its own kWh price.
Around early afternoon (14:00), you'll receive the quarter-hour prices for the next day, so you can anticipate when to run large consumers like a washing machine, dishwasher or anything else that uses a lot of energy (a car perhaps?).
 Grafana dashboard showing dynamic energy prices per quarter-hour
By itself fluctuating kWh prices may sound like a nightmare: why would you ever want to switch to such a provider, where prices fluctuate every 15 minutes?
Fortunately, electricity prices aren't that erratic. The early mornings and early evenings are more expensive, the 10:00-17:00 time window is often very cheap due to (an excess of) solar energy. And sometimes the entire night can be cheap due to tons of wind power being available. In addition, you can almost always count on low kWh prices in weekends, as many businesses and organizations are closed.
As the dynamic price data is available through an API, you can setup automation to take advantage of both cheap and expensive hours. You may decide to charge the batteries when a cheap rate is active, and inject the energy from the batteries back into the grid when energy prices are high, to keep the meter at zero.
My dishwasher and washing machine I can't control through software. But I can look at my day-ahead pricing dashboard and plan when to run these devices, which isn't an inconvenience and works well. It takes almost no effort to change my habits, save some money and be more gentle on the environment.
Some people have solar setups that produce much more energy than they consume on a daily basis. They decide to trade: to discharge their batteries as fast as possible when energy is expensive and make sure the batteries are as empty as possible for the next day, to capture as much solar yield as possible from their panels. I myself are only aiming to reduce my carbon footprint and I'm not trading.
Round-trip efficiency
Charging power from the grid into the batteries is around 90% efficient. Turning battery power back into grid power is also around 90% efficient. With some additional losses, it's best to use a 75% round-trip efficiency as a rule of thumb. The price difference between low and high prices must be substantial enough to offset the round-trip efficiency losses.
About inverter sizing
It's true that my 1000W inverter can't power large appliances like washing machines or dishwashers. Because I run those appliances on grid power when energy is cheap, the inverter never has to power them (or compensate their energy usage).
The energy usage of my home hovers between maybe 70W (idle) to 400W tops when the fridge runs and my (lab) servers are running. Most of the day, the load never surpasses 300W and that's the kind of load I mostly target with this inverter.
I sized my inverter large enough that with most common loads (<300W) the inverter operates silently without it's fan spinning (The fan is really loud).
The batteries
I started out with 4 x 230Ah prismatic LFP cells priced around 500 Euro including taxes, thus around 125 euro a piece. Later I bought 4 x 280 Ah cells for a total of 223 Euro including taxes, thus 55 euro a piece. More capacity for less then half the price: amazing.
 These battery cases fit both 230Ah and 280Ah cells
Only recently I've noticed that these very good deals have dried up, probably due to recent global events, but prices are still much lower than when I initially bought my 230Ah cells.
I bought these gray battery cases from a vendor on Ali-express (no affiliate) and I can recommend them. I paid around 63 euros a piece including shipping (for a pair).
 A 280Ah prismatic LFP cell
Battery Management Systems (BMS)
The BMS is a critical safety device that prevents individual cells from going out of spec in terms of voltage and current. This prevents damage to the cells or can even prevent a fire (or explosion).
The 230 Ah battery is using an older Daly BMS. The 280 Ah battery is using a JK BMS. My software communicates with both batteries through Bluetooth to keep track of individual cell voltages.
The Daly BMS is terrible at balancing the cells, so I've added a separate balancer device that start balancing cells when they reach 3.45V. The JK BMS has an on-board 2A balancer and that's enough to keep the 280Ah cells balanced.
Technical setup of my solar management system
This blog is running on a Raspberry Pi 4. This Pi is also running my software (Python) that controls my solar setup. It runs Zigbee2MQTT with a Zigbee dongle to remote control a switch to enable/disable (extra) 12V chargers.
The Victron gear is mostly connected through ve.direct, which is a serial protocol (using USB-to-serial cables). Device data is read and submitted to an InfluxDB server, and Grafana is used to turn the data into dashboards.
The actual 'dashboard' located in my living room is a portable Raspberry Pi 15 inch monitor, hooked up to a Raspberry Pi 4 that runs a Linux desktop in kiosk mode, just to start a browser and show a playlist of various Grafana dashboards. The Pi monitor isn't power hungry but I'm using an Ikea Zigbee motion sensor to turn off the display when there's nobody in the room.
I've added several DS18B20 temperature sensors connected to GPIO pins of the Raspberry Pi. These temperature sensors are digital and use the 1-wire protocol. The temperature data is used as part of a safety mechanism in the software. If one of the sensors crosses the 65C mark, the system stops charging or discharging.
Controlling the solar-battery system
I've written software to extract relevant data from devices and API endpoints. Based on the input data, the system decides to charge, discharge or 'do nothing'.
 data goes in and a decision to charge, discharge or stay idle comes out
The actual decision making can become complex very quickly because of all the variables involved. For example, tomorrow's prices may be low, but I have to keep the battery charged enough to get the apartment through the night (when prices are high). Although it would be more efficient to charge tomorrow, I do have to calculate how many hours to charge today as not to prematurely deplete the batteries.
There are so many different inputs that finding the optimal solution will be very difficult. The decision making can be captured with regular if-then-else statements - and that's what I'm currently doing - but it will probably never be optimal or efficient.
Some examples that can be used as input to create a charge / discharge plan:
- Average base load of the home (expected power usage)
- Expected solar yield
- Expected electricity prices based on wind forecast
- Expected temperature impacting heat pump usage
- Expected temperature impacting air conditioning
- Next day energy prices
- Current battery state-of-charge.
- State of Charge of EV
The optimization problem at hand seems akin to the knapsack problem. This kind of problem is solved with constrains programming. Google has a tool called OR-Tools that does exactly this.
I'm currently only aware of a Home Assistant plugin called "Day Ahead Optimizer" that uses the python-mip package (for Mixed-Integer Linear programs(MIPs)) to calculate the optimal charging and discharging strategy. This software actually integrates into a solar-battery management system, managing charging and discharging behavior.
Maybe there are other solutions out there as well.
Keeping the energy meter at zero
To keep the energy meter at zero, the software must know how much energy is being consumed in the first place. Fortunately, Dutch smart grid energy meters all have a P1 port (Dutch), a standard serial interface that spits out energy usage data (and more) every second.
 Reading and processing P1 data
I'm using a Raspberry Pi and read this data from the energy meter and send it to an MQTT server. My solar control software (as discussed previously) is reading the relevant MQTT topic and uses this P1 data to control the inverter, injecting more or less power, depending on current electricity usage.
When charging is required, the chargers are enabled by sending a MQTT message that gets picked up by Zigbee2MQTT and send to a Zigbee switch.
Communication with the Victron Multiplus requires a Victron MKIII-USB device as the Multiplus inverters talk a non-standard (but open, documented) protocol called VE.Bus.
 Energy management software controlling chargers and inverter
From a safety perspective, I found it interesting that the Multiplus inverter requires a message every few seconds or it will stop whatever it is doing (charging or discharging) and become idle. This is a nice example of a fail-safe mechanism.
Extra 12V chargers
In addition to the 50A charge capacity of the Multiplus, I've added two extra 12V, 25A chargers to the system to speed up charging. The total charging current is 100A on paper, or about 1kW of power. With 6kWh of capacity, it takes around 6+ hours to fully charge the batteries.
I'm using the old Atlas charger/inverter as shown in the picture. This older model can only charge from the grid and not discharge into the grid.
I'm also using a Victron Blue Smart Charger that can also charge with 25A.
Both chargers are connected to a Zigbee 230V switch and they are enabled/disabled by software.
I do think that this approach with multiple chargers to speed up charging is not very efficient as each separate charger has their own charging losses. It would be better to have one single, beefy charger but those are expensive.
A 12 Volt system is not a great choice
As a rule of thumb, current is 'bad' because current times resistance results in heat losses. To keep resistance low, copper cables with less resistance are required, thus cables with a larger diameter are necessary. Such cables can become expensive quickly.
A 12V system needs to output 10A for a 120W load. A 24V system only needs 5A and a 48V system only 2.5A. 24V and 48V can therefore be build with much thinner cables and 24V and 48V equipment is much cheaper for a certain output than 12V equipment.
If possible, I would always try and use 48V or at least 24V for a solar-battery setup.
My solar setup as a UPS (Uninterruptible power supply)
As a nice bonus, the Multiplus inverter has a secondary output (AC OUT) that is battery protected. By default the AC OUT port is connected to the grid. In case of a power failure, relays within the inverter switch within 20ms to the battery, thus all (computer) equipment will keep running.
It's quite easy to grab a power extention cord and power my fridge from the batteries during a power outage.
Although not very cheap, it's quite easy to build your own LFP-powered UPS using an inverter/charger and an LFP battery. It's probably a better solution than most lead-acid battery based UPS devices where you often discover the batteries are shot during an actual power outage.
Some people are motivated by grid outages to put their entire home behind Multiplus inverters, so they can run 'off-grid' during a (prolonged) power outage.
Closing words
My particular hobby solar setup won't recuperate it's cost, but that's ok. I have an intrinsic afinity with renewables and I want to be mindful about my own carbon footprint. Working with solar, batteries and control software has been a ton of fun and I have a working system that makes me happy.
And maybe, just maybe, somebody else reading my blogposts about my solar setup will be inspired to start a solar-battery project of their own.
Take a look at Will Prowse's YT channel and The Offgrid Garage YT channel.
If you have any comments email me, see the About page for contact details.