Introduction
When it comes to dealing with storage in a DIY NAS context, two important topics come up:
- Unrecoverable read errors (UREs) or what old people like me call 'bad sectors'
- Silent data corruption (data corruption unnoticed by the storage layers)
I get a strong impression that people tend to confuse those concepts. However, they often come up when people evaluate their options when they want to buy or build their own do-it-yourself NAS.
In this article, I want to make a clear distinction between the two and assess their risk. This may help you evaluating these risks and make an informed decision.
Unrecoverable read errors (due to bad sectors)
When a hard drive hits a 'bad sector', it means that it can't read the contents of that particular sector anymore.
If the hard drive is unable to read that data even after multiple attempts, the operating system will return an Unrecoverable Read Error (URE).
This is an example (on Linux) of a drive experiencing read errors, as pulled from /var/log/syslog (culled a bit for readability):
sd 0:0:0:0: [sda] tag#19 FAILED Result: hostbyte=DID_OK driverbyte=DRIVER_SENSE
sd 0:0:0:0: [sda] tag#19 Sense Key : Medium Error [current]
sd 0:0:0:0: [sda] tag#19 Add. Sense: Unrecovered read error
sd 0:0:0:0: [sda] tag#19 CDB: Read(10) 28 00 02 1c 8c 00 00 00 98 00
blk_update_request: critical medium error, dev sda, sector 35425280 op 0x0:(READ)
sd 0:0:0:0: [sda] tag#16 FAILED Result: hostbyte=DID_OK driverbyte=DRIVER_SENSE
sd 0:0:0:0: [sda] tag#16 Sense Key : Medium Error [current]
sd 0:0:0:0: [sda] tag#16 Add. Sense: Unrecovered read error
sd 0:0:0:0: [sda] tag#16 CDB: Read(10) 28 00 02 1c 8d 00 00 00 88 00
blk_update_request: critical medium error, dev sda, sector 35425536 op 0x0:(READ)
If a sector cannot be read, the data stored in that sector is lost. And in my experience, if you encounter a single bad sector, soon, there will be more. So if this happens, it's time to replace the hard drive.
We use RAID to protect against drive failure. RAID (no matter the implementation) also can deal with 'partial failure' such as a drive encountering bad sectors.
In a RAID array, a drive encountering unrecoverable read errors is just kicked out of the array, so it doesn't 'hang' or 'stall' the entire RAID array.
Please note that this behaviour does depend on the particular RAID solution of choice1. The point is though that bad sectors or UREs are a common event and RAID solutions can deal with them properly.
The real problem with bad sectors (resulting in UREs) is that they can remain undiscovered until it is too late. So to uncover them in an early state, it's very important to run regular data scrubs. I've written an article specifically about this topic.
Silent data corruption
An unrecoverable read error means that we can't read (a portion of) a file. Although it is unfortunate - because we better have an intact backup of that file - we are also fortunate.
Why are we fortunate?
We are fortunate because the storage system - the hard drive and in turn the operating system - reported an error. We were able to diagnose the problem an take action.
But it is possible that bits and bytes get mangled without your hard drive, SATA controller or operating system noticing. Somewhere, somehow, a bit is read or transmitted as a 1 where it should have been a 0.
This is really bad, because this data corruption is undetected, it is 'silent', there is no notification.
Because imagine what happens: the corrupted file is happily backed up by your backup software, because it's unaware that anything is wrong. And by the time you discover the data corruption, the original pristine file is no longer part of the backup (rotated out). You are left with a lot of backups of a corrupted file. We encounter dataloss.
This is one of the scariest kinds of data loss. Because it's very difficult to detect. You'll have to constantly calculate the checksum of a file and verify it's still ok.
And that's - although rather simplified - exactly what ZFS does (amongst many other things). ZFS uses checksums at the block-level and thus assures with every read if the data contained in the block is still valid. ZFS is one of the few file systems that has this very powerfull feature (BTRFS is another example).
Regular RAID arrays (be it hardware-based or software-based) cannot detect silent data corruption (although it could be possible with RAID6). So it must be clear that ZFS is capable of protecting against a risk 'regular' RAID cannot cope with.
Is silent data corruption a significant threat for home DIY NAS builders?
Although silent data corruption is a very scary threat, from what I can tell there is no significant independant evidence that the risk of silent data corruption is so high that the average home DIY NAS builder should take this risk into account2.
Maybe I'm wrong, but I think many people mistakenly confuse UREs or unrecoverable read errors (caused by bad sectors) with silent data corruption. And I think that's wrong, because there's nothing silent about an unrecoverable read error.
The truth is that hard drives are in fact very reliable when it comes to silent data corruption, because they make heavy use of error detection and correction algoritms. A significant portion of the raw capacity of a hard drive is sacrificed to store redundant information to aid in detecting and correcting data corruption. According to wikipedia, hard drives used Reed-Solomon error correction in the past and more modern drives use LDPC.
These error correction codes asure data integrity. Although 'soft' read errors may occur, there is enough additional redundant information stored on the hard drive to detect errors and even reconstruct the data (to some extend). Your hard drive handles this all by itself, it's part of normal operation.
So this is my point: it's important to understand that there is a lot of protection against silent data corruption in a hard drive. The risk of silent data corruption is therefore small3.
Sometimes the read data is so garbled that even the error correction codes cannot reconstruct the data as it was originally stored and that's what we then experience as an unrecoverable read error. But the disk notices! And it will report it!. This is not silent at all!
To really create silent data corruption, something very special need to happen. And to be very clear: such events do happen. But they are very rare.
Somehow, a bit must flip and this event is not detected by the error correction algorithm. Maybe the bit flipped in the hard drive cache memory when it was read from the drive. Maybe it flipped during transport over the SATA cable.
But it's fun to realise that the SATA protocol also has error detection embedded in the protocol for reliable data transmission. It's error detection and correction all the way down.
The risk that silent data corruption happens is thus very small, especially for home users.
Again, make no mistake: the risk is real and storage solutions for larger scale storage solutions (SANs / Storage arrays) with hundreds, thousands or tens of thousands of drives do really have to take into account the risk of silent data corruption. At scale, even very small risks become a certainty.
Enterprise storage solutions often employ their own proprietary solutions to protect against silent data corruption. Although it depend on the particular solution4, it's often part of the storage array. ZFS was revolutionary because they put the data integrity checking in the filesystem itself.
So if you think the risk of silent data corruption is still high enough that you should protect yourself against it, I would recommend to consider using ECC memory to protect against corrupted data in memory. To be frank: I consider non-ECC memory a more likely cause of silent data corruption than the storage subsystem, which already employs all these error detection and correction algoritms. Non-ECC memory is totally unprotected.
Anekdote: I myself run a 24-drive NAS based on ZFS and it has been rock-solid for 6 years straight.
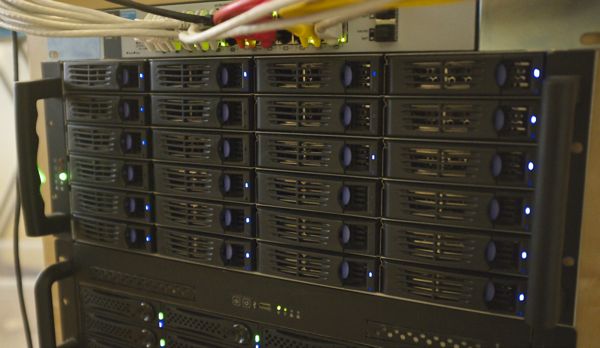
From time to time, I do run disk 'scrubs', which can take quite some time. Although I have many terrabytes of data protected by ZFS, not a single instance of silent data corruption has been detected. And I have performed so many scrubs that I've read more than a petabyte worth of data.
Anekdote: Somebody made a mistake and used the wrong type of cable to connect the hard drives to the HBA controller card. This caused actual silent data corruption. Because that person was running ZFS, it was detected so ZFS saved his data. This an example where ZFS did protect a person against silent data corruption.
Evaluation
I hope that the difference between unrecoverable read errors and silent data corruption is clear and that we should not confuse the two. They have different risk profiles associated with them.
Furthermore, I have argued that silent data corruption is real and a serious issue at scale, and that it is that is dealt with accordingly.
However, I've also argued that unless you are a home user running a small datacenter inside your basement, the risk of silent data corruption is so small that it is reasonable to accept the risk as a DIY NAS builder and not seek specific protection against it.
The decision is up to you. If you want to go with ZFS and protect against silent data corruption, you should also be aware and accept the cost of ZFS. I myself have accepted that cost for my own NAS, but it's OK if you don't. If you care about silent data corruption so much, please also consider using ECC-memory.
But in my opinion, you are not taking an unreasonable risk if you chose to go with Unraid, Snapraid, Linux kernel RAID, Windows Storage Spaces or maybe other options in the same vein. I would say that this is reasonable and up to you.
Remember: the famous vendors of home user NAS boxes all seem to use regular Linux kernel RAID under the hood. And they seem to think that's fine.
In the end, what really matters is a solution that suits your needs and also fits your budget and level of expertise. Can you fix problems when something goes wrong?
-
I've noticed while testing with this particular drive that the drive was not kicked out of the array, and it just kept trying to read, grinding the Linux software RAID array to a halt. Removing the drive from the array fixed this. There is a 'failfast' option that only works with RAID1 or RAID10. ↩
-
I don't want to suggest in any way that it would be wrong to take silent data corruption into account, but just to say I think it's not mandatory to really fret over it. ↩
-
The most significant risk is that enterprise grade hard drives use on-board ECC cache memory, whereas consumer drives use non-ECC cache memory. So silently corrupted data in the cache memory of the drive could be a risk. ↩
-
Storage vendors often choose to reformat har drives with larger sector sizes5. Those larger sectors then also incorporate additional checksum data to better protect against data corruption or unrecoverable read errors. ↩
-
https://www.seagate.com/files/staticfiles/docs/pdf/whitepaper/safeguarding-data-from-corruption-technology-paper-tp621us.pdf ↩