Preface
In this article I provide instructions on how to setup a local Ubuntu mirror using debmirror. To set expectations: the mirror will work as intended and distribute packages and updates, but a do-release upgrade from one major version of Ubuntu to the next won't work.
Introduction
By default, Ubuntu systems get their updates straight from the internet at archive.ubuntu.com. In an environment with lots of Ubuntu systems (servers and/or desktops) this can cause a lot of internet traffic as each system needs to download the same updates.
In an environment like this, it would be more efficient if one system would download all Ubuntu updates just once and distribute them to the clients. In this case, updates are distributed using the local network, removing any strain on the internet link1.
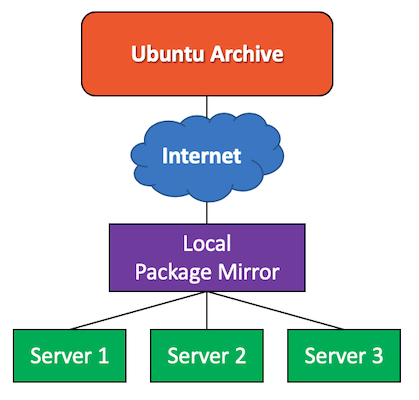
We call such a system a local mirror and it's just a web server with sufficient storage to hold the Ubuntu archive (or part of it). A local mirror is especially relevant for sites with limited internet bandwidth, but there are some extra benefits.
To sum up the main benefits:
- Reduced internet bandwidth usage
- Faster update proces using the local network (often faster than internet link)
- Update or install systems even during internet or upstream outage
The main drawbacks of a local mirror are:
- An extra service to maintain and monitor
- Storage requirement: starts at 1TB
- Initial sync can take a long time depending on internet speed
Mirror solutions
Ubuntu mirror script
This solution is geared towards ISPs or companies who like to run their own regional mirror. It is meant to mirror the entire, unfiltered Ubuntu package archive.
As of 2023 you should expect 2.5TB for archive.ubuntu.com and also around 2.5 TB for ports.ubuntu.com (ARM/RISCV and others).
This is a lot of storage and likely not what most environments need. Even so, if this is what you want to run you can consult this web page and use the script mentioned here.
debmirror
Based on my own research, it seems that the tool Debmirror is the most simple and straight-forward way to create a local Ubuntu mirror with a reasonable data footprint of about 480 GB (2023) for both Jammy AMD64 (22.04) and Focal AMD64 (20.04).
Based on on your needs, you can further finetune Debmirror to only download the pacakges that you need for your environment.
apt-cacher-ng
The tool apt-cacher-ng acts as a caching proxy and only stores updates that are requested by clients. Missing or new updates are only downloaded once the first client requests this download, although there seem to be option to pre-download updates.
Although I expect a significantly smaller footprint than debmirror, I could not find any information about actual real-life disk usage.
Creating an Ubuntu mirror with debmirror
Although apt-cacher-ng is quite a capable solution which many additional features, I feel that a simple mirror solution like debmirror is extremely simple to setup and maintain. This article will this focus on debmirror.
Preparation
1 - Computer
First of all we need a computer - which can be either physical or virtual - that can act as the local mirror. I've used a Raspberry Pi 4B+ as a mirror with an external USB hard drive and it can saturate a local 1 Gbit network with ease.
2 - 1TB storage capacity (minimum)
I'm mirroring Ubuntu 22.04 and 20.04 for AMD64 architecture and that uses around 480 GB (2023). For ARM64, you should expect a similar storage footprint. There should be some space available for future growth so that's why I recommend to have at least 1 TB of space available.
Aside from capacity, you should also think about the importance of redundancy: what if the mirror storage device dies and you have to redownload all data? Would this impact be worth the investment in redundancy / RAID?
It might even be interesting to use a filesystem (layer) like ZFS or LVM that support snapshots to quickly restore the mirror to a known good state if there has been an issue with a recent sync.
3 - Select a local public Ubuntu archive
It's best to sync your local mirror with a public Ubuntu archive close to your physical location. This provides the best internet performance and you also reduce the strain on the global archive. Use the linked mirror list to pick the best mirror for your location.
In my case, I used nl.archive.ubuntu.com as I'm based in The Netherlands.
Ubuntu Mirror configuration
01 - Add the storage device / volume to the fstab
If you haven't done so already, make sure you create a directory as a mountpoint for the storage we will use for the mirror.
In my case I've created the /mirror directory...
mkdir /mirror
... and updated the fstab like this (example!):
/dev/disk/by-uuid/154d28fb-83d0-4848-ac1d-da1420252422 /mirror xfs noatime 0 0
I recommend using the by-uuid or by-id path for mounting the storage device as it's most stable and don't forget the use the correct filesystem (xfs/ext4).
Now we can issue:
mount /mirror
02 - Install required software
We need a webserver installed on the mirror to serve the deb packages to the clients. Installation is straightforward and no further configuration is required. In this example I'm using Apache2 but you can use any webserver you're comfortable with.
If you want to synchronise with the upstream mirror using regular HTTP you don't need additional software.
apt-get update
apt install apache2 debmirror gnupg xz-utils
I think that using rsync for synchronisation is more efficient and faster but you have to configure your firewall to allow outbound traffic to TCP port 873 (which is outside the scope of this tutorial)
apt install rsync
Tip: make sure you run debmirror on a 20.04 or 22.04 system as older versions don't support current ubuntu mirrors and some required files won't be downloaded.
03 - Creating file paths
I've created this directory structure to host my local mirror repos.
/mirror/
├── debmirror
│   ├── amd64
│   │   ├── dists
│   │   ├── pool
│   │   └── project
│   └── mirrorkeyring
└── scripts


mkdir /mirror/debmirror
mkdir /mirror/debmirror/amd64
mkdir /mirror/debmirror/mirrorkeyring
mkdir /mirror/scripts
The folders within the amd64 directory will be created by debmirror so they don't have to be created in advance.
04 - install GPG keyring
gpg --no-default-keyring --keyring /mirror/debmirror/mirrorkeyring/trustedkeys.gpg --import /usr/share/keyrings/ubuntu-archive-keyring.gpg
05 - Create symlinks
We need to create symlinks in the apache2 /var/www/html directory that point to our mirror like this:
cd /var/www/html
ln -s /mirror/debmirror/amd64 ubuntu
06 - Configure debmirror
Debmirror is just a command-line tool that takes a lot of arguments. If we want to run this tool daily to keep our local mirror in sync, it's best to use a wrapper script that can be called by cron.
Such a wrapper script is provided by this page and I have included my own customised version here.
You can download this script and place it in /mirror/scripts like this:
cd /mirror/scripts
wget https://louwrentius.com/files/debmirroramd64.sh.txt -O debmirroramd64.sh
chmod +x debmirroramd64.sh
Now we need to edit this script and change some parameters to your specific requirements. The changes I've made as compared to the example are:
export GNUPGHOME=/mirror/debmirror/mirrorkeyring
release=focal,focal-security,focal-updates,focal-backports,jammy,jammy-security,jammy-updates,jammy-backports
server=nl.archive.ubuntu.com
proto=rsync
outPath=/mirror/debmirror/amd64
The Ubuntu installer ISO for 20.04 and 22.04 seem to require the -backports releases too so those are included.
Limitations I've not been able (yet) to make the do-release-upgrade process work to upgrade a system from focal to jammy. I found this old resource but those instructions don't seem to work for me.
07 - Limiting bandwidth
The script by default doesn't provide a way to limit rsync bandwidth usage. In my script, I've added some lines to make bandwidth limiting work as an option.
A new variable is added that must be uncommented and can be set to the desired limit. In this case 1000 means 1000 Kilobytes per second.
bwlimit=1000
You also need to uncomment this line:
--rsync-options "-aIL --partial --bwlimit=$bwlimit" \
08 - Initial sync
It may be advised not to first run the initial sync before we configure a periodic cron job to do a daily sync. The first sync can take a long time and may interfere with the cron job. It may be advised to only enable the cronjob once the initial sync is completed.
As the initial sync can take a while, I like to run this job with screen. If you accidentally close the terminal, the rsync process isn't interrupted (although this isnot a big deal if that happens, it just continues where it left off).
apt install screen
screen /mirror/scripts/debmirroramd64.sh
09 - Setup cron job
When the initial sync is completed we can configure the cron job to sync periodically.
0 1 * * * /mirror/scripts/debmirroramd64.sh
In this case the sync runs daily at 1 AM.
The mirror includes all security updates so depending on your environment, it's recommended to synchronise the mirror at least daily.
10 - Client configuration
All clients should point to your local mirror in their /etc/apt/sources.list file. You can use the IP-address of your mirror, but if you run a local DNS, it's not much effort to setup a DNS-record like mirror.your.domain and have all clients reconfigured to connect to the domain name.
This is the /etc/apt/sources.list for the client
deb http://mirror.your.domain/ubuntu RELEASE main restricted universe multiverse
deb http://mirror.your.domain/ubuntu RELEASE-security main restricted universe multiverse
deb http://mirror.your.domain/ubuntu RELEASE-updates main restricted universe multiverse
The RELEASE value should be changed to the appropriate ubuntu release, like bionic, focal or jammy.
If you have an environment with a lot of Ubuntu systems, this configuration is likely provisioned with tools like ansible.
11 - Monitoring
Although system monitoring is out-of-scope for this blog post, there are two topics to monitor:
- disk space usage (alert if space is running out)
- succesfull synchronisation script execution (alert if script fails)
If you don't monitor the synchronisation process, the mirror will become out-dated and will lack the latest security updates.
Closing words
As many environments are either cloud-native or moving towars a cloud-environment, running a local mirror seems less and less relevant. Yet there may still be environments that could benefit from a local mirror setup. Maybe this instruction is helpful.
-
You may notice that cloud provides actually also run their own Ubuntu archive mirror to reduce the load on their upstream and peering links. When you deploy a standard virtual machine based on Ubuntu, it is by default configured to use the local mirror. ↩
