I have released LIFS, the Linux Iptables Firewall Script. This script allows you to setup a firewall within minutes. It is easy to use, yet very powerful. It uses Iptables and even improves upon some limitations of Iptables.
Every person who has to maintain some kind of Iptables-based firewall should really look into LIFS. It will make managing your firewall much more convenient.
For more advanced purposes. LFS allows you to create object groups. These are groups of individual hosts, networks or services (tcp/udp).
Look at this example of object groups in action. Read and understand.
HTTP_SERVICES="
    80/tcp
   443/tcp
"

WEB_SERVER_1=192.168.0.10
WEB_SERVER_2=192.168.0.11

WEB_SERVERS="
    $WEB_SERVER_1
    $WEB_SERVER_2
"

allow_in any "$WEB_SRVERS" any "$HTTP_SERVICES"
As you can see, a single firewall rule in fact creates 4 rules, one for each host and port. This functionality can be found in commercial based firewalls but it is not build-in into Iptables. LIFS fixes this.
LIFS is a continuation of LFS, which has been discontinued.
If you have any comments email me, see the About page for contact details.
There is one problem. When the robot is not connected to the charger, the batteries are depleted very fast. Even if the batteries are not entirely depleted and the robot can still display the menu, the clock loses it's time. Every time the robot gets a too low charge, you have to set the date and the time, which is a bit of a hassle. This does not happen often though. The robot seems to be consistently operating properly.
Update 1 March 2012
It seems that the batteries have worsened so bad that the device cannot clean my living room without 3x recharging. I have to return the product for repair.
I had the device scheduled to clean every other day, about 4x per week.
Update 20 March 2012
I received a brand new device that is now charging. I hope this one will last longer.
Update 23 March 2012
It seems that the brand new robot is also flawed, it just goes nuts. Seems to be up-to-date regarding software, so have to return this one also. (read below!)
Update 31 March 2012
I did not return this device and did some additional cleaning cycles. All cylces where performed withouth problems. The device choked om some cloth and some cables I forgot to cleanup, but it does seem to operate properly. So I will keep it.
Uodate 4 May 2012
Still works like a charm. I'm currently very hapy with it. If the batteries hold up, this device is really worth the money.
Uodate 8 June 2012
I had some critical battery errors and contacted support. They asked me to
check if the batteries are connected properly. So I just pushed on the connectors to make sure they are firmly connected. After that, I didn't see
any more battery errors and the device is still cleaning like a charm.
Original article:
So I bought a robotic vacuum cleaner. The first question is 'why would you spend some serious money on such a device? On a toy?'. I have some rationalisations for buying this device, but honestly, one reason is that sometimes I just like to buy a new toy. Something to play with. Excuse me for being human. In this blog post I want to explain to you why I bought a Neato XV-15 and not another product.
Now I did say that I have some rationalisations, so let's start. One rationalisation is that I hate vacuum cleaning. Since I have two cats, vacuum cleaning once a week may not be enough. And I'm not going to clean more frequently. So you can accept it or if you can spare a little dough, buy a robotic vacuum cleaner that cleans your house when you're not at home.
So let's introduce the Neato XV-15.
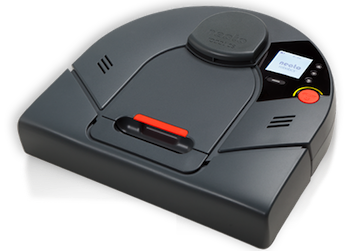
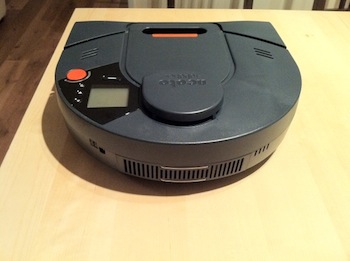
The Neato XV-15 Vacuum cleaning robot
The XV-15 robot is made by Neato Robotics, a young startup that seems to be started purely for this device. The company started with the XV-11 for the US market, and the XV-15 is identical except that it is meant for the European market. A new XV-12 has also been announced, which seems to be identical to the other two machines, except for the color (white).
The robot automatically vacuums your house while you're away or minding your own business. I't can't do anything else, but not having to vacuum all the time is kinda cool, right?
I bought the XV-15 in The Netherlands for 500 euros. The XV-11 can be had for around $400 excluding taxes or maybe even for less at Amazon. Not very cheap, but competitively priced compared to other robots on the market.
How the robot works
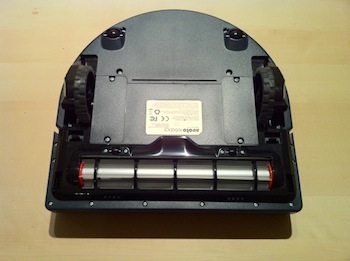
The XV-15 has a rubber brush at the front that rotates quite fast and that brush scoops up the dirt. Just behind the rubber brush, a vacuum mouth is present. Anything sucked up through that mouth enters the dustbin. The actual vacuum motor is at the back of the dustbin, protected by the dust filter of the dustbin. The XV-15 is a true vacuum and Neato claims that vacuuming power is way stronger than any other robot on the market. Based on the noise, that may be true.
On top of the XV-15 you can find an LCD screen for configuring the robot and the turret housing its special secret weapon: laser sight. This is the cool part.
The XV-15 has a laser system mounted on top that allows the robot to locate objects and walls. It is capable of creating a map of its surroundings. Anything the laser can 'see' will be avoided. The robot will not bump into any objects it can see. This is in stark contrast to products like the iRobot Roomba, which just bumps into everything. The XV-15 does have a front bumper though, because anything below the laser turret cannot be seen. Thus the robot does bump into things occasionally but it does a hard job trying not to.
The laser system is not just for preventing collisions with furniture. Being able to generate a map of your house allows the robot to clean your house in an efficient manner. Robots like the Roomba just randomly zigzag through your house. If you do that long enough, chances are high that most of your house gets cleaned, which it will.
The XV-15 only covers each spot once, and thus is able to clean your house much faster. It first cleans the perimeter of a room, hugging the walls. It then cleans the room in straight lines, like a swimmer in a pool. It remembers where it has cleaned or not and will come back later to a spot if something (like humans or pets) was occupying an area that can now be cleaned.
My living-room, kitchen and entrance are cleaned in 40 minutes. An area of 40 square meters or about 420 square feet.
When you see the XV-15 doing it's job, you may tend to stare at it longer than you may want to. It's just fascinating to see the device effortlessly navigating around your house. And it doesn't need stuff like battery operated 'light houses' like the Roomba's need. It is truly autonomous except for emptying the dust bin.
The XV-15 seems to divide the rooms it detects in parts and will start cleaning those parts one after another. As said earlier, the robot will continue cleaning where it had left off if the batteries are low and needs recharging.
The robot has no problem detecting stairs. Neato has also provided a roll of magnetic strip that can be used as a boundary marker. The robot will not cross this strip and will clean around it.
However, how smart the XV-15 may be, you need to make your house robot-proof. The first time you start cleaning with the Neato, it is advised to monitor it's progress and 'fix' difficult spots in your house. I have no experience with other robots, but I think that this is true for all of them.
The robot is just low enough that it can clean underneath my central heating radiators, which is very nice. It also has no trouble cleaning under my bed, an area which seems to collect dust very fast.
The robot has never had any problems finding the base. It gently wiggles it's behind towards the base until it has a connection. It then informs you with a sound that it has finished cleaning.
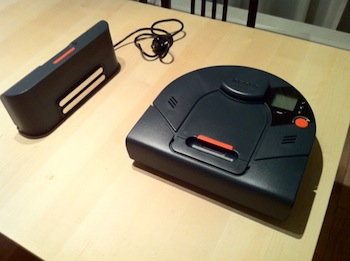
Docking station
The XV-15 comes with a docking station that allows the device to automatically recharge for the next run. The XV-15 will return to the docking station if the batteries are low. When recharged, the XV-15 will continue cleaning where it left off. If you have a single story apartment, the XV-15 will thus clean the entire apartment all by itself, even if it can't clean your home in one take on a single battery charge. After recharging, the unit will just return to the spot where it aborted cleaning to recharge and continue cleaning.
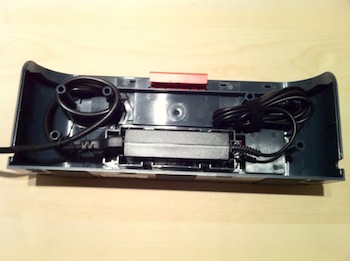
The docking station allows you to put excess power cord into the station itself, to keep cable clutter to a minimum. You can also reroute the cable to exit the station from either the left side or right side.
Scheduling
The robot can start cleaning with a press of the big orange button. The robot will start cleaning and return to the docking station when finished. Ideally, you want to have the robot clean the house when you're not around. Fortunately you can set a schedule for all seven days of the week.
The robot has a clear LCD screen with a very easy menu for setting the clock and entering a schedule. A few simple buttons allows you to enter a schedule, which probably has to be done once. I have it set to clean every other day except for the weekend.
Scheduling is extremely simple: for all seven days of the week, you can configure a start time or choose not to clean that day. That's all.
Noise level
When you start the XV-15 for the first time, you will be surprised by the of noise this little device generates. The vacuum motor is loud, but the rubber brush adds an additional roaring and rattling sound to it that is just almost unbearable.
The rubber brush keeps hitting the floor causing the loud rattling sound. I had to add some felt strips on the bottom to raise the robot a little bit from the ground. This eliminated the rattling, but the robot is very loud. Keep this in mind.
I think the noise level is the biggest downside of this robot.
Cleaning performance
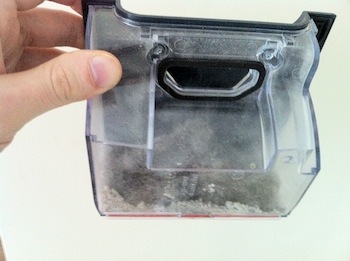
The picture shows what the XV-15 can collect during a sweep. I dit not perform any scientific tests to verify the cleaning performance of the robot, but any visible dirt is always devoured by the robot. I'm personally very pleased with the results.
I found a source written in Italian that seems to suggest that the XV-15 does a significantly worse job of cleaning stuff (67%) than the Roomba 780 (97%) robot, but it is an artificial test that does not use the stuff it is supposed to clean: (fine) dust and hair. However, it thus may be possible that the dumb Roomba's clean better. I don't know.
I only can tell you that even if you clean daily and you have some pets, you will find quite some stuff inside the dustbin after each run.
Maintenance
The iRobot Roomba range of products seem to require quite some maintenance. The biggest issue with the Roombas is the fact that you need to clean out hair from the bearings and brushes after each run. This is not necessary with the XV-15.
I don't know how much time cleaning of a Roomba takes, but I have an issue with that: why bother with a robot if you have to clean the robot instead of the house itself? Yes cleaning the robot takes less time, but it's probably no fun either.
The only thing that you need to do when the XV-15 is finished: empty the dustbin and clean the filter. That will take no longer than 30 seconds I guess. No need to clean up the brush or bearings. It is of course advised to inspect the brush and bearings now and then.
Checking the condition of the rubber brush and bearings is very easy. The brush guard can be removed without tools in seconds. Removing the rubber brush is just as easy and cleaning the axles shouldn't take long if ever required. I've never had to clean the brush itself. It seems that hair gets sucked up and doesn't stick to the brush.
Inside the box
The XV-15 comes with an additional rubber brush and four additional filters. According to Neato, you need to replace the filter every three to six months, depending on the frequency of your cleaning schedule. At 16 euros ($20) for 4 filters, that's not a big deal I guess.
I couldn't find any details on how long the rubber brush will last.
Updating the software
If you take a closer look at the back of the robot, you will notice that at the left side of the big exhaust vent, two small ports are present: for power (only useful if you do not use the docking station) and a USB port. The USB port can be used to update the software of the robot to the latest version.
Please note that Neato does not suply a USB cable so you need to get a mini USB cable when you want to update the software (firmware) of the robot. Bad news for Apple and Linux users: the firmware update software only runs on Windows. You can update the robot from Windows running inside VMware (Workstation or Fusion).
When the robot is connected to the computer through USB, you can communicate with the device through Hyperterminal or Minicom. If you like hacking your robot, continue reading here.
Conclusion
I'm quite happy with the robot. The biggest question is how long this device will last. At first, a robot like this seems a bit as a toy and it may be, but it is a pretty darn useful one.
The lack of maintenance compared to the other robots is a big plus to me. If you have to spend time on cleaning the robot itself, where is the benefit?
To me, the only downside is the noise.
It can't vacuum the stairs. It can't vacuum in every corner. But the device can clean the majority of your house more often than you would probably have done yourself.