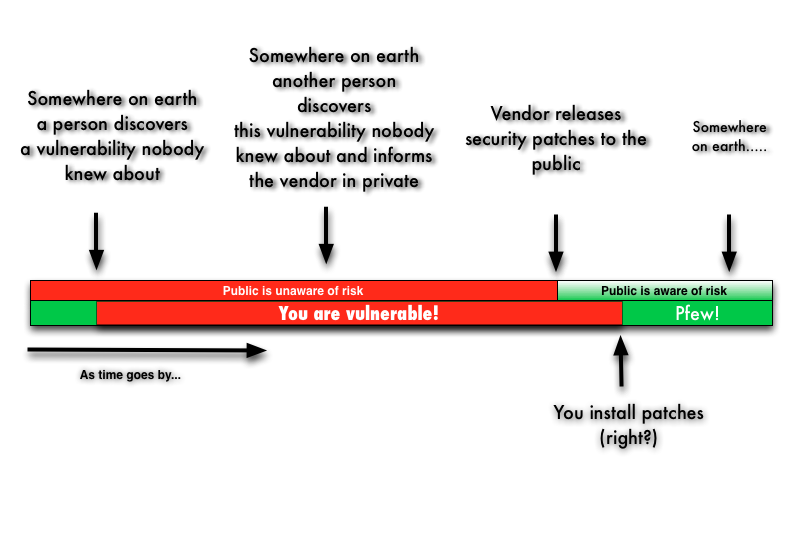
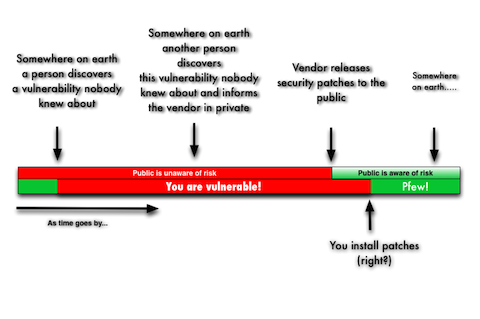
Many people asume that if you regularly update your computer, you are safe from hackers. But nothing could be further from the truth. Keeping your systems up-to-date only protects you against exploits for publicly known vulnerabilities.
Your systems are still not protected against privately known vulnerabilities and if hackers have zero-day exploits for such vulnerabilities, you are clearly having a false sense of security.
There couldn't be a better example than a high-risk vulnerability MS12-020 regarding the Microsoft Remote Desktop Protocol interface, as present on TCP-port 3389. Any unpatched Microsoft Windows-based server or desktop system can be compromised through this vulnerability. If the system is vulnerable and TCP-port 3389 is accessible, it is over. Your data is compromised.
Now, how many people knew about this vulnerability and for how long?
As we speak, someone may be reading these very words on your computer, just remotely, because of an undisclosed, unknown vulnerability. That sounds like paranoia, but it isn't.
Zero-day exploit market
There is a whole zero-day exploit market. Exploits are sold at enormous prices, as high as $100.000+ dollars. Only those who have the means (money) and a need for them will pay such prices. Buyers often tend to be government agencies and such.
There is no doubt in my mind that the computer I'm currently working on is affected by high-risk vulnerabilities I don't know of. It is very likely that for some of them, exploits exist. But look at the risk: who is going to spend a $100.000 exploit on me? But is the intelectual property of your company worth that much? Might sound way more realistic already, doesn't it?
You may hope that zero-day exploits are sold to trustworthy governments, but the marked is free. Anyone with sufficient means can buy them. Some sellers may scrutinize to whom they sell, but others?
This whole zero-day exploit market is a problem. Exploit-sellers have nothing to gain and only to loose from public disclosure of the vulnerability. As long it is undiscovered, it can be used by buyers. All parties involved in this market benefit from keeping systems insecure. From keeping systems unpatched.
So instead of informing the vendor of a security vulnerability so the public can be protected, knowledge of the vulnerability is sold to the highest bidder who then does who knows what with it.
For most organisations and people, the upside is that nobody will spend a $100.000 on you if you're not worth it. The reason is that every time an exploit is used, it can be discovered, rendering the exploit useless once a security patch is released.
Protecting against zero-day exploits
The question is then what to do against this kind of threat. What can you do to protect yourself against the risk of zero-day exploits if you perceive the risk as realistic towards your organisation.
The answer is a security strategy of defense in depth. It is not a solution that ends all problems, but it decreases the risk that your organisation gets compromised. It is about trying to diminishing risk to acceptable levels.
Assume that you will get compromised. Then, think about what can be done to reduce the impact of the hack. Will only one server get hacked, or the entire internal company network?
Defense in depth is the principle that you do not rely on one single security measure to protect systems and services from a compromise. There are many ways to implement such a strategy and I will name a few.
- Only expose those services towards the internet that are required for production.
- Make sure you have proper network segmentation in place, systems should not provide a stepping stone for an attacker to enter your internal company network.
- Never expose management interfaces such as RDP towards the internet directly, use an additional security layer (white list IP address or use VPN).
- Establish an emergency patch-policy to make sure that all systems are patched outside regular maintenance windows if high-risk vulnerabilities are reported.
- Monitor the heck out of your environment. Carefully try to log and alert to those events that may indicate a security breach.
- Audit your systems, regularly check for misconfigurations and resolve them.
- Select hardware and software vendors based on their security track record.
- Use different vendors and brands for different defensive layers.
- Consider internet off-limits for end-user systems processing sensitive information
Software is vulnerable so prepare for the worst.
If you have any comments email me, see the About page for contact details.