1. Benchmarking Cheap SSDs for Fun, No Profit (Be Warned)

    Sun 26 March 2023

    The price of Solid-state drives (SSDs) has dropped significantly over the last few years. It's now possible to buy a 1TB solid-state drive for less than €60. However, at such low price points, there is a catch.

    Although cheap SSDs do perform fine regarding reads, sustained write performance can be really atrocious. To demonstrate this concept, I bought a bunch of the cheapest SATA SSDs I could find - as listed below - and benchmarked them with Fio.

    Model Capacity Price
    ADATA Ultimate SU650 240 GB € 15,99
    PNY CS900 120 GB € 14,56
    Kingston A400 120 GB € 20,85
    Verbatim Vi550 S3 128 GB € 14,99

    I didn't have the budget to buy a bunch of 1TB of 2TB SSD, so these ultra-cheap, low capacity SSDs are a bit of a stand-in. I've also added a Crucial MX500 1TB (CT1000MX500SSD1) SATA1 SSD - which I already owned - to the benchmarks to see how well those small-capacity SSDs stack up to a cheap SSD with a much larger capacity.

    Understanding SSD write performance

    To understand the benchmark results a bit better, we discuss some SSD concepts in this section. Feel free to skip to the actual benchmarks if you're already familiar with them.

    SLC Cache

    SSDs originally used single-level cell (SLC) flash memory, which can hold a single bit and is the fastest and most reliable flash memory available. Unfortunately, it's also the most expensive. To reduce cost, multi-level cell (MLC) flash was invented, which can hold two bits instead of one, at the cost of speed and longevity2. This is even more so for triple-level cell (TLC) and quad-level cell (QLC) flash memory. All 'cheap' SSDs I benchmark use 3D v-nand3 TLC flash memory.

    One technique to temporarily boost SSD performance is to use a (small) portion of (in our case) TLC flash memory as if it was SLC memory. This SLC memory then acts as a fast write cache4. When the SSD is idle, data is moved from the SLC cache to the TLC flash memory in the background. However, this process is limited by the speed of the 'slower' TLC flash memory and can take a while to complete.

    While this trick with SLC memory works well for brief, intermittent write loads, sustained write loads will fill up the SLC cache and cause a significant drop in performance as the SSD is forced to write data into slower TLC memory.

    DRAM cache

    As flash memory has a limited lifespan and can only take a limited number of writes, a wear-leveling mechanism is used to distribute writes over all cells evenly, regardless of where data is written logically. Keeping track of this mapping between logical and physical 'locations' can be sped up with a DRAM cache (chip) as DRAM tend to be faster than flash memory. In addition, the DRAM can also be used to cache writes, improving performance. Cheap SSDs don't use DRAM cache chips to reduce cost, thus they have to update their data mapping tables in flash memory, which is slower. This can also impact (sustained) write performance. To be frank, I'm not sure how much a lack of DRAM impacts our benchmarks.

    Benchmark method

    Before I started benchmarking I submitted a trim command to clear each drive. Next, I performed a sequential write benchmark of the entire SSD with a block size of 1 megabyte and a queue depth of 32. The benchmark is performed on the 'raw' device, no filesystem is used. I used Fio for these benchmarks.

    Benchmark results

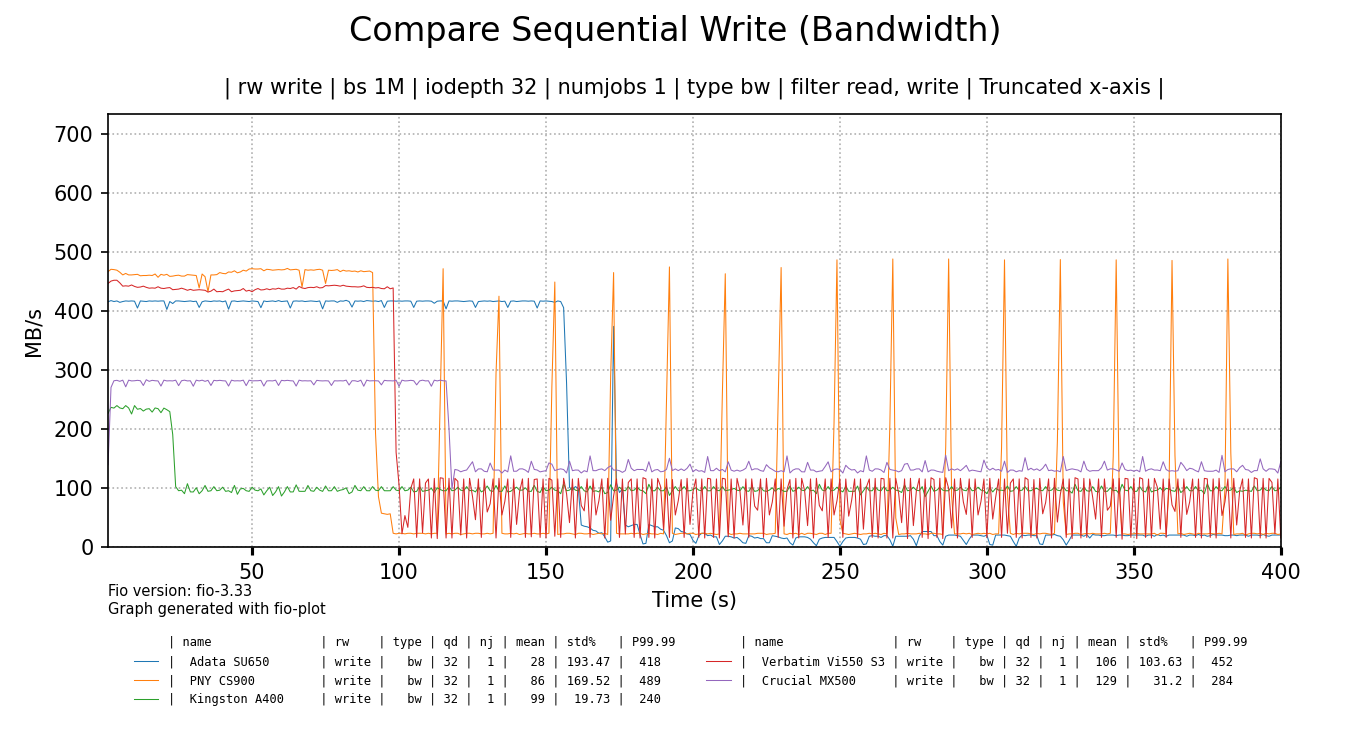
    The chart below shows write bandwith over time for all tested SSDs. Each drive has been benchmarked in full, but the data is truncated to the first 400 seconds for readability (performance didn't change). The raw Fio benchmark data can be found here (.tgz).

    chart

    click for a larger image

    It's funny to me that some cheap SSDs initially perform way better than the more expensive Crucial 1TB SSD5. As soon as their SLC cache runs out, the Crucial 1TB has the last laugh as it shows best sustained throughput, beating all cheaper drives, but the Kingston A400 comes close.

    Of all the cheap SSDs only the Kingston shows the best sustained write speed at around 100 MB/s and there are no intermittent drops in performance. The ADATA, PNY and Verbatim SSDs show flakey behaviour and basically terrible sustained write performance. But make no mistake, I would not call the performance of the Kingston SSD, nor the Crucial SSD - added as a reference - 'good' by any definition of that word. Even the Kingston can't saturate gigabit Ethernet.

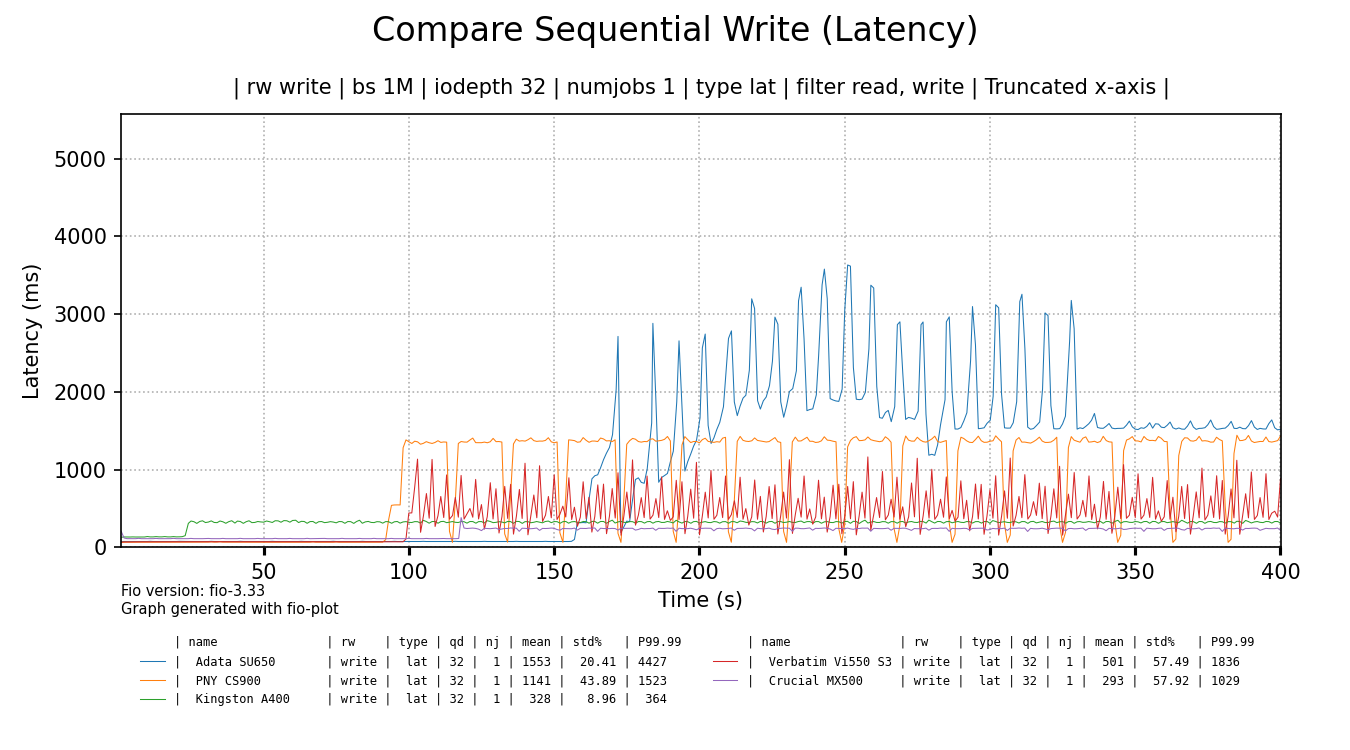
    The bandwidth alone doesn't tell the whole story. The latency or responsiveness of the SSDs is also significantly impacted:

    chart

    click for a larger image

    The Crucial 1TB SSD shows best latency overall, followed by the Kingston SSD. The rest of the cheap SSDs show quite high latency spikes and very high latency overall, even when some of the spikes settle, like for the ADATA SSD. When latency is measured in seconds, things are bad.

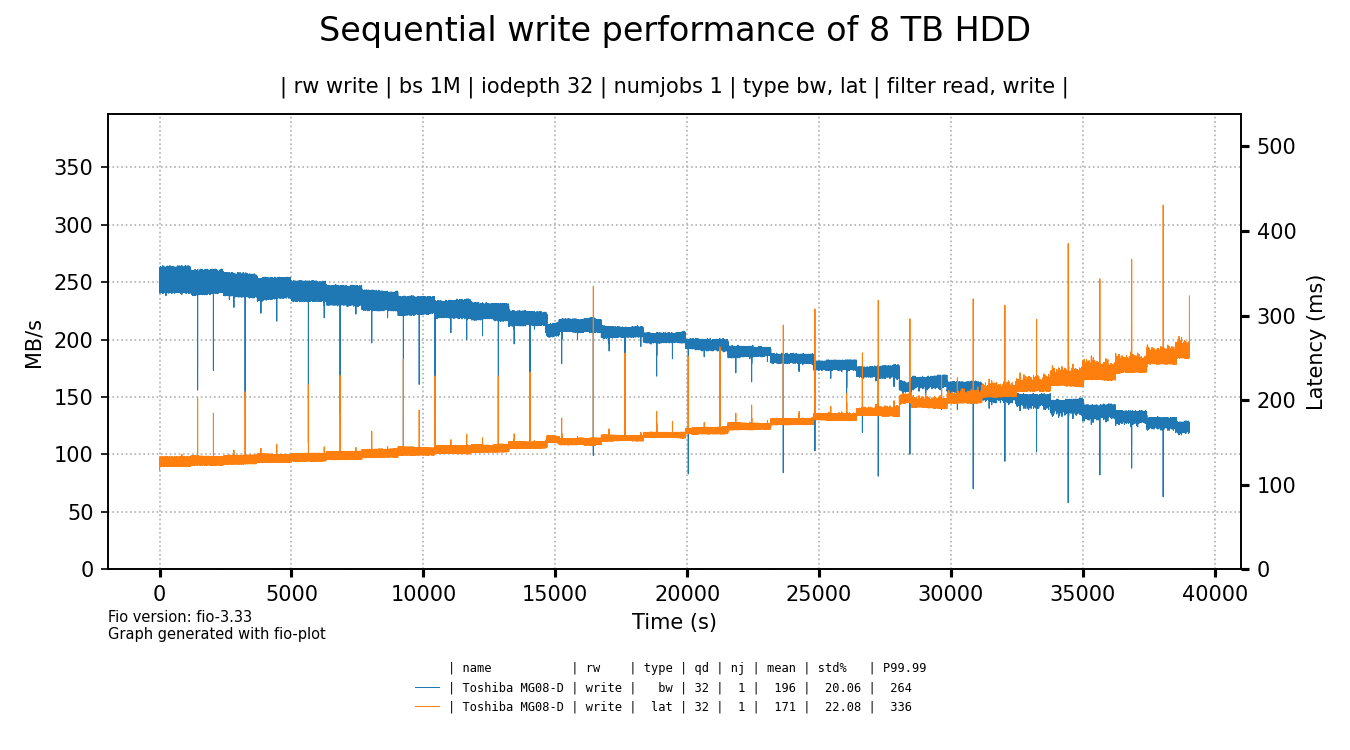
    To put things a bit in perspective, let's compare these results to a Toshiba 8 TB 7200 RPM hard drive I had lying around.

    chart

    click for a larger image

    The hard drive shows better write throughput and latency6 as compared to most of the tested SSDs. Yes, except for the initial few minutes where the cheap SSDs tend to be faster (except for the Kingston & Crucial SSDs) but how much does that matter?

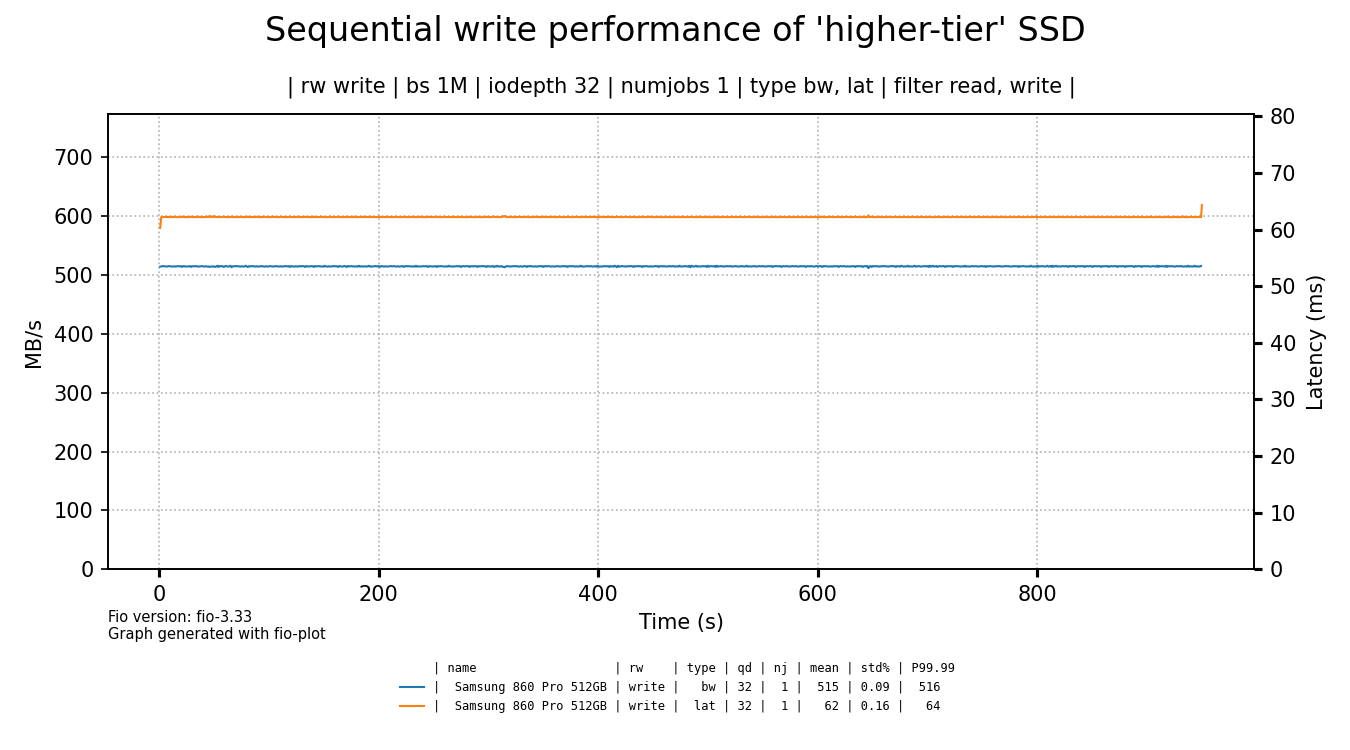
    As we've shown the performance of a hard drive to contrast the terrible write performance of the cheap SSDs, it's time to also compare them to a more expensive, higher-tier SSD.

    chart

    click for a larger image

    I've bought this Samsung SSD in 2019 for €137 euro, so that's quite a different price point. I think the graph speaks for itself, especially if you consider that this graph is not truncated, this is the full drive write.

    Evaluation & conclusion

    One of the funnier conclusions to draw is that it's beter to use a hard drive than to use cheap SSDs if you need to ingest a lot of data. Even the Crucial 1TB SSD could not keep up with the HDD.

    A more interesting conclusion is that the 1TB SSD didn't perform that much better than the small cheaper SSDs. Or to put it differently: although the performance of the small, cheap SSDs is not representative of the larger SSD, it is still quite in the same ball park. I don't think it's a coincidence that the Kingston SSD came very close to the performance of the Crucial SSD, as it's the most 'expensive' of the cheap drives.

    In the end, my intend was to demonstrate with actual benchmarks how cheap SSDs show bad sustained write performance and I think I succeeded. I hope it helps people to understand that good SSD write performance is not a given, especially for cheaper drives.

    The Hacker News discussion of this blog post can be found here

    Disclaimer

    I'm not sponsored in any way. All mentioned products have been bought with my own money.

    The graphs are created with fio-plot, a tool I've made and maintain. The benchmarks have been performed with bench-fio, a tool included with fio-plot, to automate benchmarking with Fio.


    1. As I don't have a test system with NVMe, I had to use SATA-based SSDs. The fact that the SATA interface was not the limiting factor in any of the tests, is foreboding. 

    2. As a general note, I think the vast majority of users should not worry about SSD longevity in general. Only people with high-volume write workloads should keep an eye on write endurance of SSD and buy a suitable product. 

    3. instead of packing the bits really dense together in a cell horizontally, the bits are stacked vertically, saving horizontal space. This allows for higher data densities in the same footprint. 

    4. Some SSDs have a static SLC cache, but others size the SLC cache in accordance to how full an SSD is. When the SSD starts to fill up, the SLC cache size is reduced. 

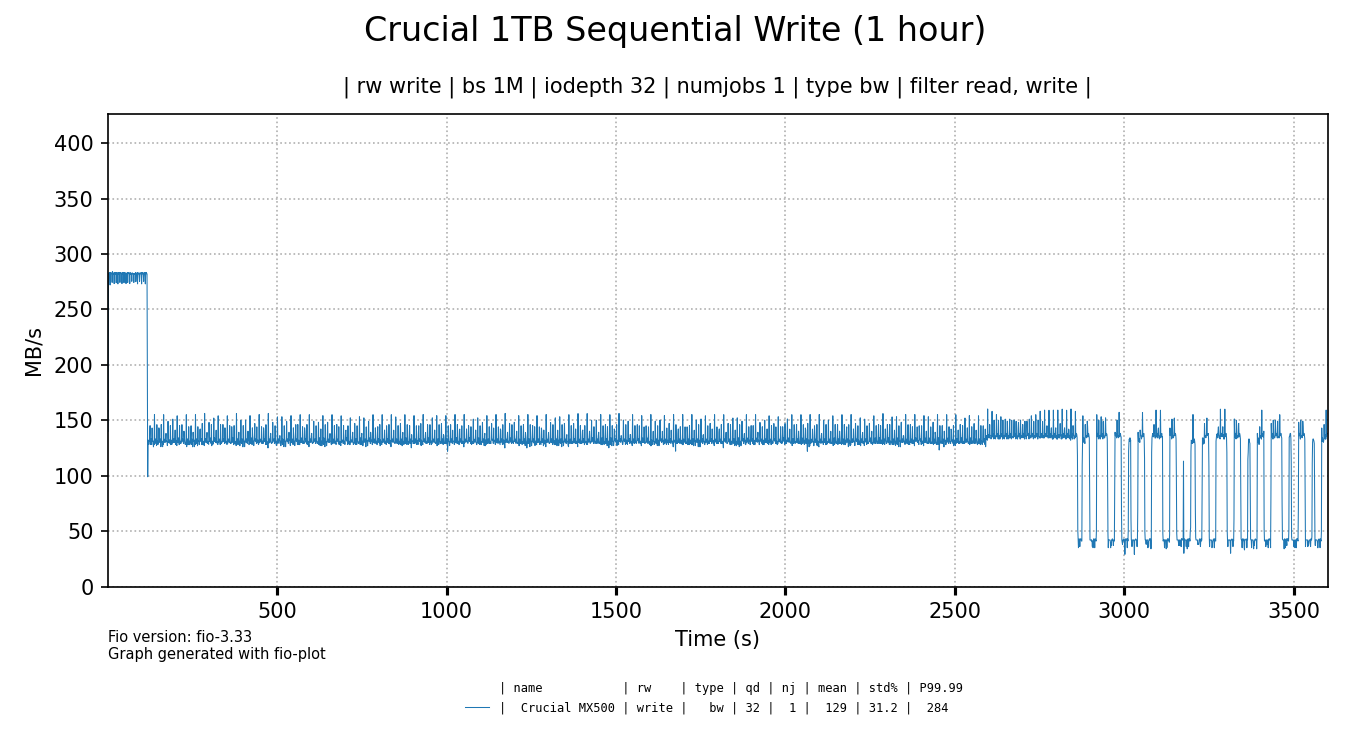
    5. After around 45-50 minutes of testing, performance of the Crucial MX 500 also started to drop to around 40 MB/s and fluctuate up and down. Evidence

    6. it's so funny to me that a hard drive beats an SSD on latency. 

    Tagged as : storage
  2. An Ode to the 10,000 RPM Western Digital (Veloci)Raptor

    Sat 30 October 2021

    Introduction

    Back in 2004, I visited a now bankrupt Dutch computer store called MyCom1, located at the Kinkerstraat in Amsterdam. I was there to buy a Western Digital Raptor model WD740, with 74 GB of capacity, running at 10,000 RPM.

    mywd

    When I bought this drive, we were still in the middle of the transition from the PATA interface to SATA2. My raptor hard drive still had a molex connector because older computer power supplies didn't have SATA power connectors.

    olds

    You may notice that I eventually managed to break off the plastic tab of the SATA power connector. Fortunately, I could still power the drive through the Molex connector.

    A later version of the same drive came with the Molex connector disabled, as you can see below.

    news

    Why did the Raptor matter so much?

    I was very eager to get this drive as it was quite a bit faster than any consumer drive on the market at that time.

    This drive not only made your computer start up faster, but it made it much more responsive. At least, it really felt like that to me at the time.

    The faster spinning drive wasn't so much about more throughput in MB/s - although that improved too - it was all about reduced latency.

    A drive that spins faster3 can complete more I/O operations per second or IOPs4. It can do more work in the same amount of time, because each operation takes less time, compared to slower turning drives.

    The Raptor - mostly focussed on desktop applications5 - brought a lot of relief for professionals and consumer enthusiasts alike. Hard disk performance, notably latency, was one of the big performance bottlenecks at the time.

    For the vast majority of consumers or employees this bottleneck would start to be alleviated only well after 2010 when SSDs slowly started to become standard in new computers.

    And that's mostly also the point of SSDs: their I/O operations are measured in micro seconds instead of milliseconds. It's not that throughput (MB/s) doesn't matter, but for most interactive applications, you care about latency. That's what makes an old computer feel as new when you swap out the hard drive for an SSD.

    The Raptor as a boot drive

    For consumers and enthusiast, the Raptor was an amazing boot drive. The 74 GB model was large enough to hold the operating system and applications. The bulk of the data would still be stored on a second hard drive either also connected through SATA or even still through PATA.

    Running your computer with a Raptor for the boot drive, resulted in lower boot times and application load times. But most of all, the system felt more responsive.

    And despite the 10,000 RPM speed of the platters, it wasn't that much louder than regular drives at the time.7.

    In the video above, a Raspberry Pi4 boots from a 74 GB Raptor hard drive.

    Alternatives to the raptor at that time

    To put things into perspective, 10,000 RPM drives were quite common even in 2003/2004 for usage in servers. The server-oriented drives used the SCSI interface/protocol which was incompatible with the on-board IDE/SATA controllers.

    Some enthusiasts - who had the means to do so - did buy both the controller8 and one or more SCSI 'server' drives to increase the performance of their computer. They could even get 15,000 RPM hard drives! These drives however, were extremely loud and had even less capacity.

    The Raptor did perform remarkably well in almost all circumstances, especially those who mattered to consumers and consumer enthusiasts alike. Suddenly you could get SCSI/Server performance for consumer prices.

    The in-depth review of the WD740 by Techreport really shows how significant the raptor was.

    The Velociraptor

    The Raptor eventually got replaced with the Velociraptor. The Velociraptor had a 2.5" formfactor, but it was much thicker than a regular 2.5" laptop drive. Because it spun at 10,000 RPM, the drive would get hot and thus it was mounted in an 'icepack' to disipate the generated heat. This gave the Velociraptor a 3.5" formfactor, just like the older Raptor drives.

    velociraptor

    In the video below, a Raspberry Pi4 boots from a 500 GB Velociraptor hard drive.

    Benchmarking the (Veloci)raptor

    Hard drives do well with sequential read/write patterns, but their performance implodes when the data access pattern becomes random. This is due to the mechanical nature of the device. That random access pattern is where 10,000 RPM outperform their slower turning siblings.

    Random 4K read performance showing both IOPs and latency. This is kind of a worst-case benchmark to understand the raw I/O and latency performance of a drive.

    fios

    Drive ID Form Factor RPM Size (GB) Description
    ST9500423AS 2.5" 7200 500 Seagate laptop hard drive
    WD740GD-75FLA1 3.5" 10,000 74 Western Digital Raptor WD740
    SAMSUNG HD103UJ 3.5" 7200 1000 Samsung Spintpoint F1
    WDC WD5000HHTZ 2.5" in 3.5" 10,000 500 Western Digital Velociraptor
    ST2000DM008 3.5" 7200 2000 Seagate 3.5" 2TB drive
    MB1000GCWCV 3.5" 7200 1000 HP Branded Seagate 1 TB drive

    I've tested the drives on an IBM M1015 SATA RAID card flashed to IT mode (HBA mode, no RAID firmware). The image is generated with fio-plot, which also comes with a tool to run the fio benchmarks.

    It is quite clear that both 10,000 RPM drives outperform all 7200 rpm drives, as expected.

    If we compare the original 3.5" Raptor to the 2.5" Velociraptor, the performance increase is significant: 22% more IOPs and 18% lower latency. I think that performance increase is due to a combination of the higher data density, the smaller size (r/w head is faster in the spot it needs to be) and maybe better firmware.

    Both the laptop and desktop Seagate drives seem to be a bit slower than they should be based on theory. The opposite is true for the HP (rebranded Seagate), which seem to perform better than expected for the capacity and rotational speed. I have no idea why that is. I can only speculate that because the HP drive came out of a server, that the fireware was tuned for server usage patterns.

    Closing words

    Although the performance increase of the (veloci)raptor was quite significant, it never gained wide-spread adoption. Especially when the Raptor first came to marked, its primary role was that of a boot drive because of its small capacity. You still needed a second drive for your data. So the increase in performance came at a significant extra cost.

    The Raptor and Velociraptor are now obsolete. You can get a solid state drive for $20 to $40 and even those budget-oriented SSDs will outperform a (Veloci)raptor many times over.

    If you are interested in more pictures and details, take a look at this article.

    This article was discussed on Hacker News here.

    Reddit thread about this article can be found here


    1. Mycom, a chain store with quite a few shops in all major cities in The Netherlands, went bankrupt twice, once in 2015 and finally in 2019. 

    2. We are talking about the first SATA version, with a maximum bandwidth capacity of 150 MB/s. Plenty enough for hard drives at that time. 

    3. https://en.wikipedia.org/wiki/Hard_disk_drive_performance_characteristics 

    4. https://louwrentius.com/understanding-storage-performance-iops-and-latency.html 

    5. I read that WD intended the first Raptor (34 GB version) to be used in low-end servers as a cheaper alternative to SCSI drives . After the adoption of the Raptor by computer enthusiasts and professionals, it seems that Western Digital pivoted, so the next version - the 74 GB I have - was geared more towards desktop usage. That also meant that this 74 GB model got fluid bearings, making it quieter6

    6. The 74 GB model is actually rather quiet drive at idle. Drive activity sounds rather smooth and pleasant, no rattling. 

    7. Please note that the first model, the 37 GB version, used ball bearings in stead of fluid bearings, and was reported to be significant louder. 

    8. Low-end SCSI card were often used to power flatbed scanners, Iomega ZIP drives, tape drives or other peripherals, but in order to benefit from the performance of those server hard drives, you needed a SCSI controller supporting higher bandwidth and those were more expensive. 

    Tagged as : Storage
  3. ZFS RAIDZ Expansion Is Awesome but Has a Small Caveat

    Tue 22 June 2021

    Introduction


    Update April 2023: It has been fairly quiet since the announcement of this feature. The Github PR about this feature is rather stale and people are wondering what the status is and what the plans are. Meanwhile, FreeBSD has announced In February 2023 that they suspect to integrate RAIDZ expansion by Q3.


    One of my most popular blog articles is this article about the "Hidden Cost of using ZFS for your home NAS". To summarise the key argument of this article:

    Expanding ZFS-based storge can be relatively expensive / inefficient.

    For example, if you run a ZFS pool based on a single 3-disk RAIDZ vdev (RAID5 equivalent2), the only way to expand a pool is to add another 3-disk RAIDZ vdev1.

    You can't just add a single disk to the existing 3-disk RAIDZ vdev to create a 4-disk RAIDZ vdev because vdevs can't be expanded.

    The impact of this limitation is that you have to buy all storage upfront even if you don't need the space for years to come.

    Otherwise, by expanding with additional vdevs you lose capacity to parity you may not really want/need, which also limits the maximum usable capacity of your NAS.

    RAIDZ vdev expansion

    Fortunately, this limitation of ZFS is being addressed!

    ZFS founder Matthew Ahrens created a pull request around June 11, 2021 detailing a new ZFS feature that would allow for RAIDZ vdev expansion.

    Finally, ZFS users will be able to expand their storage by adding just one single drive at a time. This feature will make it possible to expand storage as-you-go, which is especially of interest to budget conscious home users3.

    Jim Salter has written a good article about this on Ars Technica.

    There is still a caveat

    Existing data will be redistributed or rebalanced over all drives, including the freshly added drive. However, the data that was already stored on the vdev will not be restriped after the vdev is expanded. This means that this data is stored with the older, less efficient parity-to-data ratio.

    I think Matthew Ahrends explains it best in his own words:

    After the expansion completes, old blocks remain with their old data-to-parity ratio (e.g. 5-wide RAIDZ2, has 3 data to 2 parity), but distributed among the larger set of disks. New blocks will be written with the new data-to-parity ratio (e.g. a 5-wide RAIDZ2 which has been expanded once to 6-wide, has 4 data to 2 parity). However, the RAIDZ vdev's "assumed parity ratio" does not change, so slightly less space than is expected may be reported for newly-written blocks, according to zfs list, df, ls -s, and similar tools.
    

    So, if you add a new drive to a RAIDZ vdev, you'll notice that after expansion, you will have less capacity available than you would theoretically expect.

    However, it is even more important to understand that this effect accumulates. This is especially relevant for home users.

    I think that the whole concept of starting with a small number of disks and expand-as-you-go is very desirable and typical for home users. But this also means that every time a disk is added to the vdev, existing data is still stored with the old data-to-parity rate.

    Imagine that we have a 10-drive chassis and we start out with a 4-drive RAIDZ2.

    If we keep adding drives5 conform this example, until the chassis is full at 10 drives, about 1.35 drives worth of capacity is 'lost' to parity overhead/efficiency loss4.

    That is quite a lot of overhead or loss of capacity, I think.

    How is this overhead calculated? If we would just buy 10 drives and create a 10-drive RAIDZ2 vdev, data-to-parity overhead is 20% meaning that 20% of the total raw capacity of the vdev is used for storing parity. This is the most efficient scenario in this case.

    When we start out with the four-drive RAIDZ2 vdev, the data-to-parity overhead is 50%. That's a 30% overhead difference compared to the 'ideal' 10-drive setup.

    As we keep adding drives, the relative overhead of the parity keeps dropping so we end up with 'multiple data sets' with different data-to-parity ratios, that are less efficient than the end-stage of 10 drives.

    I created a google sheet to roughly estimate this overhead for each stage, but my math was totally off. Fortunately, Yorick rewrote the sheet, which can be found here. Thanks Yorick! Further more, Truenas user DayBlur shared additional insights on the calculations if you are interested in that.

    The google sheet allows you to play with various variables to estimate how much capacity is lost for a given scenario. Please note that any losses that may arise because a number of drives is used that requires data to be padded - as discussed in the Ars Technica article - are not part of the calculation.

    It is a bit unfortunate that especially in the scenario of the home user who want to start small and expand-as-you go that this overhead manifests itself so much. But there is good news!

    Lost capacity can be recovered!

    The overhead or 'lost capacity' can be recovered by rewriting existing data after the vdev has been expanded, because the data will then be written with the more efficient parity-to-data ratio of the larger vdev.

    Rewriting all data may take quite some time and you may opt to postpone this step until the vdev has been expanded a couple of times so the parity-to-data ratio is now 'good enough' that significant storage gains can be had by rewriting the data.

    Because capacity lost to overhead can be fully recovered, I think that this caveat is relatively minor, especially compared to the old situation where we had to expand a pool with entire vdevs and there was no way to recover any overhead.

    There is currently no build-in mechanism to trigger this data rewrite as part of the native ZFS tools. This will be a manual process until somebody may create a script that automates this process. According to Matthew Ahrens, restriping the data as part of the vdev expansion process would be an effort of similar scale as the RAIDZ expansion itself.

    Evaluation

    I think it cannot be stated enough how awesome the RAIDZ vdev expansion feature is, especially for home users who want to start small and grow their storage over time.

    Although the expansion process can accumulate quite a bit of overhead, that overhead can be recovered by rewriting existing data, which is probably not a problem for most people.

    Despite all the awesome features and capabilities of ZFS, I think quite a few home users went with other storage solutions because of the relatively high expansion cost/overhead. Now that this barrier will be overcome, I think that ZFS will be more accessible to the home user DIY NAS crowd.

    Release timeline

    According to the Ars Technica article by Jim Salter, this feature will probably become available in August 2022, so we need to have some patience. Even so, you might want to already decide to build your new DIY NAS based on ZFS: by the time you may need to expand your storage, the feature may be available!

    Update on some - in my opinion - bad advice

    The podcast 2.5 admins (which I enjoy listening to) discussed the topic of RAIDZ expansion in episode 45.

    There are two remarks made that I want to address, because I disagree with them.

    Don't rewrite the data?

    As in his Ars Technica article, Jim Salter keeps advocating not to bother rewriting the data after a vdev expansion, but I personally disagree with this advice. I hope I have demonstrated that if you keep adding drives, the parity overhead is significant enough for most home users to make it worthwhile to rewrite the data after a few drives have been added.

    Just use mirrors!

    I also disagree with the advice of using mirrors, especially for home users6. I personally think it is bad advice, because home users have other needs and desires as enterprise environments.

    If 'just use mirrors' is still the advice, why did Matthew Ahrends build the whole RAIDZ vdev expansion feature in the first place? I think the RAIDZ vdev expansion is really beneficial for home users.

    Maybe Jim and I have very different ideas about what a home user would want or need in a DIY NAS storage solution. I think that home users want this:

    As much storage as possible for as little money as possible with acceptable redundancy.

    In addition, I think that home users in general work with larger files (multiple megabytes at least). And if they sometimes work with smaller files, they accept some performance loss due to the lower random I/O performance of single RAIDZ vdevs7.

    Frankly, to me it feels like the 'just use mirrors' advice is used to 'downplay' a significant limitation of ZFS8. Jim is a prolific writer on Ars Technica and has a large audience so his advice matters. So that's why I think it's sad that he sticks with 'just use mirrors' while that's clearly not in the best interest of most home users.

    However, that's just my opinion, you decide for yourself what's best.


    1. The other method is to replace all existing drives one by one with larger ones. Only after you have replaced all drives will you be able to gain extra capacity so this method has a similar downside as just expanding with extra vdevs: you must buy multiple drives at once. In addition, I think this method is rather time consuming and cumbersome although people do use it to expand capacity. And to be fair: you can indeed add 4+ disk vdevs, vdevs with a higher RAIDZ level or mirrors but none of that makes sense in this context. 

    2. Just to illustrate the level of redundancy in terms of how many disks can be lost and still be operational. 

    3. I personally think that it's even great for small and medium business owners. Only larger businesses want to keep adding relatively large vdevs consisting of multiple drives because if they keep expanding with just one drive at a time, they may have to expand capacity very frequently which may not be practical. 

    4. If you would only upgrade once the pool is almost full - not recommended! - that overhead grows to 1.69 drives. 

    5. So you go from four to five drives. Then from five to six drives, and so on. 

    6. If random I/O performance is important, it is probably wise to go for SSD based storage anyway. 

    7. resolved by by ZFS vdev expansion obviously, when it lands in production. 

    Tagged as : Storage

Page 1 / 6