Security is all about a defence-in-depth strategy. Create multiple layers of defence. Every layer presenting a different set of challenges, requiring different skill sets and technology. So every layer will increase the time and effort to compromise your environment.
A content-scanning proxy server may provide you with one of these defensive layers. A content scanning proxy checks all data for malware. It blocks all content presumed to be infected. This may prevent numerous infections of company computers. Basically, the proxy server is virusscanning all network traffic.
But there is a severe limitation. Any data requested through an SSL-connection (https://) cannot be scanned, precisely because it is encrypted. So if a blackhat is smart and serves all malware through HTTPS, a content scanning proxy will not stop that malware. There are man-in-the-midle solutions that do allow you to inspect SSL traffic, but there are some limitations and this is outside the scope of this post.
As I believe that most malware is still being served through unencrypted HTTP sites, a content-scanning proxy does create an extra layer of defence. I think it is worth the effort.
So I decided to create a content-scanning proxy based on available open-source software. In this case, open-source as in free to use in commercial settings.
So in this post I will document how to setup a content-scanning proxy based on Squid 3.1, c-icap version 1, the Squidclamav module and the Clamav anti-virus scanner.
The basis of this proxy server is Ubuntu 12.10 LTS.
Important:
How does it work?
The Squid proxy server must pass all content to the Clamav daemon. Squid can't do that by itself. It's needs some glue service. For this purpose, a standard protocol has been designed called 'ICAP'. The c-icap daemon, combined with the squidclamav module, is the glue between the proxy server and the anti-virus software. The fun thing about c-icap is that you can add extra content scanning features if you want, just by adding those modules. You can decide to implement additional commercial anti-virus products in addition to Clamav.
Installing Clamav and c-icap + development files
1. apt-get install clamav-daemon c-icap  libicapapi-dev apache2
2. freshclam (update clamav on the spot)
Apache or any other HTTP server with CGI support is required to display virus-warnings to end-users.
Installing squidclamav module for c-icap
Do not install squidclamav with apt-get, this version seems to contain bugs that prevent pages from loading properly. The latest version straight from the vendor does work properly.
1. cd /usr/src/
2. download the source from:
"http://sourceforge.net/projects/squidclamav/"
3. tar xzf squidclamav-6.8.tar.gz
4. cd squidclamav-6.8
5. ./configure
6. make -j 2
7. make install
Squid configuration
Please download my sample Squid.conf configuration. The icap lines are of interest.
icap_enable on
icap_send_client_ip on
icap_send_client_username on
icap_client_username_encode off
icap_client_username_header X-Authenticated-User
icap_preview_enable on
icap_preview_size 1024

icap_service service_req reqmod_precache bypass=0 \
    icap://127.0.0.1:1344/squidclamav
icap_service service_resp respmod_precache bypass=0 \
    icap://127.0.0.1:1344/squidclamav

adaptation_access service_req allow all
adaptation_access service_resp allow all
It is the icap:// URL that calls a particular icap service (squidclamav) that processes all data.
Squidclamav icap module configuration
The configuration is stored in /etc/squidclamav.conf, and this is what I used:
maxsize 5000000
redirect http://proxy.company.local/cgi-bin/clwarn.cgi
clamd_ip 127.0.0.1
clamd_port 3310
timeout 1
logredir 0
dnslookup 1
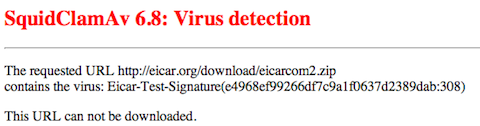
Of interest is the redirect url, which tells the user that a virus is found. That line redirects the user towards a page as shown at the beginning of this post. You can customise this page with CSS, for example, you can add the company logo to make it more official.
c-icap configuration
This is the configuration I use:
PidFile /var/run/c-icap/c-icap.pid
CommandsSocket /var/run/c-icap/c-icap.ctl
Timeout 300
MaxKeepAliveRequests 100
KeepAliveTimeout 600
StartServers 3
MaxServers 10
MinSpareThreads     10
MaxSpareThreads     20
ThreadsPerChild     10
MaxRequestsPerChild  0
Port 1344
User c-icap
Group nogroup
ServerAdmin you@your.address
ServerName Anti-Virus-Proxy
TmpDir /tmp
MaxMemObject 1048576
DebugLevel 0
ModulesDir /usr/lib/c_icap
ServicesDir /usr/lib/c_icap
TemplateDir /usr/share/c_icap/templates/
TemplateDefaultLanguage en
LoadMagicFile /etc/c-icap/c-icap.magic
RemoteProxyUsers off
RemoteProxyUserHeader X-Authenticated-User
RemoteProxyUserHeaderEncoded on
ServerLog /var/log/c-icap/server.log
AccessLog /var/log/c-icap/access.log
Service echo srv_echo.so
Service squidclamav squidclamav.so
Configuring Apahce web server
The warning page should be put in /usr/lib/cgi-bin. You may have to copy clwarn.cgi into this directory. Also make sure that your Apache configuration contains a directive like:
ScriptAlias /cgi-bin/ /usr/lib/cgi-bin/
<Directory "/usr/lib/cgi-bin">
        AllowOverride None
        Options +ExecCGI -MultiViews +SymLinksIfOwnerMatch
        Order allow,deny
        Allow from all
</Directory>
Automatic proxy configuration through DHCP and WPAD
To make the entire setup extra nice, use your DHCP configuraiton to inform clients about the proxy configuration. Clients must be configured to autodetect proxy settings for this to work.
Put a wpad.dat in the root directory of your http server:
function FindProxyForURL(url, host)
{
    if (dnsDomainIs(host, "localhost")) return "DIRECT";
    if (isInNet(host, "127.0.0.0", "255.0.0.0")) return "DIRECT";
    if (isPlainHostName(host)) return "DIRECT";
    if (isInNet(host, "192.168.0.0", "255.255.255.0")) return "DIRECT";
    return "PROXY proxy.company.local:3128";
}
And also add the appropriate mime type for .dat files in /etc/mime.types
application/x-ns-proxy-autoconfig dat
Restart the apache webserver after these modifications.
Now add the proxy to the DNS configuration of your DNS server like proxy.company.local.
Most important, add this directive to the general portion of the configuration file:
option local-proxy-config code 252 = text;
Add this directive to the particular scope for your network:
option local-proxy-config "http://proxy.company.local/wpad.dat";
Restart your DNS and DHCP server.
Monitoring proxy performance
The cagemgr.cgi file provides very detailed information about the performance of your Squid proxy. This is more relevant regarding actual cahcing performance than for anti-virus scanning, but this may be of interest. Especially the 'general runtime information' is of interest, as it shows the hit-rate, memory usage, etc.
First, make sure you take the appropirate precautions as not to expose this page to the entire company network without some protection, as it can contain sensitive information.
If you have installed squid-cgi just browse to http://your.proxy.server/cgi-bin/cachemgr.cgi
Some example data:
Cache information for squid:
    Hits as % of all requests:  5min: 10.3%, 60min: 4.1%
    Hits as % of bytes sent:    5min: 81.4%, 60min: 5.2%
    Memory hits as % of hit requests:   5min: 0.0%, 60min: 14.8%
    Disk hits as % of hit requests: 5min: 0.0%, 60min: 74.1%
Final words
This whole configuration shouldbe sufficient to setup a content-scanning proxy server. I have no experience how well this solution performs and you may have to do some benchmarks if your own to determine if it is capable of handling the traffic users generate. The fun thing about this setup is that it is modular. For example, you can have one Squid + HTTP box, and a separate host just for the c-icap service and Clamav service.
Besides the whole content scanning part, a proxy server, based on some non-scientific tests, does seem to improve performance for end-users. It may save you an expensive upgrade to a faster corporate internet connection.

Comments