Articles in the Networking category

  1. Using InfiniBand for Cheap and Fast Point-To-Point Networking

    Sat 25 March 2017

    InfiniBand networking is quite awesome. It's mainly used for two reasons:

    1. low latency
    2. high bandwidth

    As a home user, I'm mainly interested in setting up a high bandwidth link between two servers.

    I was using quad-port network cards with Linux Bonding, but this solution has some downsides:

    1. you can only go to 4 Gbit with Linux bonding (or you need more ports)
    2. you need a lot of cabling
    3. it is similar in price as InfiniBand

    So I've decided to take a gamble on some InfiniBand gear. You only need InfiniBand PCIe network cards and a cable.

    1 x SFF-8470 CX4 cable                                              $16
    2 x MELLANOX DUAL-PORT INFINIBAND HOST CHANNEL ADAPTER MHGA28-XTC   $25
                                                                Total:  $66
    

    view of installed infiniband card and cable

    I find $66 quite cheap for 20 Gbit networking. Regular 10Gbit Ethernet networking is often still more expensive that using older InfiniBand cards.

    InfiniBand is similar to Ethernet, you can run your own protocol over it (for lower latency) but you can use IP over InfiniBand. The InfiniBand card will just show up as a regular network device (one per port).

    ib0 Link encap:UNSPEC HWaddr 80-00-04-04-FE-80-00-00-00-00-00-00-00-00-00-00  
          inet addr:10.0.2.3  Bcast:10.0.2.255  Mask:255.255.255.0
          inet6 addr: fe80::202:c902:29:8e01/64 Scope:Link
          UP BROADCAST RUNNING MULTICAST  MTU:65520  Metric:1
          RX packets:7988691 errors:0 dropped:0 overruns:0 frame:0
          TX packets:17853128 errors:0 dropped:10 overruns:0 carrier:0
          collisions:0 txqueuelen:256 
          RX bytes:590717840 (563.3 MiB)  TX bytes:1074521257501 (1000.7 GiB)
    

    Configuration

    I've followed these instructions to get IP over InfiniBand working.

    Modules

    First, you need to assure the following modules are loaded at a minimum:

    ib_mthca
    ib_ipoib
    

    I only had to add the ib_ipoib module to /etc/modules. As soon as this module is loaded, you will notice you have some ibX interfaces available which can be configured like regular ethernet cards

    Subnet manager

    In addition to loading the modules, you also need a subnet manager. You just need to install it like this:

    apt-get install opensm
    

    This service needs to run on just one of the endpoints.

    Link status

    if you want you can check the link status of your InfiniBand connection like this:

    # ibstat
    CA 'mthca0'
        CA type: MT25208
        Number of ports: 2
        Firmware version: 5.3.0
        Hardware version: 20
        Node GUID: 0x0002c90200298e00
        System image GUID: 0x0002c90200298e03
        Port 1:
            State: Active
            Physical state: LinkUp
            Rate: 20
            Base lid: 1
            LMC: 0
            SM lid: 2
            Capability mask: 0x02510a68
            Port GUID: 0x0002c90200298e01
            Link layer: InfiniBand
        Port 2:
            State: Down
            Physical state: Polling
            Rate: 10
            Base lid: 0
            LMC: 0
            SM lid: 0
            Capability mask: 0x02510a68
            Port GUID: 0x0002c90200298e02
            Link layer: InfiniBand
    

    Set mode and MTU

    Since my systems run Debian Linux, I've configured /etc/network/interfaces like this:

    auto ib0
    iface ib0 inet static
        address 10.0.2.2
        netmask 255.255.255.0
        mtu 65520
        pre-up echo connected > /sys/class/net/ib0/mode
    

    Please take note of the 'mode' setting. The 'datagram' mode gave abysmal network performance (< Gigabit). The 'connected' mode made everything perform acceptable.

    The MTU setting of 65520 improved performance by another 30 percent.

    Performance

    I've tested the card on two systems based on the Supermicro X9SCM-F motherboard. Using these systems, I was able to achieve file transfer speeds up to 750 MB (Megabytes) per second or about 6.5 Gbit as measured with iperf.

    ~# iperf -c 10.0.2.2
    ------------------------------------------------------------
    Client connecting to 10.0.2.2, TCP port 5001
    TCP window size: 2.50 MByte (default)
    ------------------------------------------------------------
    [  3] local 10.0.2.3 port 40098 connected with 10.0.2.2 port 5001
    [ ID] Interval       Transfer     Bandwidth
    [  3]  0.0-10.0 sec  7.49 GBytes  6.43 Gbits/sec
    

    Similar test with netcat and dd:

    ~# dd if=/dev/zero bs=1M count=100000 | nc 10.0.2.2 1234
    100000+0 records in
    100000+0 records out
    104857600000 bytes (105 GB) copied, 128.882 s, 814 MB/s
    

    Testing was done on Debian Jessie.

    During earlier testing, I've also used these cards in HP Micro Proliant G8 servers. On those servers, I was running Ubuntu 16.04 LTS.

    As tested on Ubuntu with the HP Microserver:

    ------------------------------------------------------------
    Client connecting to 10.0.4.3, TCP port 5001
    TCP window size: 4.00 MByte (default)
    ------------------------------------------------------------
    [  5] local 10.0.4.1 port 52572 connected with 10.0.4.3 port 5001
    [  4] local 10.0.4.1 port 5001 connected with 10.0.4.3 port 44124
    [ ID] Interval       Transfer     Bandwidth
    [  5]  0.0-60.0 sec  71.9 GBytes  10.3 Gbits/sec
    [  4]  0.0-60.0 sec  72.2 GBytes  10.3 Gbits/sec
    

    Using these systems, I was able eventually able to achieve 15 Gbit as measured with iperf, although I have no 'console screenshot' from it.

    Closing words

    IP over InfiniBand seems to be a nice way to get high-performance networking on the cheap. The main downside is that when using IP over IB, CPU usage will be high.

    Another thing I have not researched, but could be of interest is running NFS or other protocols directly over InfiniBand using RDMA, so you would bypass the overhead of IP.
  2. Creating Configuration Backups of HP Procurve Switches

    Mon 12 January 2015

    I've created a tool called procurve-watch. It creates a backup of the running switch configuration through secure shell (using scp).

    It also diffs backed up configurations against older versions, in order to keep track of changes. If you run the script from cron every hour or so, you will be notified by email of any (running) configuration changes.

    The tool can backup hundreds of switches in seconds as it is running the configuration copy in parallel.

    A tool like Rancid may actually be the best choice for this task, but it didn't work. The latest version of Rancid doesn't support HP Procurve switches (yet) and older versions created backups containing garbled characters.

    I've released it on github, check it out and let me know if it works for you and you have suggestions to improve it further.

    Tagged as : Networking
  3. Configuring, Attacking and Securing VRRP on Linux

    Fri 02 January 2015

    The VRRP or Virtual Router Redundancy Protocol helps you create a reliable network by using multiple routers in an active/passive configuration. If the primary router fails, the backup router takes over almost seamlessly.

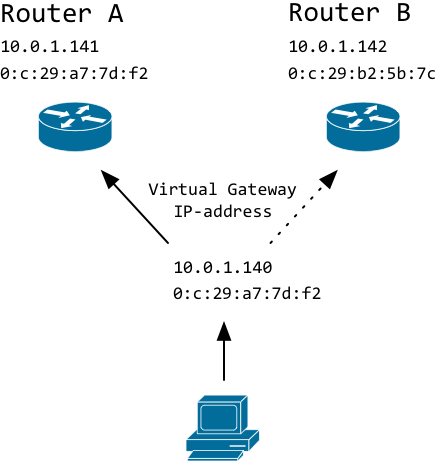
    This is how VRRP works:

    vrrp

    Clients connect to a virtual IP-address. It is called virtual because the IP-address is not hard-coded to a particular interface on any of the routers.

    If a client asks for the MAC-address that is tied to the virtual IP, the master will respond with its MAC-address. If the master dies, the backup router will notice and start responding to ARP-requests.

    Let's take a look at the ARP table on the client to illustrate what is happening.

    Master is active:

    (10.0.1.140) at 0:c:29:a7:7d:f2 on en0 ifscope [ethernet]
    (10.0.1.141) at 0:c:29:a7:7d:f2 on en0 ifscope [ethernet]
    (10.0.1.142) at 0:c:29:b2:5b:7c on en0 ifscope [ethernet]
    

    Master has failed and backup has taken over:

    (10.0.1.140) at 0:c:29:b2:5b:7c on en0 ifscope [ethernet]
    (10.0.1.141) at 0:c:29:a7:7d:f2 on en0 ifscope [ethernet]
    (10.0.1.142) at 0:c:29:b2:5b:7c on en0 ifscope [ethernet]
    

    Notice how the MAC-address of the virtual IP (.140) is now that of the backup router.

    Configuring VRRP on Linux

    1. configure static IP-addresses on the primary and backup router. Do not configure the virtual IP on any of the interfaces. In my test environment, I used 10.0.1.141 for the master and 10.0.1.142 for the backup router.

    2. Because the virtual IP-address is not configured on any of the interfaces, Linux will not reply to any packets destined for this IP. This behaviour needs to be changed or VRRP will not work. Edit /etc/sysctl.conf and add this line:

      net.ipv4.ip_nonlocal_bind=1
      
    3. Run this command to active this setting:

      sysctl -p
      
    4. Install Keepalived

      apt-get install keepalived
      
    5. Sample configuration of /etc/keepalived/keepalived.conf for MASTER

      vrrp_instance VI_1 {
          interface eth0
          state MASTER
          virtual_router_id 51
          priority 101
      
          authentication {
              auth_type AH
              auth_pass monkey
          }
      
          virtual_ipaddress {
              10.0.1.140
          }
      }
      
    6. Sample configuration of /etc/keepalived/keepalived.conf for SLAVE

      vrrp_instance VI_1 {
          interface eth0
          state BACKUP
          virtual_router_id 51
          priority 100
      
          authentication {
              auth_type AH
              auth_pass monkey
          }
      
          virtual_ipaddress {
              10.0.1.140
          }
      }
      
    7. Start keepalived:

      service keepalived start
      

    The only configuration difference regarding keepalived between the master and the standby router is the 'priority' setting. The master server should have a higher priority than the backup router (101 vs. 100).

    As there can be multiple VRRP configurations active within the same subnet, it is important that you make sure that you set a unique virtual_router_id.

    Please do not forget to set your own password in case you enable authentication.

    VRRP failover example

    This is what happens if the master is shutdown:

    64 bytes from 10.0.1.140: icmp_seq=148 ttl=64 time=0.583 ms
    64 bytes from 10.0.1.140: icmp_seq=149 ttl=64 time=0.469 ms
    64 bytes from 10.0.1.140: icmp_seq=150 ttl=64 time=0.267 ms
    Request timeout for icmp_seq 151
    Request timeout for icmp_seq 152
    Request timeout for icmp_seq 153
    Request timeout for icmp_seq 154
    64 bytes from 10.0.1.140: icmp_seq=155 ttl=64 time=0.668 ms
    64 bytes from 10.0.1.140: icmp_seq=156 ttl=64 time=0.444 ms
    64 bytes from 10.0.1.140: icmp_seq=157 ttl=64 time=0.510 ms
    

    After about five seconds (default) the standby router takes over and starts responding to the virtual IP.

    Security

    A host within the same subnet could just spoof VRRP packets and disrupt service.

    An attack on VRRP is not just theoretical. A tool called Loki allows you to take over the virtual IP-address and become the master router. This will allow you to create a DoS or sniff all traffic.

    VRRP security is also discussed in this document from the Loki developers.

    According to rfc3768 authentication and security has been deliberately omitted (see section 10 Security Considerations) from newer versions of the VRRP protocol RFC.

    The main argument is that any malicious device in a layer 2 network can stage similar attacks focussing on ARP-spoofing and ARP-poisoning so as the fundament is already insecure, why care about VRRP?

    I understand the reasoning but I disagree. If you do have a secure Layer 2 environment, VRRP becomes the weakest link. Either you really need to filter out VRRP traffic originating from untrusted ports/devices, or implement security on VRRP itself.

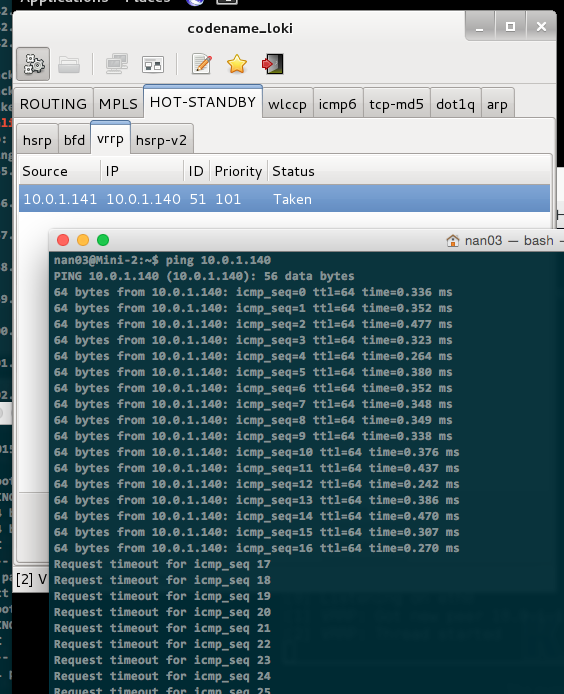
    Attacking VRRP with Loki

    I have actually used Loki on VRRP and I can confirm it works (at least) as a Denial-of-Service tool.

    I used Kali (Formerly known as Back-Track) and installed Loki according to these instructions. Please note the bottom of the page.

    What I did on Kali Linux:

    apt-get install python-dpkt python-dumbnet
    wget http://c0decafe.de/svn/codename_loki/packages/kali-1/pylibpcap_0.6.2-1_amd64.deb
    wget http://c0decafe.de/svn/codename_loki/packages/kali-1/loki_0.2.7-1_amd64.deb
    dpkg -i pylibpcap_0.6.2-1_amd64.deb
    dpkg -i loki_0.2.7-1_amd64.deb
    

    Then just run:

    loki.py
    

    vrrp attack

    This is only an issue if you already protected yourself against ARP- and IP-spoofing attacks.

    Protecting VRRP against attacks

    Keepalived offers two authentication types regarding VRRP:

    1. PASS (plain-text password)
    2. AH (IPSEC-AH (authentication header))

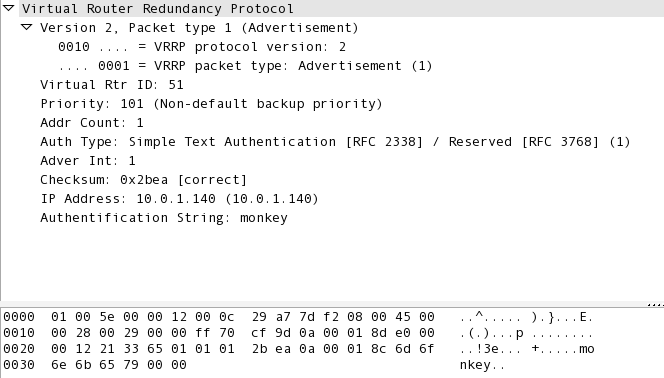
    The PASS option is totally useless from a security perspective.

    pass authentication

    As you can see, the password 'monkey' is visible and easily obtained from the VRRP multicast advertisements. So to me, it does not make sense to use this option. Loki just replayed the packets and could still create a DoS.

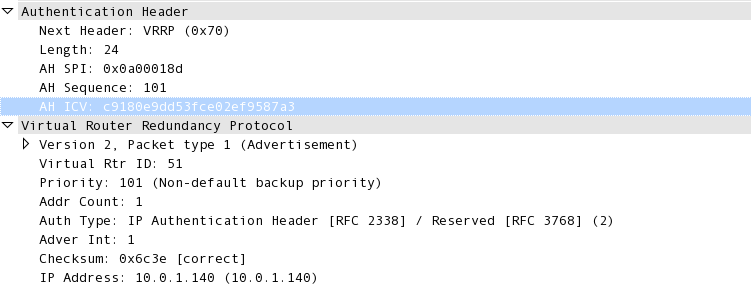
    So we are left with IPSEC-AH, wich is more promising as it actually does some cryptography using the IPSEC protocol, so there is no clear-text password to be captured. I'm not a crypto expert, so I'm not sure how secure this implementation is. Here is some more info on IPSEC-AH as implemented in Keepalived.

    AH authentication

    If I configure AH authentication, the Loki tool does not recognise the VRRP trafic anymore and it's no longer possible to use this simple script-kiddie-friendly tool to attack your VRRP setup.

    IPSEC-AH actually introduces an IPSEC-AH header between the IP section and the VRRP section of a packet, so it changes the packet format, which probably makes it unrecognisable for Loki.

    Running VRRP multicast traffic on different network segments

    It has been pointed out to me by XANi_ that it is possible with Keepalived to keep the virtual IP-address and the VRRP multicast traffic in different networks. Clients will therefore not be able to attack the VRRP traffic.

    In this case, security on the VRRP traffic is not relevant anymore and you don't really need to worry about authentication, assuming that untrusted devices don't have access to that 'VRRP' VLAN.

    Th first step is that both routers should have their physical interface in the same (untagged) VLAN. The trick is then to specify the virtual IP-addresses in the appropriate VLANs like this example:

    virtual_ipaddress {
    
        10.0.1.1/24 dev eth0.100
        10.0.2.1/24 dev eth0.200
    }
    

    In this example, virtual IP 10.0.1.1 is tied to VLAN 100 and 10.0.2.1 is tied to VLAN 200.

    If the physical router interfaces are present in the untagged VLAN 50 (example), the VRRP multicast traffic will only be observed in this VLAN.

    Some background information on working with VLANs and Keepalived.

    Firewall configuration

    Update August 2018:

    I had problems running VRRP on Red Hat / CentOS. Since I use AH authentication, the protocol is not seen as VRRP but (as TCPDUMP shows) "AH". This is why you need to create a service for Firewalld and enable it for the appropriate zone.

    1. Create a file called "VRRP.xml" in /etc/firewalld/services
        <?xml version="1.0" encoding="utf-8"?>
        <service>
            <short>VRRP</short>
            <description>Virtual Router Redundancy Protocol</description>
            <port protocol="ah" port=""/>
        </service>
    
    1. Enable VRRP (select the appropriate zone for your interface):
        sudo firewall-cmd --zone=public --permanent --add-service=VRRP
    
    1. Reload the configuration
        sudo firewall-cmd --reload
    
    1. check that the service is active with:
        sudo firewall-cmd --zone=public --list-services
    

    Closing words

    VRRP can provide a very simple solution to setup a high-availability router configuration. Security can be a real issue if untrusted devices reside in the same layer 2 network so implementing security with IPSEC-AH or network segmentation is recommended.

    Tagged as : VRRP

Page 2 / 8